本文共 29261 字,大约阅读时间需要 97 分钟。
一、字符(Character)和字形(Glyphs)
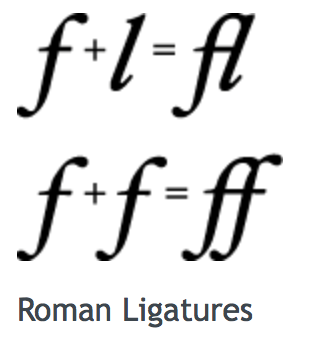
排版过程中一个重要的步骤就是从字符到字形的转换,字符表示信息本身,而字形是它的图形表现形式。字符一般就是指某种编码,如Unicode编码,而字形则是这些编码对应的图片。但是他们之间不是一一对应关系,同个字符的不同字体族,不同字体大小,不同字体样式都对应了不同的字形。而由于连写(Ligatures)的存在,多个字符也会存在对应一个字形的情况。
 下面就来详情看看字形的各个参数也就是所谓的字形度量Glyph Metrics
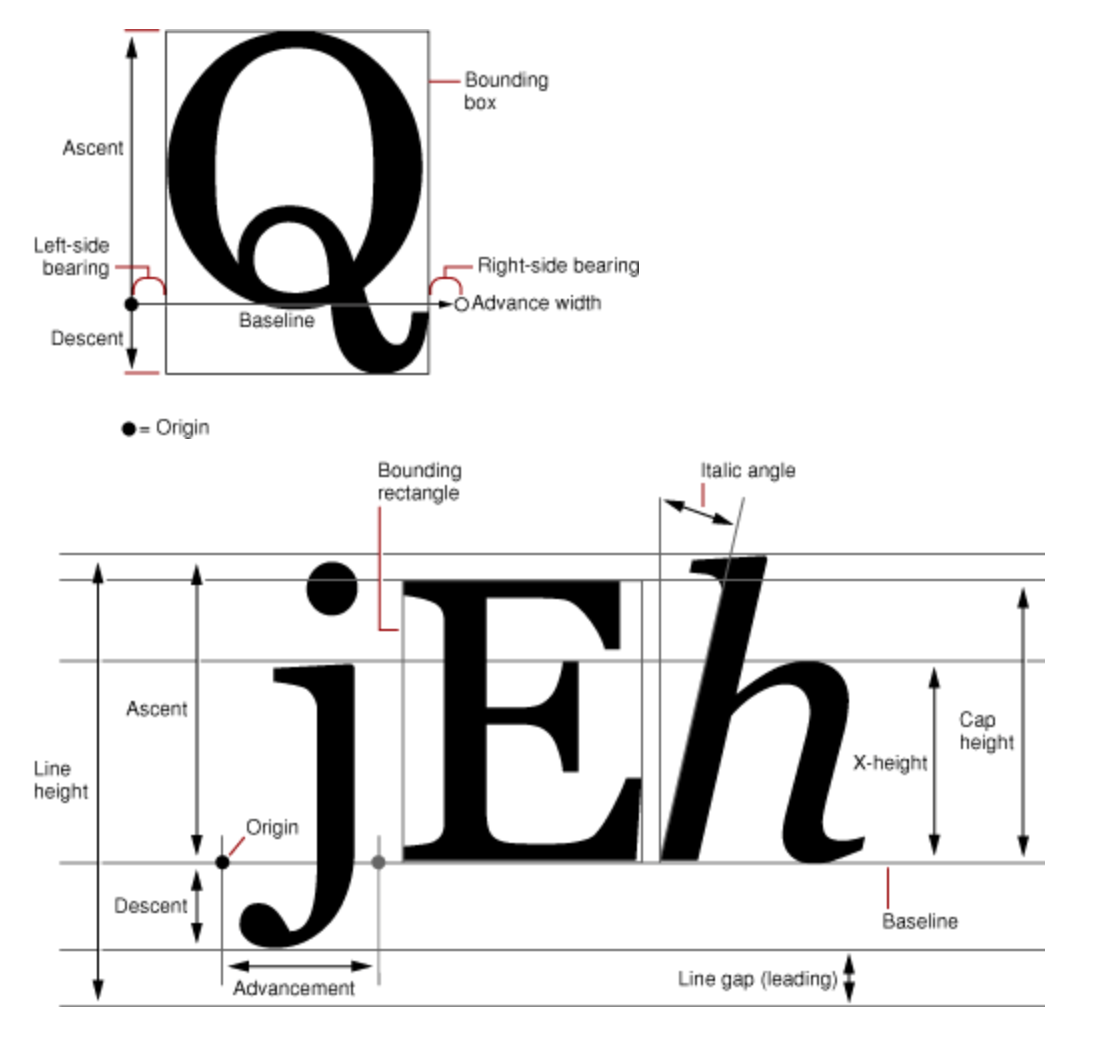
(1)、边界框 bbox(bounding box)
这是一个假想的框子,它尽可能紧密的装入字形。 (2)、基线(baseline) 一条假想的线,一行上的字形都以此线作为上下位置的参考,在这条线的左侧存在一个点叫做基线的原点, (3)、上行高度(ascent) 从原点到字体中最高(这里的高深都是以基线为参照线的)的字形的顶部的距离,ascent是一个正值 (4)、下行高度(descent) 从原点到字体中最深的字形底部的距离,descent是一个负值(比如一个字体原点到最深的字形的底部的距离为2,那么descent就为-2) (5)、行距(line gap) line gap也可以称作leading(其实准确点讲应该叫做External leading),行高line Height则可以通过 ascent + |descent| + linegap 来计算。 (6)、字间距(Kerning) 字与字之间的距离,为了排版的美观,并不是所有的字形之间的距离都是一致的,但是这个基本步影响到我们的文字排版。 (7)、基础原点(Origin) 基线上最左侧的点。
二、坐标系
传统的Mac中的坐标系的原点在左下角,比如NSView默认的坐标系,原点就在左下角。但Mac中有些View为了其实现的便捷将原点变换到左上角,像NSTableView的坐标系坐标原点就在左上角。
iOS UIKit中,UIView是以左上角为原点,而Core Text一开始的定位是使用与桌面应用的排版系统,桌面应用的坐标系是以左下角为原点,即Core Text在绘制的时候也是参照左下角为原点进行绘制的,所以需要对当前的坐标系进行处理。
实际上,Core Graphic 中的context也是以左下角为原点的, 但是为什么我们用Core Graphic 绘制一些简单的图形的时候不需要对坐标系进行处理呢,是因为通过这个方法UIGraphicsGetCurrentContext()来获得的当前context是已经被处理过的了,用下面方法可以查看指定的上下文的当前图形状态变换矩阵。
- 方法一
//因为Core Text要配合Core Graphic 配合使用的,如Core Graphic一样,绘图的时候需要获得当前的上下文进行绘制CGContextRef context = UIGraphicsGetCurrentContext();NSLog(@"当前context的变换矩阵 %@", NSStringFromCGAffineTransform(CGContextGetCTM(context)));//翻转当前的坐标系(因为对于底层绘制引擎来说,屏幕左下角为(0,0))CGContextSetTextMatrix(context, CGAffineTransformIdentity);//设置字形变换矩阵为CGAffineTransformIdentity,也就是说每一个字形都不做图形变换CGAffineTransform flipVertical = CGAffineTransformMake(1,0,0,-1,0,self.bounds.size.height);CGContextConcatCTM(context, flipVertical);//将当前context的坐标系进行flipNSLog(@"翻转后context的变换矩阵 %@", NSStringFromCGAffineTransform(CGContextGetCTM(context)));
打印结果为:
当前context的变换矩阵 [2, 0, 0, -2, 0, 800]翻转后context的变换矩阵 [2, 0, 0, 2, 0, 0]
- 方法二
//因为Core Text要配合Core Graphic 配合使用的,如Core Graphic一样,绘图的时候需要获得当前的上下文进行绘制CGContextRef context = UIGraphicsGetCurrentContext();NSLog(@"当前context的变换矩阵 %@", NSStringFromCGAffineTransform(CGContextGetCTM(context)));//翻转当前的坐标系(因为对于底层绘制引擎来说,屏幕左下角为(0,0))CGContextSetTextMatrix(context, CGAffineTransformIdentity);CGContextTranslateCTM(context, 0, self.bounds.size.height);CGContextScaleCTM(context, 1.0, -1.0);NSLog(@"翻转后context的变换矩阵 %@", NSStringFromCGAffineTransform(CGContextGetCTM(context)));
打印:
当前context的变换矩阵 [2, 0, 0, -2, 0, 800]翻转后context的变换矩阵 [2, 0, -0, 2, 0, 0]
可以发现变换矩阵与CGAffineTransformIdentity的值[1, 0, 0, 1, 0, 0]是不相同的,并且与设备是否为Retina屏和设备尺寸相关。他的作用是将上下文空间坐标系进行翻转,并使原来的左下角原点变成左上角是原点,并将向上为正y轴变为向下为正y轴。 所以在使用drawRect的时候,当前的context已经被做了一次翻转,如果不对当前的坐标系进行处理,会发现,绘制出来的文字是镜像上下颠倒的。所以在UIView的drawRect方法中的context上进行Core Text绘制之前需要对context进行一次Flip。
三、主要函数
1、传入CTFrame,返回一个装有多个CTLine对象的数组。
CFArrayRef CTFrameGetLines( CTFrameRef frame ) CT_AVAILABLE(10_5, 3_2);
2、获取数组中的元素个数
CFIndex CFArrayGetCount(CFArrayRef theArray);
3、获取数组中第idx个元素
const void *CFArrayGetValueAtIndex(CFArrayRef theArray, CFIndex idx);
4、 获取所有CTLineRef的基础原点,传入CTFrame,CFRange,和一个CGPoint的结构体数组指针,该函数会把每一个CTLine的origin坐标写到数组里。
void CTFrameGetLineOrigins( CTFrameRef frame, CFRange range, CGPoint origins[] ) CT_AVAILABLE(10_5, 3_2);
5、获取CTLine中文字在整段文字中的Range
CFRange CTLineGetStringRange( CTLineRef line ) CT_AVAILABLE(10_5, 3_2);
6、获取CTLine中的CTRun的数组
CFArrayRef CTLineGetGlyphRuns( CTLineRef line ) CT_AVAILABLE(10_5, 3_2);
7、获取CTRun在整段文字中的Range
CFRange CTRunGetStringRange( CTRunRef run ) CT_AVAILABLE(10_5, 3_2);
8、 获取点击处position文字在整段文字中的index
CFIndex CTLineGetStringIndexForPosition( CTLineRef line, CGPoint position ) CT_AVAILABLE(10_5, 3_2);
9、获取整段文字中charIndex位置的字符相对line的原点的x值
CGFloat CTLineGetOffsetForStringIndex( CTLineRef line, CFIndex charIndex, CGFloat * __nullable secondaryOffset ) CT_AVAILABLE(10_5, 3_2);
10、获取数组中字形个个数
CFIndex CTLineGetGlyphCount( CTLineRef line ) CT_AVAILABLE(10_5, 3_2);
11、设置CoreText绘制前的坐标。设置基线位置
CG_EXTERN void CGContextSetTextPosition(CGContextRef __nullable c, CGFloat x, CGFloat y) CG_AVAILABLE_STARTING(__MAC_10_0, __IPHONE_2_0);
12、绘制CTLine。
void CTLineDraw( CTLineRef line, CGContextRef context ) CT_AVAILABLE(10_5, 3_2);
13、获取CTLine的上行高度,下行高度,行距
double CTLineGetTypographicBounds( CTLineRef line, CGFloat * __nullable ascent, CGFloat * __nullable descent, CGFloat * __nullable leading ) CT_AVAILABLE(10_5, 3_2);
14、设置当前文本矩阵
CG_EXTERN void CGContextSetTextMatrix(CGContextRef __nullable c, CGAffineTransform t) CG_AVAILABLE_STARTING(__MAC_10_0, __IPHONE_2_0);
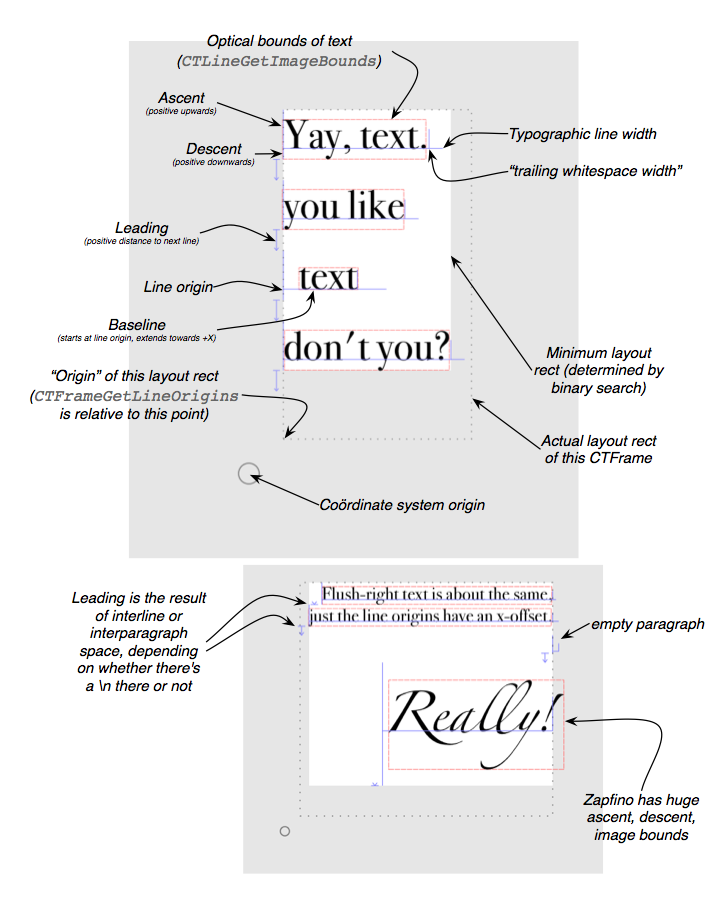
15、获取一行文字的范围, 就是指把这一行文字点有的像素矩阵作为一个image图片,来得到整个矩形区域。相对于每一行基线原点的偏移量和宽高(例如:{
{1.2, -2.57227}, {208.025, 19.2523}},就是相对于本身的基线原点向右偏移1.2个单位,向下偏移2.57227个单位,后面是宽高)CGRect CTLineGetImageBounds( CTLineRef line, CGContextRef __nullable context ) CT_AVAILABLE(10_5, 3_2);
例如:
//获取frame中CTLineRef数组CFArrayRef Lines = CTFrameGetLines(frame);//获取数组Lines中的个数CFIndex lineCount = CFArrayGetCount(Lines);//获取数组中第一个CTLineRefCTLineRef lineRef = CFArrayGetValueAtIndex(Lines, 0);//获取lineRef中CTRunRef数组CFArrayRef runs = CTLineGetGlyphRuns(lineRef);//获取CTLineRef中字形个数CFIndex rus = CTLineGetGlyphCount(lineRef);//获取数组runs中的个数CFIndex runCount = CFArrayGetCount(runs);NSLog(@"lines = %ld runs = %ld rus = %ld",lineCount,runCount,rus);
打印:
lines = 7 runs = 5 rus = 37
四、举例
1、绘框

- (void)drawRect:(CGRect)rect{ // 步骤1:得到当前用于绘制画布的上下文,用于后续将内容绘制在画布上 // 因为Core Text要配合Core Graphic 配合使用的,如Core Graphic一样,绘图的时候需要获得当前的上下文进行绘制 CGContextRef context = UIGraphicsGetCurrentContext(); NSLog(@"当前context的变换矩阵 %@", NSStringFromCGAffineTransform(CGContextGetCTM(context))); // 步骤2:翻转当前的坐标系(因为对于底层绘制引擎来说,屏幕左下角为(0,0)) CGContextSetTextMatrix(context, CGAffineTransformIdentity);//设置字形变换矩阵为CGAffineTransformIdentity,也就是说每一个字形都不做图形变换 CGAffineTransform flipVertical = CGAffineTransformMake(1,0,0,-1,0,self.bounds.size.height); CGContextConcatCTM(context, flipVertical);//将当前context的坐标系进行flip NSLog(@"翻转后context的变换矩阵 %@", NSStringFromCGAffineTransform(CGContextGetCTM(context))); // 步骤3:创建绘制区域 CGMutablePathRef path = CGPathCreateMutable(); CGPathAddRect(path, NULL, self.bounds); // 步骤4:创建需要绘制的文字与计算需要绘制的区域 NSMutableAttributedString *attrString = [[NSMutableAttributedString alloc] initWithString:@"iOS程序在启动时会创建一个主线程,而在一个线程只能执行一件事情,如果在主线程执行某些耗时操作,例如加载网络图片,下载资源文件等会阻塞主线程(导致界面卡死,无法交互),所以就需要使用多线程技术来避免这类情况。iOS中有三种多线程技术 NSThread,NSOperation,GCD,这三种技术是随着IOS发展引入的,抽象层次由低到高,使用也越来越简单。"]; // 步骤5:根据AttributedString生成CTFramesetterRef CTFramesetterRef frameSetter = CTFramesetterCreateWithAttributedString((CFAttributedStringRef)attrString); CTFrameRef frame = CTFramesetterCreateFrame(frameSetter, CFRangeMake(0, [attrString length]), path, NULL); //获取frame中CTLineRef数组 CFArrayRef Lines = CTFrameGetLines(frame); //获取数组Lines中的个数 CFIndex lineCount = CFArrayGetCount(Lines); //获取基线原点 CGPoint origins[lineCount]; CTFrameGetLineOrigins(frame, CFRangeMake(0, 0), origins); for (CFIndex i = 0; i < lineCount; i ++) { CTLineRef line = CFArrayGetValueAtIndex(Lines, i); //相对于每一行基线原点的偏移量和宽高(例如:{ {1.2, -2.57227}, {208.025, 19.2523}},就是相对于本身的基线原点向右偏移1.2个单位,向下偏移2.57227个单位,后面是宽高) CGRect lineBounds = CTLineGetImageBounds((CTLineRef)line, context); NSLog(@"lineBounds = %@",NSStringFromCGRect(lineBounds)); NSLog(@"point = %@",NSStringFromCGPoint(origins[i])); //每一行的起始点(相对于context)加上相对于本身基线原点的偏移量 lineBounds.origin.x += origins[i].x; lineBounds.origin.y += origins[i].y; //填充 CGContextSetLineWidth(context, 1.0); CGContextAddRect(context,lineBounds); CGContextSetStrokeColorWithColor(context, [[UIColor redColor] CGColor]); CGContextStrokeRect(context, lineBounds); } // 步骤6:进行绘制 CTFrameDraw(frame, context); // 步骤7.内存管理 CFRelease(frame); CFRelease(path); CFRelease(frameSetter);} 打印:
当前context的变换矩阵 [2, 0, 0, -2, 0, 800]翻转后context的变换矩阵 [2, 0, 0, 2, 0, 0]lineBounds = { {0.7734375, -2.052}, {354.70246875000004, 11.964}}point = { 0, 387}lineBounds = { {0.44400000000000001, -2.052}, {371.06400000000002, 11.94}}point = { 0, 370}lineBounds = { {0.38400000000000001, -2.052}, {371.06400000000002, 11.975999999999999}}point = { 0, 353}lineBounds = { {0.41999999999999998, -2.052}, {320.66929687499999, 11.927999999999999}}point = { 0, 336}lineBounds = { {0.9140625, -2.501953125}, {366.28096875, 12.473953125}}point = { 0, 319}lineBounds = { {0.40800000000000003, -2.052}, {148.16400000000002, 11.94}}point = { 0, 302} 2、单行绘制
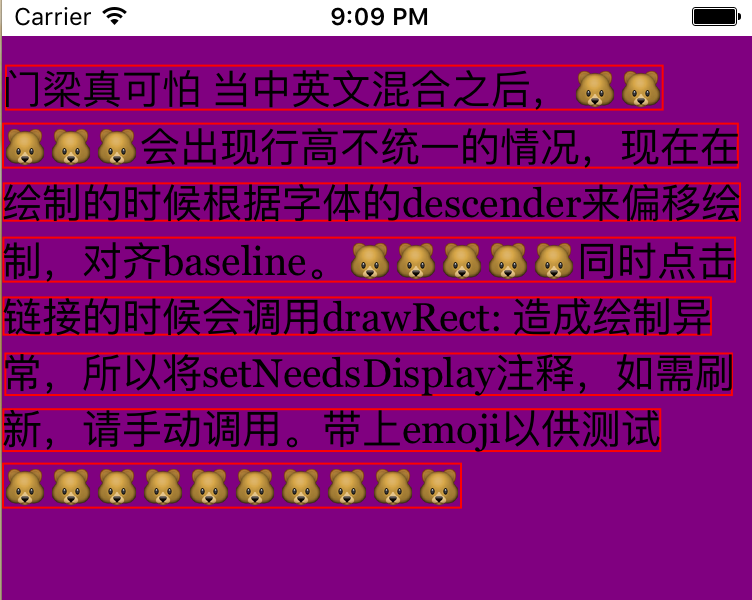
- (void)drawRect:(CGRect)rect{ // 步骤1:得到当前用于绘制画布的上下文,用于后续将内容绘制在画布上 // 因为Core Text要配合Core Graphic 配合使用的,如Core Graphic一样,绘图的时候需要获得当前的上下文进行绘制 CGContextRef context = UIGraphicsGetCurrentContext(); NSLog(@"当前context的变换矩阵 %@", NSStringFromCGAffineTransform(CGContextGetCTM(context))); // 步骤2:翻转当前的坐标系(因为对于底层绘制引擎来说,屏幕左下角为(0,0)) CGContextSetTextMatrix(context, CGAffineTransformIdentity);//设置字形变换矩阵为CGAffineTransformIdentity,也就是说每一个字形都不做图形变换 CGAffineTransform flipVertical = CGAffineTransformMake(1,0,0,-1,0,self.bounds.size.height); CGContextConcatCTM(context, flipVertical);//将当前context的坐标系进行flip NSLog(@"翻转后context的变换矩阵 %@", NSStringFromCGAffineTransform(CGContextGetCTM(context))); // 步骤3:创建绘制区域 CGMutablePathRef path = CGPathCreateMutable(); CGPathAddRect(path, NULL, self.bounds); // 步骤4:创建需要绘制的文字与计算需要绘制的区域 NSMutableAttributedString *attrString = [[NSMutableAttributedString alloc] initWithString:@"门梁真可怕 当中英文混合之后,����������会出现行高不统一的情况,现在在绘制的时候根据字体的descender来偏移绘制,对齐baseline。����������同时点击链接的时候会调用drawRect: 造成绘制异常,所以将setNeedsDisplay注释,如需刷新,请手动调用。带上emoji以供测试��������������������"]; CTFontRef font = CTFontCreateWithName(CFSTR("Georgia"), 20, NULL); [attrString addAttribute:(id)kCTFontAttributeName value:(__bridge id)font range:NSMakeRange(0, attrString.length)]; // 步骤5:根据AttributedString生成CTFramesetterRef CTFramesetterRef frameSetter = CTFramesetterCreateWithAttributedString((CFAttributedStringRef)attrString); CTFrameRef frame = CTFramesetterCreateFrame(frameSetter, CFRangeMake(0, [attrString length]), path, NULL); //获取frame中CTLineRef数组 CFArrayRef Lines = CTFrameGetLines(frame); //获取数组Lines中的个数 CFIndex lineCount = CFArrayGetCount(Lines); //获取基线原点 CGPoint origins[lineCount]; CTFrameGetLineOrigins(frame, CFRangeMake(0, 0), origins); for (CFIndex i = 0; i < lineCount; i ++) { CTLineRef line = CFArrayGetValueAtIndex(Lines, i); //遍历每一行CTLine CGFloat lineAscent; CGFloat lineDescent; CGFloat lineLeading; // 行距 // 该函数除了会设置好ascent,descent,leading之外,还会返回这行的宽度 CTLineGetTypographicBounds(line, &lineAscent, &lineDescent, &lineLeading); NSLog(@"lineAscent = %f",lineAscent); NSLog(@"lineDescent = %f",lineDescent); NSLog(@"lineLeading = %f",lineLeading); CGPoint lineOrigin = origins[i]; NSLog(@"point = %@",NSStringFromCGPoint(lineOrigin)); CGRect oldLineBounds = CTLineGetImageBounds((CTLineRef)line, context); NSLog(@"lineBounds改动前:%@",NSStringFromCGRect(oldLineBounds)); NSLog(@"y = %f d = %f fontD = %f",lineOrigin.y,lineDescent,CTFontGetDescent(font)); NSLog(@"Position修改前%@",NSStringFromCGPoint(CGContextGetTextPosition(context))); CGContextSetTextPosition(context, lineOrigin.x, lineOrigin.y -lineDescent - CTFontGetDescent(font)); NSLog(@"Position修改后%@",NSStringFromCGPoint(CGContextGetTextPosition(context))); CGRect lineBounds = CTLineGetImageBounds((CTLineRef)line, context); NSLog(@"lineBounds改动后 = %@",NSStringFromCGRect(lineBounds)); //填充 CGContextSetLineWidth(context, 1.0); CGContextAddRect(context,lineBounds); CGContextSetStrokeColorWithColor(context, [[UIColor redColor] CGColor]); CGContextStrokeRect(context, lineBounds); CTLineDraw(line, context);//绘制原点为左下角 } // 步骤6:进行绘制// CTFrameDraw(frame, context); // 步骤7.内存管理 CFRelease(frame); CFRelease(path); CFRelease(frameSetter);} 打印数据:
当前context的变换矩阵 [2, 0, 0, -2, 0, 800]翻转后context的变换矩阵 [2, 0, 0, 2, 0, 0]lineAscent = 22.000000lineDescent = 6.875000lineLeading = 0.000000point = {0, 378}lineBounds改动前:{ {1.98, -3.5499999999999998}, {328.34421874999998, 22}}y = 378.000000 d = 6.875000 fontD = 4.384766Position修改前{0, 0}Position修改后{0, 366.740234375}lineBounds改动后 = { {1.98, 363.19023437499999}, {328.34421874999998, 22}}lineAscent = 22.000000lineDescent = 6.875000lineLeading = 0.000000point = {0, 349}lineBounds改动前:{ {331.32421875, 363.19023437499999}, {367.41999999999996, 22}}y = 349.000000 d = 6.875000 fontD = 4.384766Position修改前{330.82421875, 366.740234375}Position修改后{0, 337.740234375}lineBounds改动后 = { {0.5, 334.19023437499999}, {367.41999999999996, 22}}lineAscent = 21.200000lineDescent = 6.800000lineLeading = 0.000000point = {0, 321}lineBounds改动前:{ {369.83999999999997, 335.58023437499997}, {368.16703124999998, 18.66}}y = 321.000000 d = 6.800000 fontD = 4.384766Position修改前{369, 337.740234375}Position修改后{0, 309.81523437499999}lineBounds改动后 = { {0.83999999999999997, 307.65523437499996}, {368.16703124999998, 18.66}}lineAscent = 22.000000lineDescent = 6.875000lineLeading = 0.000000point = {0, 292}lineBounds改动前:{ {370.40703124999999, 306.26523437499998}, {365.81625000000003, 22}}y = 292.000000 d = 6.875000 fontD = 4.384766Position修改前{369.70703125, 309.81523437499999}Position修改后{0, 280.740234375}lineBounds改动后 = { {0.70000000000000007, 277.19023437499999}, {365.81625000000003, 22}}lineAscent = 21.200000lineDescent = 6.800000lineLeading = 0.000000point = {0, 264}lineBounds改动前:{ {368.41624999999999, 278.58023437499997}, {353.68367187500002, 18.620000000000001}}y = 264.000000 d = 6.800000 fontD = 4.384766Position修改前{367.65625, 280.740234375}Position修改后{0, 252.81523437499999}lineBounds改动后 = { {0.76000000000000001, 250.65523437499999}, {353.68367187500002, 18.620000000000001}}lineAscent = 21.200000lineDescent = 6.800000lineLeading = 0.000000point = {0, 236}lineBounds改动前:{ {356.94367187500001, 248.47929687499999}, {363.27226562499999, 20.775937499999998}}y = 236.000000 d = 6.800000 fontD = 4.384766Position修改前{355.263671875, 252.81523437499999}Position修改后{0, 224.81523437499999}lineBounds改动后 = { {1.6799999999999999, 220.47929687499999}, {363.27226562499999, 20.775937499999998}}lineAscent = 21.200000lineDescent = 6.800000lineLeading = 0.000000point = {0, 208}lineBounds改动前:{ {367.25226562500001, 220.47929687499999}, {328.44562499999995, 20.915937499999998}}y = 208.000000 d = 6.800000 fontD = 4.384766Position修改前{366.572265625, 224.81523437499999}Position修改后{0, 196.81523437499999}lineBounds改动后 = { {0.68000000000000005, 192.47929687499999}, {328.44562499999995, 20.915937499999998}}lineAscent = 22.000000lineDescent = 6.875000lineLeading = 0.000000point = {0, 179}lineBounds改动前:{ {330.265625, 193.26523437499998}, {229, 22}}y = 179.000000 d = 6.875000 fontD = 4.384766Position修改前{329.765625, 196.81523437499999}Position修改后{0, 167.740234375}lineBounds改动后 = { {0.5, 164.19023437499999}, {229, 22}} 3、固定行间距
行高=每行的asent + 每行的descent + 行数*行间距
.m#import "MyView.h"#import// 行距const CGFloat kGlobalLineLeading = 5.0;@interface MyView()@property (nonatomic ,assign) CGFloat textHeight;@end@implementation MyView- (instancetype)initWithFrame:(CGRect)frame{ self = [super initWithFrame:frame]; if (self) { self.text = @"我自横刀向天笑,去留肝胆两昆仑。--谭嗣同同学你好啊。This is my first CoreText demo,how are you ?I love three things,the sun,the moon,and you.the sun for the day,the moon for the night,and you forever.��������������去年今日此门中,人面桃花相映红。人面不知何处去,桃花依旧笑春风。��������������少年不知愁滋味,爱上层楼,爱上层楼,为赋新词强说愁。56321363464.而今识尽愁滋味,欲说还休,欲说还休,却道天凉好个秋。123456,7890,56321267895434。缺月挂疏桐,漏断人初静。谁见幽人独往来,缥缈孤鸿影。惊起却回头,有恨无人省。捡尽寒枝不肯栖,寂寞沙洲冷。"; self.font = [UIFont systemFontOfSize:15]; } return self;}#pragma mark - 计算高度/** * 高度 = 每行的asent + 每行的descent + 行数*行间距 * 行间距为指定的数值 */+ (CGFloat)textHeightWithText:(NSString *)aText width:(CGFloat)aWidth font:(UIFont *)aFont{ NSMutableAttributedString *content = [[NSMutableAttributedString alloc] initWithString:aText]; // 设置全局样式 [self addGlobalAttributeWithContent:content font:aFont]; CTFramesetterRef framesetterRef = CTFramesetterCreateWithAttributedString((CFAttributedStringRef)content); //粗略的计算高度 CGSize suggestSize = CTFramesetterSuggestFrameSizeWithConstraints(framesetterRef, CFRangeMake(0, aText.length), NULL, CGSizeMake(aWidth, MAXFLOAT), NULL); CGMutablePathRef path = CGPathCreateMutable(); CGPathAddRect(path, NULL, CGRectMake(0, 0, aWidth, suggestSize.height*10)); // 10这个数值是随便给的,主要是为了确保高度足够 CTFrameRef frameRef = CTFramesetterCreateFrame(framesetterRef, CFRangeMake(0, aText.length), path, NULL); CFArrayRef lines = CTFrameGetLines(frameRef); CFIndex lineCount = CFArrayGetCount(lines); CGFloat ascent = 0; CGFloat descent = 0; CGFloat leading = 0; CGFloat totalHeight = 0; NSLog(@"计算高度开始"); for (CFIndex i = 0; i < lineCount; i++){ CTLineRef lineRef = CFArrayGetValueAtIndex(lines, i); CTLineGetTypographicBounds(lineRef, &ascent, &descent, &leading); NSLog(@"ascent = %f---descent = %f---leading = %f",ascent,descent,leading); totalHeight += ascent + descent + kGlobalLineLeading;//行间距 } NSLog(@"totalHeight = %f",totalHeight); return totalHeight;}#pragma mark - 工具方法#pragma mark 给字符串添加全局属性,比如行距,字体大小,默认颜色+ (void)addGlobalAttributeWithContent:(NSMutableAttributedString *)aContent font:(UIFont *)aFont{ CGFloat lineLeading = kGlobalLineLeading; // 行间距 const CFIndex kNumberOfSettings = 2; //设置段落格式 CTParagraphStyleSetting lineBreakStyle; CTLineBreakMode lineBreakMode = kCTLineBreakByWordWrapping; lineBreakStyle.spec = kCTParagraphStyleSpecifierLineBreakMode; lineBreakStyle.valueSize = sizeof(CTLineBreakMode); lineBreakStyle.value = &lineBreakMode; //设置行距 CTParagraphStyleSetting lineSpaceStyle; CTParagraphStyleSpecifier spec; spec = kCTParagraphStyleSpecifierLineSpacingAdjustment; lineSpaceStyle.spec = spec; lineSpaceStyle.valueSize = sizeof(CGFloat); lineSpaceStyle.value = &lineLeading; // 结构体数组 CTParagraphStyleSetting theSettings[kNumberOfSettings] = { lineBreakStyle, lineSpaceStyle, }; CTParagraphStyleRef theParagraphRef = CTParagraphStyleCreate(theSettings, kNumberOfSettings); // 将设置的行距应用于整段文字 [aContent addAttribute:NSParagraphStyleAttributeName value:(__bridge id)(theParagraphRef) range:NSMakeRange(0, aContent.length)]; CFStringRef fontName = (__bridge CFStringRef)aFont.fontName; CTFontRef fontRef = CTFontCreateWithName(fontName, aFont.pointSize, NULL); // 将字体大小应用于整段文字 [aContent addAttribute:NSFontAttributeName value:(__bridge id)fontRef range:NSMakeRange(0, aContent.length)]; // 给整段文字添加默认颜色 [aContent addAttribute:NSForegroundColorAttributeName value:[UIColor blackColor] range:NSMakeRange(0, aContent.length)]; // 内存管理 CFRelease(theParagraphRef); CFRelease(fontRef);}/** * 一行一行绘制,未调整行高(行高不固定) */- (void)drawRectWithLineByLine{ // 1.创建需要绘制的文字 NSMutableAttributedString *attributed = [[NSMutableAttributedString alloc] initWithString:self.text]; // 2.设置行距等样式 [[self class] addGlobalAttributeWithContent:attributed font:self.font]; self.textHeight = [[self class] textHeightWithText:self.text width:CGRectGetWidth(self.bounds) font:self.font]; // 3.创建绘制区域,path的高度对绘制有直接影响,如果高度不够,则计算出来的CTLine的数量会少一行或者少多行 CGMutablePathRef path = CGPathCreateMutable(); CGPathAddRect(path, NULL, CGRectMake(0, 0, CGRectGetWidth(self.bounds), self.textHeight)); // 4.根据NSAttributedString生成CTFramesetterRef CTFramesetterRef framesetter = CTFramesetterCreateWithAttributedString((CFAttributedStringRef)attributed); CTFrameRef ctFrame = CTFramesetterCreateFrame(framesetter, CFRangeMake(0, attributed.length), path, NULL); // 1.获取上下文 CGContextRef contextRef = UIGraphicsGetCurrentContext(); // 2.转换坐标系 CGContextSetTextMatrix(contextRef, CGAffineTransformIdentity); CGContextTranslateCTM(contextRef, 0, self.textHeight); // 此处用计算出来的高度 CGContextScaleCTM(contextRef, 1.0, -1.0); // 重置高度 // CGPathAddRect(path, NULL, CGRectMake(0, 0, CGRectGetWidth(self.bounds), self.textHeight)); // 一行一行绘制 CFArrayRef lines = CTFrameGetLines(ctFrame); CFIndex lineCount = CFArrayGetCount(lines); CGPoint lineOrigins[lineCount]; // 把ctFrame里每一行的初始坐标写到数组里,注意CoreText的坐标是左下角为原点 CTFrameGetLineOrigins(ctFrame, CFRangeMake(0, 0), lineOrigins); for (int i = 0; i < lineCount; i++){ CGPoint point = lineOrigins[i]; NSLog(@"point.y = %f",point.y); } NSLog(@"font.ascender = %f,descender = %f,lineHeight = %f,leading = %f",self.font.ascender,self.font.descender,self.font.lineHeight,self.font.leading); CGFloat frameY = 0; for (CFIndex i = 0; i < lineCount; i++){ // 遍历每一行CTLine CTLineRef line = CFArrayGetValueAtIndex(lines, i); CGFloat lineAscent; CGFloat lineDescent; CGFloat lineLeading; // 行距 // 该函数除了会设置好ascent,descent,leading之外,还会返回这行的宽度 CTLineGetTypographicBounds(line, &lineAscent, &lineDescent, &lineLeading); NSLog(@"lineAscent = %f",lineAscent); NSLog(@"lineDescent = %f",lineDescent); NSLog(@"lineLeading = %f",lineLeading); CGPoint lineOrigin = lineOrigins[i]; NSLog(@"i = %ld, lineOrigin = %@",i,NSStringFromCGPoint(lineOrigin)); // 微调Y值,需要注意的是CoreText的Y值是在baseLine处,而不是下方的descent。 // lineDescent为正数,self.font.descender为负数 if (i > 0){ // 第二行之后需要计算 frameY = frameY - kGlobalLineLeading - lineAscent; lineOrigin.y = frameY; }else{ // 第一行可直接用 frameY = lineOrigin.y; } // 调整坐标 CGContextSetTextPosition(contextRef, lineOrigin.x, lineOrigin.y); CTLineDraw(line, contextRef); // 微调 frameY = frameY - lineDescent; } CFRelease(path); CFRelease(framesetter); CFRelease(ctFrame);}- (void)drawRect:(CGRect)rect{ [self drawRectWithLineByLine];}@end
.h文件
#import@interface MyView : UIView@property (nonatomic ,copy) NSString *text;@property (nonatomic ,strong) UIFont *font;+ (CGFloat)textHeightWithText:(NSString *)aText width:(CGFloat)aWidth font:(UIFont *)aFont;@end
结果:

3、固定行高
总高度 = 行数*每行的高度
.m#import "MyView.h"#import// 行距const CGFloat kGlobalLineLeading = 5.0;// 在15字体下,比值小于这个计算出来的高度会导致emoji显示不全const CGFloat kPerLineRatio = 1.4;@interface MyView()@property (nonatomic ,assign) CGFloat textHeight;@end@implementation MyView- (instancetype)initWithFrame:(CGRect)frame{ self = [super initWithFrame:frame]; if (self) { self.text = @"我自横刀向天笑,去留肝胆两昆仑。--谭嗣同同学你好啊。This is my first CoreText demo,how are you ?I love three things,the sun,the moon,and you.the sun for the day,the moon for the night,and you forever.��������������去年今日此门中,人面桃花相映红。人面不知何处去,桃花依旧笑春风。��������������少年不知愁滋味,爱上层楼,爱上层楼,为赋新词强说愁。56321363464.而今识尽愁滋味,欲说还休,欲说还休,却道天凉好个秋。123456,7890,56321267895434。缺月挂疏桐,漏断人初静。谁见幽人独往来,缥缈孤鸿影。惊起却回头,有恨无人省。捡尽寒枝不肯栖,寂寞沙洲冷。"; self.font = [UIFont systemFontOfSize:15]; } return self;}/** * 高度 = 每行的固定高度 * 行数 */+ (CGFloat)textHeightWithText:(NSString *)aText width:(CGFloat)aWidth font:(UIFont *)aFont{ NSMutableAttributedString *content = [[NSMutableAttributedString alloc] initWithString:aText]; // 给字符串设置字体行距等样式 [self addGlobalAttributeWithContent:content font:aFont]; CTFramesetterRef framesetterRef = CTFramesetterCreateWithAttributedString((__bridge CFAttributedStringRef)content); // 粗略的高度,该高度不准,仅供参考 CGSize suggestSize = CTFramesetterSuggestFrameSizeWithConstraints(framesetterRef, CFRangeMake(0, content.length), NULL, CGSizeMake(aWidth, MAXFLOAT), NULL); NSLog(@"suggestHeight = %f",suggestSize.height); CGMutablePathRef pathRef = CGPathCreateMutable(); CGPathAddRect(pathRef, NULL, CGRectMake(0, 0, aWidth, suggestSize.height)); CTFrameRef frameRef = CTFramesetterCreateFrame(framesetterRef, CFRangeMake(0, content.length), pathRef, NULL); CFArrayRef lines = CTFrameGetLines(frameRef); CFIndex lineCount = CFArrayGetCount(lines); NSLog(@"行数 = %ld",lineCount); // 总高度 = 行数*每行的高度,其中每行的高度为指定的值,不同字体大小不一样 CGFloat accurateHeight = lineCount * (aFont.pointSize * kPerLineRatio); CGFloat height = accurateHeight; CFRelease(pathRef); CFRelease(frameRef); return height;}#pragma mark - 工具方法#pragma mark 给字符串添加全局属性,比如行距,字体大小,默认颜色+ (void)addGlobalAttributeWithContent:(NSMutableAttributedString *)aContent font:(UIFont *)aFont{ CGFloat lineLeading = kGlobalLineLeading; // 行间距 const CFIndex kNumberOfSettings = 2; //设置段落格式 CTParagraphStyleSetting lineBreakStyle; CTLineBreakMode lineBreakMode = kCTLineBreakByWordWrapping; lineBreakStyle.spec = kCTParagraphStyleSpecifierLineBreakMode; lineBreakStyle.valueSize = sizeof(CTLineBreakMode); lineBreakStyle.value = &lineBreakMode; //设置行距 CTParagraphStyleSetting lineSpaceStyle; CTParagraphStyleSpecifier spec; spec = kCTParagraphStyleSpecifierLineSpacingAdjustment; lineSpaceStyle.spec = spec; lineSpaceStyle.valueSize = sizeof(CGFloat); lineSpaceStyle.value = &lineLeading; // 结构体数组 CTParagraphStyleSetting theSettings[kNumberOfSettings] = { lineBreakStyle, lineSpaceStyle, }; CTParagraphStyleRef theParagraphRef = CTParagraphStyleCreate(theSettings, kNumberOfSettings); // 将设置的行距应用于整段文字 [aContent addAttribute:NSParagraphStyleAttributeName value:(__bridge id)(theParagraphRef) range:NSMakeRange(0, aContent.length)]; CFStringRef fontName = (__bridge CFStringRef)aFont.fontName; CTFontRef fontRef = CTFontCreateWithName(fontName, aFont.pointSize, NULL); // 将字体大小应用于整段文字 [aContent addAttribute:NSFontAttributeName value:(__bridge id)fontRef range:NSMakeRange(0, aContent.length)]; // 给整段文字添加默认颜色 [aContent addAttribute:NSForegroundColorAttributeName value:[UIColor blackColor] range:NSMakeRange(0, aContent.length)]; // 内存管理 CFRelease(theParagraphRef); CFRelease(fontRef);}#pragma mark - 一行一行绘制,行高确定,行与行之间对齐- (void)drawRectWithLineByLineAlignment{ // 1.创建需要绘制的文字 NSMutableAttributedString *attributed = [[NSMutableAttributedString alloc] initWithString:self.text]; // 2.设置行距等样式 [[self class] addGlobalAttributeWithContent:attributed font:self.font]; self.textHeight = [[self class] textHeightWithText:self.text width:CGRectGetWidth(self.bounds) font:self.font]; // 3.创建绘制区域,path的高度对绘制有直接影响,如果高度不够,则计算出来的CTLine的数量会少一行或者少多行 CGMutablePathRef path = CGPathCreateMutable(); CGPathAddRect(path, NULL, CGRectMake(0, 0, CGRectGetWidth(self.bounds), self.textHeight*2)); // 4.根据NSAttributedString生成CTFramesetterRef CTFramesetterRef framesetter = CTFramesetterCreateWithAttributedString((CFAttributedStringRef)attributed); CTFrameRef ctFrame = CTFramesetterCreateFrame(framesetter, CFRangeMake(0, attributed.length), path, NULL); // 获取上下文 CGContextRef contextRef = UIGraphicsGetCurrentContext(); // 转换坐标系 CGContextSetTextMatrix(contextRef, CGAffineTransformIdentity); CGContextTranslateCTM(contextRef, 0, self.textHeight); // 此处用计算出来的高度 CGContextScaleCTM(contextRef, 1.0, -1.0); // 一行一行绘制 CFArrayRef lines = CTFrameGetLines(ctFrame); CFIndex lineCount = CFArrayGetCount(lines); CGPoint lineOrigins[lineCount]; // 把ctFrame里每一行的初始坐标写到数组里,注意CoreText的坐标是左下角为原点 CTFrameGetLineOrigins(ctFrame, CFRangeMake(0, 0), lineOrigins); for (int i = 0; i < lineCount; i++) { CGPoint point = lineOrigins[i]; NSLog(@"point.y = %f",point.y); } NSLog(@"font.ascender = %f,descender = %f,lineHeight = %f,leading = %f",self.font.ascender,self.font.descender,self.font.lineHeight,self.font.leading); CGFloat frameY = 0; NSLog(@"self.textHeight = %f,lineHeight = %f",self.textHeight,self.font.pointSize * kPerLineRatio); for (CFIndex i = 0; i < lineCount; i++){ // 遍历每一行CTLine CTLineRef line = CFArrayGetValueAtIndex(lines, i); CGFloat lineAscent; CGFloat lineDescent; CGFloat lineLeading; // 行距 // 该函数除了会设置好ascent,descent,leading之外,还会返回这行的宽度 CTLineGetTypographicBounds(line, &lineAscent, &lineDescent, &lineLeading); NSLog(@"lineAscent = %f",lineAscent); NSLog(@"lineDescent = %f",lineDescent); NSLog(@"lineLeading = %f",lineLeading); CGPoint lineOrigin = lineOrigins[i]; NSLog(@"i = %ld, lineOrigin = %@",i,NSStringFromCGPoint(lineOrigin)); // 微调Y值,需要注意的是CoreText的Y值是在baseLine处,而不是下方的descent。 CGFloat lineHeight = self.font.pointSize * kPerLineRatio; frameY = self.textHeight - (i + 1)*lineHeight - self.font.descender; NSLog(@"frameY = %f",frameY); lineOrigin.y = frameY; // 调整坐标 CGContextSetTextPosition(contextRef, lineOrigin.x, lineOrigin.y); CTLineDraw(line, contextRef); } CFRelease(path); CFRelease(framesetter); CFRelease(ctFrame);}- (void)drawRect:(CGRect)rect{ [self drawRectWithLineByLineAlignment];}@end
.h
#import@interface MyView : UIView@property (nonatomic ,copy) NSString *text;@property (nonatomic ,strong) UIFont *font;+ (CGFloat)textHeightWithText:(NSString *)aText width:(CGFloat)aWidth font:(UIFont *)aFont;@end
结果

参考
发表评论
最新留言
关于作者
