本文共 32115 字,大约阅读时间需要 107 分钟。
文章目录
一、前言
由于之前没有使用过 Shiro,最近开始使用,故对其部分流程和源码进行了阅读,大体总结了一些内容记录下来。本系列并不会完完全全分析 Shiro 的全部代码,仅把主(我)要(用)流(到)程(的) 简单分析一下。由于本系列大部分为个人内容理解 并且 个人学艺实属不精,故难免出现 “冤假错乱”。如有发现,感谢指正,不胜感激。
Shiro 源码分析全集:
在使用 Shiro 时,当一个请求请求服务端时,首先需要通过的一关就是 AbstractShiroFilter。AbstractShiroFilter 的主要作用有两个 :
- 负责创建一个和当前线程绑定的Subject,并且将Session 中的缓存信息填充到 Subject属性中 (如果存在Session 缓存信息的话)。这样进行一些校验时便可以通过Session缓存来进行判断。
- 将请求分发给合适的过滤器来进行处理,比如authc的请求分发给 FormAuthenticationFilter 过滤器来处理。
二、AbstractShiroFilter
在整篇文章开始之前,我们首先来看看一个过滤器AbstractShiroFilter,其实AbstractShiroFilter 还有一个子类 ShiroFilter,不过其也就初始化了一下信息,更多的事情是在 AbstractShiroFilter 中处理,所以这里来看 AbstractShiroFilter。AbstractShiroFilter如下:
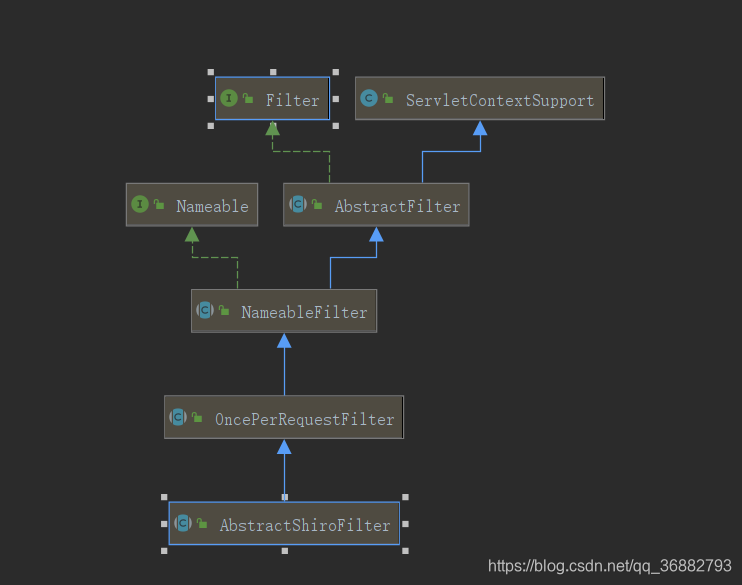 以我目前对Shiro 有限的认知来说,个人觉着这个过滤器还是非常重要的。AbstractShiroFilter 继承了
 OncePerRequestFilte,OncePerRequestFilter 提供了 doFilterInternal 方法,保证每次一次请求仅经过一次过滤(如部分转发请求会经过多次过滤器。详参 : )。 那么这个过滤器做了什么呢?直白的说,在每次请求过来的时候,AbstractShiroFilter 会去创建一个Subject并将其绑定到当前请求的线程上,在创建Subject的时候会去读取缓存的用户信息,并填充到Subject 中,这样我们便能随时随地的通过 Subject subject = SecurityUtils.getSubject(); 来获取Subject。
下面来简单看看Subject的绑定过程。
由于AbstractShiroFilter 继承了 OncePerRequestFilter ,所以我们这里直接来看 AbstractShiroFilter#doFilterInternal 方法的实现。
protected void doFilterInternal(ServletRequest servletRequest, ServletResponse servletResponse, final FilterChain chain) throws ServletException, IOException { // ... 异常处理 // 转换 request 和 response final ServletRequest request = prepareServletRequest(servletRequest, servletResponse, chain); final ServletResponse response = prepareServletResponse(request, servletResponse, chain); // 1. 创建 Subject final Subject subject = createSubject(request, response); //noinspection unchecked // 2. 将Subject 绑定到当前线程上。同时调用 回调方法 subject.execute(new Callable() { public Object call() throws Exception { // 更新session 会话时间 updateSessionLastAccessTime(request, response); // 执行过滤器链,分发请求 executeChain(request, response, chain); return null; } }); // ... 对异常信息的处理 } 这里我们可以看到两个关键方法:
- createSubject(request, response); : 见名知意,在这个方法中创建了 Subject
- subject.execute : 在这里将 Subject绑定到线程上,同时执行了
updateSessionLastAccessTime和executeChain两个回调方法。
下面,我尝试在我有限的理解里讲清楚这两个方法。。。。
1. createSubject(request, response)
目前我所知 Subject的创建的场景有两个
-
第一种是调用 DelegatingSubject#login 方法时会在内部创建一个 Subject,这个是我们自己在代码中通过Subject进行验证时进行的主动调用,如下:
UsernamePasswordToken usernamePasswordToken = new UsernamePasswordToken("张三", "123456"); // 这里通过 SecurityUtils.getSubject(); 获取到的Subject就是本篇中AbstractShiroFilter 创建的Subject Subject subject = SecurityUtils.getSubject(); // subject.login 中还会创建一个Subject,不过个人理解,这个Subject仅仅用来承载数据,即作为一个暂时的数据保存作用。 subject.login(usernamePasswordToken); -
第二种即是当前场景下,当一个请求过来时,AbstractShiroFilter 在处理请求的过程中,会通过
AbstractShiroFilter#createSubject方法会创建一个 Subject// org.apache.shiro.web.servlet.AbstractShiroFilter#createSubject protected WebSubject createSubject(ServletRequest request, ServletResponse response) { // 在Builder 方法中会将 request,response 赋值给 return new WebSubject.Builder(getSecurityManager(), request, response).buildWebSubject(); }
上面的内容,我们分成两句来看
new WebSubject.Builder(getSecurityManager(), request, response)如下,这里就是将 request 和response 填充到 SubjectContext 上下文中。private final SubjectContext subjectContext; public Builder(SecurityManager securityManager, ServletRequest request, ServletResponse response) { super(securityManager); //... 参数校验 // subjectContext 中保存 request、response setRequest(request); setResponse(response); }buildWebSubject(): 这里开始通过 SubjectContext 来创建 Subject了public WebSubject buildWebSubject() { // 会调用 this.securityManager.createSubject(this.subjectContext); 来创建 Subject Subject subject = super.buildSubject(); if (!(subject instanceof WebSubject)) { // 抛出异常 } return (WebSubject) subject; }关于super.buildSubject();的内容,其调用了this.securityManager.createSubject(this.subjectContext);来完成 Subject的创建。这一部分比较复杂,后面单独讲解。
2. subject.execute
这里则是将 Subject 绑定到当前线程的部分,并且将请求分发给匹配的过滤器。首先我们先看 subject.execute 的代码
subject.execute(new Callable() { public Object call() throws Exception { // 回调方法 updateSessionLastAccessTime(request, response); executeChain(request, response, chain); return null; } }); 2.1 线程绑定
我们可以看到 subject.execute 的实现方法 DelegatingSubject#execute(java.util.concurrent.Callable<V>) 的具体逻辑
publicV execute(Callable callable) throws ExecutionException { Callable associated = associateWith(callable); try { return associated.call(); } catch (Throwable t) { throw new ExecutionException(t); } }
这里通过 associateWith(callable) 返回的类型是 SubjectCallable。所以我们这里来看 SubjectCallable#call()
public V call() throws Exception { try { // 将Subject 绑定到当前线程 threadState.bind(); // 调用回调方法 return doCall(this.callable); } finally { threadState.restore(); } } threadState.bind(); 的方法 SubjectThreadState#bind 如下:
public void bind() { SecurityManager securityManager = this.securityManager; if ( securityManager == null ) { //try just in case the constructor didn't find one at the time: securityManager = ThreadContext.getSecurityManager(); } this.originalResources = ThreadContext.getResources(); ThreadContext.remove(); // 将Subject绑定到当前线程 ThreadContext.bind(this.subject); if (securityManager != null) { // 将 securityManager 绑定到当前线程 ThreadContext.bind(securityManager); } } 上面可以看到绑定的工作都是通过 ThreadContext.bind 方法来完成的,所以 我们 再来看 ThreadContext 部分的实现如下:
public static final String SECURITY_MANAGER_KEY = ThreadContext.class.getName() + "_SECURITY_MANAGER_KEY"; public static final String SUBJECT_KEY = ThreadContext.class.getName() + "_SUBJECT_KEY"; private static final ThreadLocal
至此,我们可以知道,Shiro 为每个 线程分配了一个 Map<Object, Object> 来保存信息,由于resources 是 ThreadLocal<Map<Object, Object>> 类型,所以可以保证每个线程独享一份内容。
2.2 updateSessionLastAccessTime(request, response);
更新会话上次访问时间
protected void updateSessionLastAccessTime(ServletRequest request, ServletResponse response) { if (!isHttpSessions()) { //'native' sessions Subject subject = SecurityUtils.getSubject(); //Subject should never _ever_ be null, but just in case: if (subject != null) { Session session = subject.getSession(false); if (session != null) { try { // 刷新 Session session.touch(); } catch (Throwable t) { // ... } } } } } 2.3 executeChain(request, response, chain);
这部分内容也是非常关键,将请求分发给合适的过滤器。下面我们来看详细代码
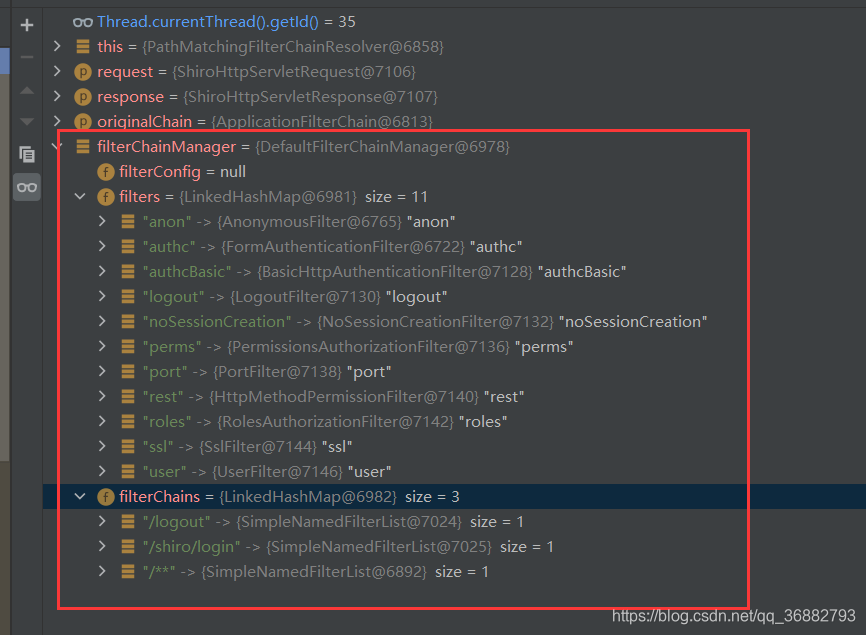
protected void executeChain(ServletRequest request, ServletResponse response, FilterChain origChain) throws IOException, ServletException { // 筛选出匹配当前请求的 Filter FilterChain chain = getExecutionChain(request, response, origChain); chain.doFilter(request, response); } protected FilterChain getExecutionChain(ServletRequest request, ServletResponse response, FilterChain origChain) { FilterChain chain = origChain; // 默认是 org.apache.shiro.web.filter.mgt.PathMatchingFilterChainResolver 类型 FilterChainResolver resolver = getFilterChainResolver(); if (resolver == null) { log.debug("No FilterChainResolver configured. Returning original FilterChain."); return origChain; } // 交由过滤链处理器来进行处理 FilterChain resolved = resolver.getChain(request, response, origChain); if (resolved != null) { log.trace("Resolved a configured FilterChain for the current request."); chain = resolved; } else { log.trace("No FilterChain configured for the current request. Using the default."); } return chain; } 我们直接进去看一下 resolver.getChain(request, response, origChain); 的实现 PathMatchingFilterChainResolver#getChain
从下面可以看到,过滤器的作用和添加顺序有关系,对于一个路径匹配多个过滤器先添加的先生效,后添加的后生效
public FilterChain getChain(ServletRequest request, ServletResponse response, FilterChain originalChain) { // 获取过滤链路管理器,这里保存着所有的Filter 以及 filterChains FilterChainManager filterChainManager = getFilterChainManager(); if (!filterChainManager.hasChains()) { return null; } // 获取当前请求路径 String requestURI = getPathWithinApplication(request); // 获取所有filterChain 中的keySet for (String pathPattern : filterChainManager.getChainNames()) { // 进行路径匹配 if (pathMatches(pathPattern, requestURI)) { // 获取 filterChain 中 pathPattern 对应的value(也即是过滤器),并包装成 ProxiedFilterChain 类型返回。 return filterChainManager.proxy(originalChain, pathPattern); } } return null; } 这里通过截图更直白的看到 FilterChainManager 所包含的内容:
这里我们来看看 filterChainManager.proxy(originalChain, pathPattern); 的实现如下:
public FilterChain proxy(FilterChain original, String chainName) { // return this.filterChains.get(chainName); NamedFilterList configured = getChain(chainName); if (configured == null) { String msg = "There is no configured chain under the name/key [" + chainName + "]."; throw new IllegalArgumentException(msg); } return configured.proxy(original); } 这里可以看到 getChain(chainName); 直接获取的 filterChain 中key对应的Filter
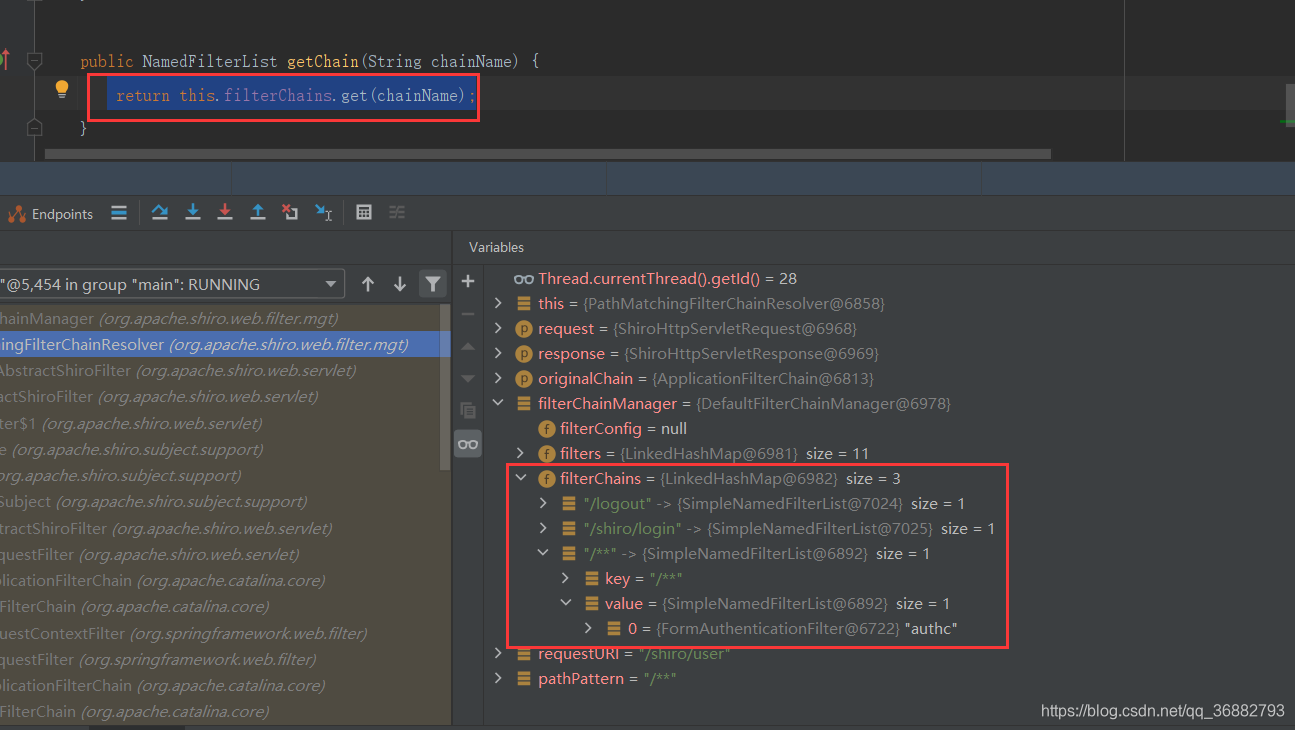
也即是说,在 executeChain(request, response, chain); 方法中,通过当前请求路径和 filterChain 的映射关系来找到对应的过滤器,再调用该过滤器的doFilter 方法。
2.3.1 Shiro 默认的过滤器
public enum DefaultFilter { anon(AnonymousFilter.class), authc(FormAuthenticationFilter.class), authcBasic(BasicHttpAuthenticationFilter.class), logout(LogoutFilter.class), noSessionCreation(NoSessionCreationFilter.class), perms(PermissionsAuthorizationFilter.class), port(PortFilter.class), rest(HttpMethodPermissionFilter.class), roles(RolesAuthorizationFilter.class), ssl(SslFilter.class), user(UserFilter.class);} 三、this.securityManager.createSubject(this.subjectContext);
该方法来实现了Subject的创建,是非常重要的方法。具体实现为
DefaultSecurityManager#createSubject(org.apache.shiro.subject.SubjectContext) ,需要注意的是,默认情况下我们这里 的 securityManager 实际类型为DefaultWebSecurityManager 下面我们来详细分析一下代码:
public Subject createSubject(SubjectContext subjectContext) { //create a copy so we don't modify the argument's backing map: // 拷贝一个 SubjectContext 副本 SubjectContext context = copy(subjectContext); //ensure that the context has a SecurityManager instance, and if not, add one: // 1. 确保上下文具有SecurityManager实例,如果没有,添加一个 context = ensureSecurityManager(context); // 2. 解析session。 context = resolveSession(context); // 3. 解析 Principals context = resolvePrincipals(context); // 4. 创建 一个全新的 Subject Subject subject = doCreateSubject(context); // 5. 保存(缓存) subject save(subject); return subject; } 1 ensureSecurityManager(context)
这一步是为了保证上下文中已经存在 SecurityManager。
如果存在则直接返回。不存在则将当前的 SecurityManager 设值进来,然后保存。protected SubjectContext ensureSecurityManager(SubjectContext context) { if (context.resolveSecurityManager() != null) { log.trace("Context already contains a SecurityManager instance. Returning."); return context; } log.trace("No SecurityManager found in context. Adding self reference."); context.setSecurityManager(this); return context; } 2 resolveSession(context);
这一步是为了填充上下文中的 session,如果上下文中没有session则进行解析。需要注意的是,在这一步中,并没有Session的创建过程,也就是说,如果当前会话存在Session, 则进行了一层包装包返回,如果没有Session,则返回的是null,也就不会向SubjectContext中注入session。
这里解析session的目的是为了尝试根据Cookies 中的sessionId 获取 Session 会话,获取Session中缓存的之前请求的内容(比如登录后会将登录信息保存到Session中,后续请求通过session获取到Session 从而解析出来登录验证的结果信息)。
protected SubjectContext resolveSession(SubjectContext context) { // 如果已经存在 解析的Session则直接返回 if (context.resolveSession() != null) { return context; } try { // 到达这里说明 context 中不能直接获取 session,需要进一步解析 Session session = resolveContextSession(context); if (session != null) { context.setSession(session); } } catch (InvalidSessionException e) { ... } return context; } ... // 这里就打算从缓存中获取session protected Session resolveContextSession(SubjectContext context) throws InvalidSessionException { // 1. 解析 SessionKey SessionKey key = getSessionKey(context); if (key != null) { // 2. 获取 session return getSession(key); } return null; } 2.1 getSessionKey(context);
@Override protected SessionKey getSessionKey(SubjectContext context) { // 判断条件是 context 是 RequestPairSource 实现类 && context.ServletRequest 和 ServletResponse 不为空 if (WebUtils.isWeb(context)) { Serializable sessionId = context.getSessionId(); ServletRequest request = WebUtils.getRequest(context); ServletResponse response = WebUtils.getResponse(context); // 封装成 SessionKey 类型 return new WebSessionKey(sessionId, request, response); } else { return super.getSessionKey(context); } } 这里 WebUtils.isWeb(context) 的成立条件是 context 是 RequestPairSource 实现类 && context.ServletRequest 和 ServletResponse 不为空。我们在 上面讲解 AbstractShiroFilter 流程的时候特意强调过 此时的 上下文 SubjectContext 是被填充了request 和 response 的,所以这里会进入if分支。封装成 WebSessionKey 返回,值得一提的是,此时的sessionId为null。
额外的 super.getSessionKey(context) 调用的是 DefaultSecurityManager#getSessionKey。实现如下:
protected SessionKey getSessionKey(SubjectContext context) { Serializable sessionId = context.getSessionId(); if (sessionId != null) { return new DefaultSessionKey(sessionId); } return null; } 2.2 getSession(key);
getSession(key) 方法会调用 this.sessionManager.getSession(key),这里会出现两种截然不同的逻辑,我们继续分析。
DefaultSessionManager: JavaSE环境ServletContainerSessionManager: Web环境,直接使用servlet容器会话DefaultWebSessionManager:用于Web环境的实现,可以替第二个,自己维护着会话,直接废弃了Servlet容器的会话管理
这里我们只关注后两种。这两种的实现逻辑并不相同。
2.2.1 ServletContainerSessionManager#getSession
上面的已经介绍了 ServletContainerSessionManager 纯粹依赖于Servlet 容器来管理会话,所以获取session的方式也是直接通过Servlet 的方式来获取。如下,可以看到直接通过 request.getSession(false) 的方式来获取,获取不到则封装一个HttpServletSession 返回 :
public Session getSession(SessionKey key) throws SessionException { if (!WebUtils.isHttp(key)) { String msg = "SessionKey must be an HTTP compatible implementation."; throw new IllegalArgumentException(msg); } HttpServletRequest request = WebUtils.getHttpRequest(key); Session session = null; HttpSession httpSession = request.getSession(false); if (httpSession != null) { session = createSession(httpSession, request.getRemoteHost()); } return session; } ... protected Session createSession(HttpSession httpSession, String host) { return new HttpServletSession(httpSession, host); } 2.2.2 DefaultWebSessionManager #getSession
DefaultWebSessionManager 的实现是在其父类中 AbstractNativeSessionManager#getSession,如下
public Session getSession(SessionKey key) throws SessionException { Session session = lookupSession(key); return session != null ? createExposedSession(session, key) : null; } 这里的调用顺序你是 AbstractNativeSessionManager#lookupSession =》AbstractNativeSessionManager#doGetSession =》AbstractValidatingSessionManager#retrieveSession
其中 AbstractNativeSessionManager#doGetSession 中通过了 SessionValidationScheduler 的来决定是否启用session会话验证。
这里我们直接来看 AbstractValidatingSessionManager#retrieveSession
protected Session retrieveSession(SessionKey sessionKey) throws UnknownSessionException { // 获取 sessionId Serializable sessionId = getSessionId(sessionKey); if (sessionId == null) { log.debug("Unable to resolve session ID from SessionKey [{}]. Returning null to indicate a " + "session could not be found.", sessionKey); return null; } // 从数据源中根据 sessionId获取 session。在这里面调用了SessionDao 来处理。 Session s = retrieveSessionFromDataSource(sessionId); if (s == null) { //session ID was provided, meaning one is expected to be found, but we couldn't find one: String msg = "Could not find session with ID [" + sessionId + "]"; throw new UnknownSessionException(msg); } return s; } 篇幅问题,就不再追下去了,
我们只需要注意下面两点内容:Serializable sessionId = getSessionId(sessionKey);通过获取 客户端的 Cookies 来获取到了 SessionId。Session s = retrieveSessionFromDataSource(sessionId);通过SessionDao 根据 sessionId 获取到了Session
注:Shiro 默认是通过 ServletContainerSessionManager#getSession 的方式来获取session。因为session 的会话需要客户端Cookies的支持,大致逻辑就是 服务端创建Session后会将sessionId 保存到客户端的Cookies 中,默认Cookies 的名称是 JSESSIONID。如下(看了好久都想不通ServletContainerSessionManager 模式下 Cookies 的生成,最后一步一步断点发现是request 中生成的。。。 ):

3 resolvePrincipals(context);
这一步其实很简单,填充上下文中的 principals ,不存在则从 RememberedMe 中获取(不保存一定存在)。
protected SubjectContext resolvePrincipals(SubjectContext context) { // 从上下文中获取 principals ,这里会尝试从Session中获取 PrincipalCollection principals = context.resolvePrincipals(); // 如果 上下文中 的 principals 为空则从 RememberedMe 中获取缓存的 principals if (isEmpty(principals)) { // 这里通过 RememberMeManager 来尝试获取 principals principals = getRememberedIdentity(context); if (!isEmpty(principals)) { context.setPrincipals(principals); } else { log.trace("No remembered identity found. Returning original context."); } } return context; } 这里可以看到,这里整个逻辑都是为了获取principals而奋斗。
- 直接从上下文中获取 principals
- 从上下文中 AuthenticationInfo ,从AuthenticationInfo 中获取 principals
- 从上下文中 Subject ,从Subject 中获取 principals
- 从上下文中 获取Session,从 Session 中获取 principals
- 最后从 RememberMeManager 中来获取 principals
3.1 context.resolvePrincipals()
context.resolvePrincipals() 的实现在DefaultSubjectContext#resolvePrincipals 中,目的就是解析出来 Principals 信息,详细代码如下:
public PrincipalCollection resolvePrincipals() { // 从缓存中获取principals。这是直接从上下文中获取,获取不到开始其他的获取 PrincipalCollection principals = getPrincipals(); if (isEmpty(principals)) { //check to see if they were just authenticated: // 从缓存中获取 AuthenticationInfo ,从 AuthenticationInfo 中获取 principals AuthenticationInfo info = getAuthenticationInfo(); if (info != null) { principals = info.getPrincipals(); } } if (isEmpty(principals)) { // 从缓存中获取 Subject,从 subject 中获取 principals Subject subject = getSubject(); if (subject != null) { principals = subject.getPrincipals(); } } if (isEmpty(principals)) { //try the session: // 从 session 中获取 principals Session session = resolveSession(); if (session != null) { principals = (PrincipalCollection) session.getAttribute(PRINCIPALS_SESSION_KEY); } } return principals; } ... // 这里从 backingMap 中尝试获取 PRINCIPALS。 backingMap实际上是 上下文中的缓存,在 上下文初始化的时候会将其保存的属性信息保存到 backingMap 中 public PrincipalCollection getPrincipals() { return getTypedValue(PRINCIPALS, PrincipalCollection.class); } public AuthenticationInfo getAuthenticationInfo() { return getTypedValue(AUTHENTICATION_INFO, AuthenticationInfo.class); } public Subject getSubject() { return getTypedValue(SUBJECT, Subject.class); } 这里需要注意,context获取 Principals 的方式 有两种 : context.resolvePrincipals() 和 context.getPrincipals() 两者并不完全相通,context.getPrincipals() 直接通过上下文获取,而 context.resolvePrincipals() 在上下文直接获取不到时会通过AuthenticationInfo、Subject 中获取。如下:
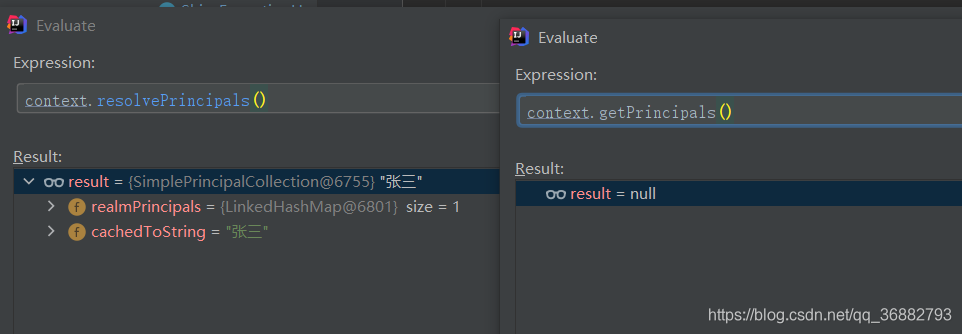
实际上 Shiro 这一步只是确定了 context.resolvePrincipals() 能解析出来 Principals ,如果能解析出来,不需要做处理,如果解析不到,则通过其他途径获取 Principals 并通过到 context.setPrincipals() 直接赋值到上下文中,以保证context.resolvePrincipals() 能解析出来 Principals。
4 doCreateSubject(context);
上面已经做了 SecurityManager、Session、PrincipalCollection 的解析工作,不管是否获取到了,准备工作在上面已经结束,这里便开始创建 Subject。其实就是将上面的解析出来的各个属性填充到新创建的 Subject 中。
public Subject createSubject(SubjectContext context) { SecurityManager securityManager = context.resolveSecurityManager(); Session session = context.resolveSession(); boolean sessionCreationEnabled = context.isSessionCreationEnabled(); PrincipalCollection principals = context.resolvePrincipals(); boolean authenticated = context.resolveAuthenticated(); String host = context.resolveHost(); return new DelegatingSubject(principals, authenticated, host, session, sessionCreationEnabled, securityManager); } 5 save(subject);
在上一步结束,我们终于创建出来了一个 Subject。为了更好的使用这个 Subject,这里将Subject 中的部分信息(PrincipalCollection 和 AuthenticationState) 保存到Session 中,Session的创建也是在这一步完成的。下面我们来看代码:
save(subject) 的实现是在 DefaultSecurityManager#save 中。我们可以看到直接委托给了 subjectDAO 来处理Subject。
protected void save(Subject subject) { this.subjectDAO.save(subject); } DefaultSubjectDAO#save 代码如下 :
public Subject save(Subject subject) { // 通过 SessionStorageEvaluator 判断是否启用 Session 缓存 if (isSessionStorageEnabled(subject)) { // 如果启用了 session缓存,则进行处理 saveToSession(subject); } else { //... 打印日志 } return subject; } protected void saveToSession(Subject subject) { //performs merge logic, only updating the Subject's session if it does not match the current state: // 执行合并逻辑,仅在主题的会话与当前状态不匹配时才更新 // 这里实际上就是将当前的 subject 中的 principals 同步到 session 中 // key 为 PRINCIPALS_SESSION_KEY : value 为当前的 principals (会将session中已存在的 principals 移除,替换成当前的 principals ) mergePrincipals(subject); // 同理,同步验证状态 true or false 。表验证是否通过 mergeAuthenticationState(subject); } 我们这里可以看到,需要合并(缓存到Session)的数据只有 principals 和 AuthenticationState ,其中AuthenticationState 就是一个状态表明当前验证已经通过。也只有需要缓存数据到Session 的情况下,才有可能主动去创建Session。
这里的合并情况:当第一次登录请求已经通过,第二次其他请求过来时,会获取当会话的Session,第二次请求也会获取到 principals 和 AuthenticationState 信息,这是需要进行一个合并缓存。
5.1 mergePrincipals(subject);
合并 Principals 状态,这里需要注意的是Subject 获取 session的方式有三种
- subject.getSession(); :等同于
subject.getSession(true);。获取 session ,不存在session则创建一个session - subject.getSession(true); :获取 session ,不存在session则创建一个session
- subject.getSession(false); :获取 session ,不存在session则返回 null
// org.apache.shiro.subject.support.DefaultSubjectContext_PRINCIPALS_SESSION_KEY public static final String PRINCIPALS_SESSION_KEY = DefaultSubjectContext.class.getName() + "_PRINCIPALS_SESSION_KEY"; protected void mergePrincipals(Subject subject) { PrincipalCollection currentPrincipals = null; // 根据官方注释,这里两种获取 Principals 的方式应该是为了上下版本兼容 if (subject.isRunAs() && subject instanceof DelegatingSubject) { try { // 通过反射获取 principals 属性 Field field = DelegatingSubject.class.getDeclaredField("principals"); field.setAccessible(true); currentPrincipals = (PrincipalCollection)field.get(subject); } catch (Exception e) { throw new IllegalStateException("Unable to access DelegatingSubject principals property.", e); } } // 反射获取不到则尝试直接获取 if (currentPrincipals == null || currentPrincipals.isEmpty()) { currentPrincipals = subject.getPrincipals(); } // 获取 session。 Session session = subject.getSession(false); if (session == null) { // 如果获取不到session && currentPrincipals 不为空(表明需要缓存),则需要自己创建一个sesson if (!isEmpty(currentPrincipals)) { // 创建一个session session = subject.getSession(); // 将 currentPrincipals 保存到 session中 session.setAttribute(DefaultSubjectContext.PRINCIPALS_SESSION_KEY, currentPrincipals); } // otherwise no session and no principals - nothing to save } else { // 如果session不为空,先尝试获取 session中缓存的 existingPrincipals 。这里需要将原先的 existingPrincipals 和 currentPrincipals 进行一个状态合并(说白了,就是以currentPrincipals 为准) PrincipalCollection existingPrincipals = (PrincipalCollection) session.getAttribute(DefaultSubjectContext.PRINCIPALS_SESSION_KEY); if (isEmpty(currentPrincipals)) { if (!isEmpty(existingPrincipals)) { session.removeAttribute(DefaultSubjectContext.PRINCIPALS_SESSION_KEY); } // otherwise both are null or empty - no need to update the session } else { if (!currentPrincipals.equals(existingPrincipals)) { session.setAttribute(DefaultSubjectContext.PRINCIPALS_SESSION_KEY, currentPrincipals); } // otherwise they're the same - no need to update the session } } } 5.2 mergeAuthenticationState(subject);
mergeAuthenticationState(subject); 的实现和上面类似,也是为了合并当前的 AuthenticationState,这个状态将在登录后的请求中作为一个判断,表明当前会话是否已经通过登录验证。
// org.apache.shiro.subject.support.DefaultSubjectContext_AUTHENTICATED_SESSION_KEY public static final String AUTHENTICATED_SESSION_KEY = DefaultSubjectContext.class.getName() + "_AUTHENTICATED_SESSION_KEY"; protected void mergeAuthenticationState(Subject subject) { Session session = subject.getSession(false); if (session == null) { if (subject.isAuthenticated()) { session = subject.getSession(); session.setAttribute(DefaultSubjectContext.AUTHENTICATED_SESSION_KEY, Boolean.TRUE); } //otherwise no session and not authenticated - nothing to save } else { Boolean existingAuthc = (Boolean) session.getAttribute(DefaultSubjectContext.AUTHENTICATED_SESSION_KEY); if (subject.isAuthenticated()) { if (existingAuthc == null || !existingAuthc) { session.setAttribute(DefaultSubjectContext.AUTHENTICATED_SESSION_KEY, Boolean.TRUE); } //otherwise authc state matches - no need to update the session } else { if (existingAuthc != null) { //existing doesn't match the current state - remove it: session.removeAttribute(DefaultSubjectContext.AUTHENTICATED_SESSION_KEY); } //otherwise not in the session and not authenticated - no need to update the session } } } 5.3 subject.getSession();
我们这里需要额外提及一下 mergePrincipals(subject); 和 mergeAuthenticationState(subject); 中调用的 subject.getSession(); 方法。
subject.getSession(); 方法创建了一个全新的Session。需要注意的是,在创建Session的同时还向Cookies 中写入了SessionId subject.getSession();调用 DelegatingSubject#getSession(boolean),如下
public Session getSession(boolean create) { if (this.session == null && create) { //added in 1.2: if (!isSessionCreationEnabled()) { //... 抛出异常 } log.trace("Starting session for host {}", getHost()); SessionContext sessionContext = createSessionContext(); Session session = this.securityManager.start(sessionContext); this.session = decorate(session); } return this.session; } this.securityManager.start(sessionContext); 实现如下,可以看到还是通过SessionManager 来进行创建:
public Session start(SessionContext context) throws AuthorizationException { return this.sessionManager.start(context); } 5.3.1 ServletContainerSessionManager#start
ServletContainerSessionManager 是直接依赖于Servlet 来管理Session,所以创建过程全权委托给了Request。
public Session start(SessionContext context) throws AuthorizationException { return createSession(context); } protected Session createSession(SessionContext sessionContext) throws AuthorizationException { if (!WebUtils.isHttp(sessionContext)) { String msg = "SessionContext must be an HTTP compatible implementation."; throw new IllegalArgumentException(msg); } HttpServletRequest request = WebUtils.getHttpRequest(sessionContext); // request在创建session的时候会自动创建一个名字为 JSESSIONID 的 Cookies ,并将SessionId写入 HttpSession httpSession = request.getSession(); //SHIRO-240: DO NOT use the 'globalSessionTimeout' value here on the acquired session. //see: https://issues.apache.org/jira/browse/SHIRO-240 String host = getHost(sessionContext); return createSession(httpSession, host); } 5.3.2 DefaultWebSessionManager#start
相较于 ServletContainerSessionManager#start 直接托管给Servlet 来实现,Cookies 的保存,DefaultWebSessionManager则需要我们自己来实现。DefaultWebSessionManager#start 实现是在AbstractNativeSessionManager#start 中,其作用是创建一个新的会话。
public Session start(SessionContext context) { Session session = createSession(context); // 应用 设置的全局Session过期时间 applyGlobalSessionTimeout(session); // 在这里将SessionId 写入到Cookies 中 onStart(session, context); // 通知 SessionListener 监听器onStart 事件 notifyStart(session); //Don't expose the EIS-tier Session object to the client-tier: // 包装成 DelegatingSession 暴露出去 return createExposedSession(session, context); } protected void onStart(Session session, SessionContext context) { super.onStart(session, context); if (!WebUtils.isHttp(context)) { log.debug("SessionContext argument is not HTTP compatible or does not have an HTTP request/response " + "pair. No session ID cookie will be set."); return; } HttpServletRequest request = WebUtils.getHttpRequest(context); HttpServletResponse response = WebUtils.getHttpResponse(context); // 如果启用cookie存储SessionId if (isSessionIdCookieEnabled()) { // 获取SessionId Serializable sessionId = session.getId(); // 将SessionId 写入Cookies 中,可以通过自己设置 SimpleCookie 来控制cookie的name,有效期等信息 storeSessionId(sessionId, request, response); } else { log.debug("Session ID cookie is disabled. No cookie has been set for new session with id {}", session.getId()); } request.removeAttribute(ShiroHttpServletRequest.REFERENCED_SESSION_ID_SOURCE); request.setAttribute(ShiroHttpServletRequest.REFERENCED_SESSION_IS_NEW, Boolean.TRUE); } 我们这里只关注 Session session = createSession(context);
protected Session createSession(SessionContext context) throws AuthorizationException { enableSessionValidationIfNecessary(); return doCreateSession(context); } ... protected Session doCreateSession(SessionContext context) { // 直接new一个 SimpleSession,如果有host,就赋值host Session s = newSessionInstance(context); if (log.isTraceEnabled()) { log.trace("Creating session for host {}", s.getHost()); } create(s); return s; } .... protected void create(Session session) { if (log.isDebugEnabled()) { log.debug("Creating new EIS record for new session instance [" + session + "]"); } // 调用了sessionDao 来对Session进行一个管理 // 这里用的如果是CacheSessionDao,则会将这个Session 缓存起来 sessionDAO.create(session); } 以上:内容部分参考网络 如有侵扰,联系删除。 内容仅用于自我记录学习使用。如有错误,欢迎指正
发表评论
最新留言
关于作者
