本文共 14695 字,大约阅读时间需要 48 分钟。
文章目录
一、前言
由于之前没有使用过 Shiro,最近开始使用,故对其部分流程和源码进行了阅读,大体总结了一些内容记录下来。本系列并不会完完全全分析 Shiro 的全部代码,仅把主(我)要(用)流(到)程(的) 简单分析一下。由于本系列大部分为个人内容理解 并且 个人学艺实属不精,故难免出现 “冤假错乱”。如有发现,感谢指正,不胜感激。
Shiro 源码分析全集:
1. Filter的对应关系
首先我们需要知道,不同的过滤器名称对应什么过滤器,如下图
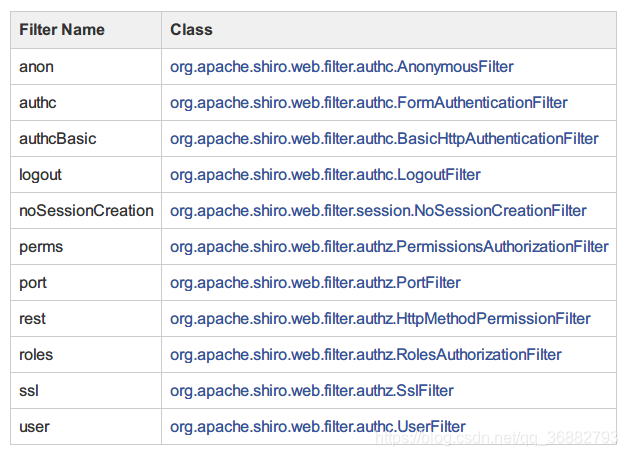
Shiro 默认的过滤器映射关系:
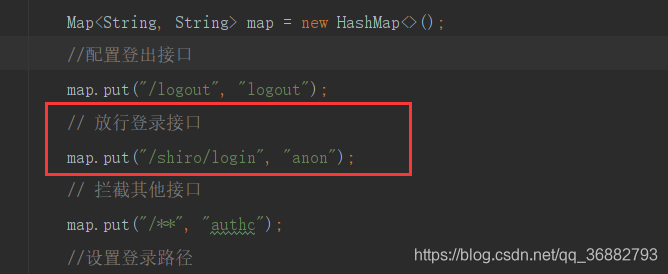
public enum DefaultFilter { anon(AnonymousFilter.class), authc(FormAuthenticationFilter.class), authcBasic(BasicHttpAuthenticationFilter.class), logout(LogoutFilter.class), noSessionCreation(NoSessionCreationFilter.class), perms(PermissionsAuthorizationFilter.class), port(PortFilter.class), rest(HttpMethodPermissionFilter.class), roles(RolesAuthorizationFilter.class), ssl(SslFilter.class), user(UserFilter.class);} 如下图 :在这里,我们修饰的 /logout会使用名字为 logout的过滤器,即 LogoutFilter
同理 /shiro/login 会使用名字为 anon 的过滤器,即 AnonymousFilter。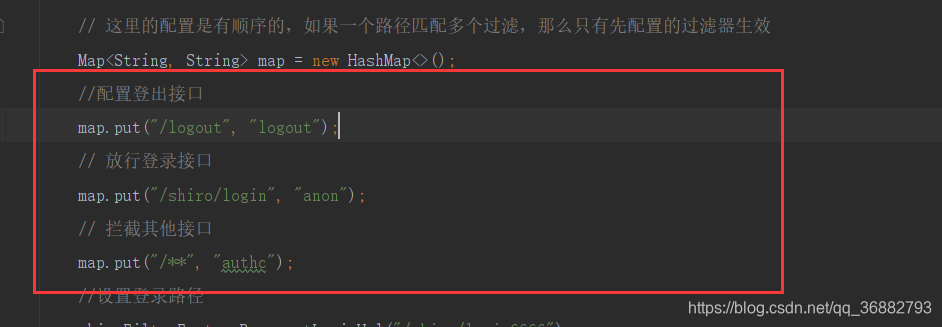
文章到这,说明我们已经登录认证成功,这里开始访问 http://localhost:8081/shiro/admin。但是Shiro 是如何确定当前会话已经通过登录认证的呢?这就是本文需要讲解的内容。
二、鉴权流程
由于我们指定了其他接口只用的过滤器是 “authc”,“authc” 对应的过滤器是FormAuthenticationFilter ,所以当我们请求 http://localhost:8081/shiro/admin 时会直接通过 FormAuthenticationFilter 来处理,所以这里来看 FormAuthenticationFilter 的鉴权过程,。
1. FormAuthenticationFilter
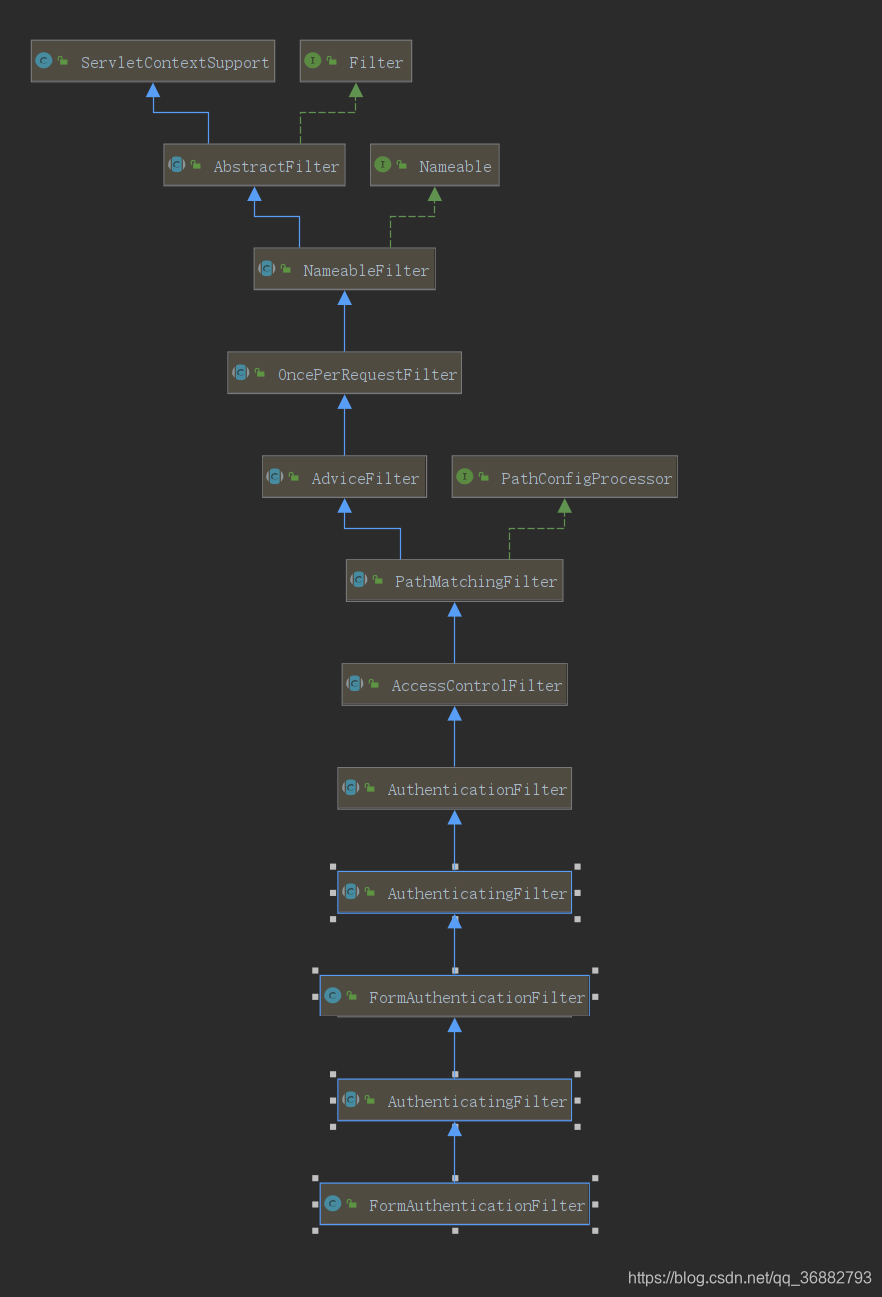
FormAuthenticationFilter 继承链路,由于 FormAuthenticationFilter 是 OncePerRequestFilter 子类,所以我们直接从 OncePerRequestFilter#doFilter 方法看起。 通过下面的调用链路我们到达了 AccessControlFilter#onPreHandle : =》 OncePerRequestFilter#doFilter =》 AdviceFilter#doFilterInternal =》 PathMatchingFilter#preHandle=》 AccessControlFilter#onPreHandle
AccessControlFilter#onPreHandle 的代码如下:
// AccessControlFilter#onPreHandle public boolean onPreHandle(ServletRequest request, ServletResponse response, Object mappedValue) throws Exception { return isAccessAllowed(request, response, mappedValue) || onAccessDenied(request, response, mappedValue); } 这个方法中的两个方法调用,决定了我们这个请求是否可以通过鉴权认证。
- isAccessAllowed(request, response, mappedValue) : 判断请求是否可以通过,在这里面完成了鉴权操作。
- onAccessDenied(request, response, mappedValue); :这里巧妙的用了 || 的执行顺序。当请求无法通过时,会调用该方法。当该方法返回true时,请求仍会通过。不过该方法被
FormAuthenticationFilter重写了,进行了错误处理。
1.1 isAccessAllowed(request, response, mappedValue)
isAccessAllowed(request, response, mappedValue) 实际调用的是 AuthenticatingFilter#isAccessAllowed,其详细代码如下:
@Override protected boolean isAccessAllowed(ServletRequest request, ServletResponse response, Object mappedValue) { // super.isAccessAllowed 返回true || (不是登录请求 && 宽容通过) return super.isAccessAllowed(request, response, mappedValue) || (!isLoginRequest(request, response) && isPermissive(mappedValue)); } 1.1.1 super.isAccessAllowed(request, response, mappedValue)
其中 super.isAccessAllowed(request, response, mappedValue) 调用的是 AuthenticationFilter#isAccessAllowed 方法,具体实现如下:
protected boolean isAccessAllowed(ServletRequest request, ServletResponse response, Object mappedValue) { // 获取当前线程的Subject Subject subject = getSubject(request, response); // 这个状态是缓存在Session中的,现在被解析出来赋值给 Subject,所以如果通过登录验证则是true return subject.isAuthenticated(); } 1.1.2 (!isLoginRequest(request, response) && isPermissive(mappedValue))
!isLoginRequest(request, response) 这里就不再解释,就是确定当前请求不是登录请求。
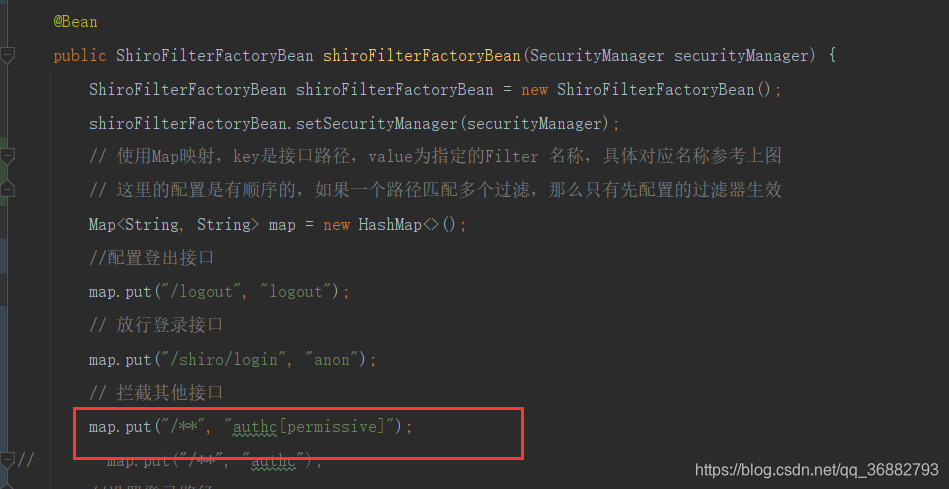
isPermissive(mappedValue),其代码如下 : // org.apache.shiro.web.filter.authc.AuthenticatingFilter#isPermissive 中实现 public static final String PERMISSIVE = "permissive"; protected boolean isPermissive(Object mappedValue) { if(mappedValue != null) { String[] values = (String[]) mappedValue; return Arrays.binarySearch(values, PERMISSIVE) >= 0; } return false; } 可以看到,其逻辑就是判断mappedValue 是否包含 permissive ,如果包含则放行。
在 ShiroFilterFactoryBean 的配置中,我们可以通过下面的方式,来对某些请求进行一个宽容放行,这部分请求可以在不登录的情况下访问,此时mappedValue 就是 authc[]中的数组的值。
1.2.3 总结
总结起来,接口是否鉴权通过,有两种情况都可通过
- subject.isAuthenticated() 为true。这个是登录后会保存在Session 中的状态,其他请求发送过来会读取Session中的状态并写入到Subject中,从而实现了这个验证。
- 非登录请求 && 宽容放行,这个需要我们自己手动去配置,不再多说。
1.2 onAccessDenied(request, response, mappedValue);
当我们在 isAccessAllowed(request, response, mappedValue) 中校验没有通过时,便会调用 onAccessDenied 方法,而 FormAuthenticationFilter 重写了该方法,如下:
protected boolean onAccessDenied(ServletRequest request, ServletResponse response) throws Exception { // 判断是否是登录请求 if (isLoginRequest(request, response)) { // 判断请求为post请求 if (isLoginSubmission(request, response)) { // 重新执行登录方法 return executeLogin(request, response); } else { // 否则返回true return true; } } else { // 否则重定向到登录 saveRequestAndRedirectToLogin(request, response); return false; } } ... protected boolean onLoginSuccess(AuthenticationToken token, Subject subject, ServletRequest request, ServletResponse response) throws Exception { // 发起重定向 : issueSuccessRedirect(request, response); //we handled the success redirect directly, prevent the chain from continuing: // 直接处理成功重定向,防止链继续进行 return false; } protected boolean onLoginFailure(AuthenticationToken token, AuthenticationException e, ServletRequest request, ServletResponse response) { if (log.isDebugEnabled()) { log.debug( "Authentication exception", e ); } setFailureAttribute(request, e); //login failed, let request continue back to the login page: // 登录失败,返回到登录页面 return true; } 这里我们来看看 executeLogin(request, response); 的实现如下:
// org.apache.shiro.web.filter.authc.AuthenticatingFilter#executeLogin protected boolean executeLogin(ServletRequest request, ServletResponse response) throws Exception { // 调用的是 FormAuthenticationFilter#createToken // 会根据 request 中的username 和password,以及rememberMe、host 等信息封装成一个 UsernamePasswordToken AuthenticationToken token = createToken(request, response); if (token == null) { // ... 抛出异常 } try { // 重新执行登录逻辑 Subject subject = getSubject(request, response); subject.login(token); // 登录成功执行 return onLoginSuccess(token, subject, request, response); } catch (AuthenticationException e) { // 登录失败执行 return onLoginFailure(token, e, request, response); } } 可以看到,onAccessDenied 方法完全用来处理鉴权失败的情况了,这里会将鉴权失败的请求重定向到登录页。
1.3 总结
整理一下整个流程,
- 当一个请求发送过来是,被AbstractShiroFilter 转发给合适的 Filter。我们这里转发给了 FormAuthenticationFilter 。
- FormAuthenticationFilter 中的判断请求是否通过鉴权,通过鉴权有两种情况 :
subject.isAuthenticated() 为true或非登录请求 && 宽容放行。 - 如果鉴权失败则交由 onAccessDenied 方法来处理,FormAuthenticationFilter 由于重写了 onAccessDenied 方法,将会将请求重定向到登录页。
三、权限注解的实现
在Shiro 中,我们可以通过 @RequiresRoles 、@RequiresPermissions 等注解来进行一个更细致的角色权限的校验。具体的注解如下图。
在上面的代码分析中,我们并没有分析这些注解功能是如何实现的,下面就借由 @RequiresRoles 注解来进行分析。
这里需要对Spring Aop 有一定程度的源码了解,如果不了解,建议先阅读完
看到这种注解,就猜测是Aop 是实现。在Shiro配置类中也发现了猫腻,配置了DefaultAdvisorAutoProxyCreator 和 AuthorizationAttributeSourceAdvisor 两个,
/** * 这里指定了动态代理的方式使用了 Cglib * * @return */ @Bean public DefaultAdvisorAutoProxyCreator defaultAdvisorAutoProxyCreator() { DefaultAdvisorAutoProxyCreator defaultAdvisorAutoProxyCreator = new DefaultAdvisorAutoProxyCreator(); defaultAdvisorAutoProxyCreator.setProxyTargetClass(true); return defaultAdvisorAutoProxyCreator; } /** * 开启注解支持,包括 RequiresPermissions.class, RequiresRoles.class, RequiresUser.class, RequiresGuest.class, RequiresAuthentication.class。 * 和Aop相同的逻辑,通过注入 Advisor 来增强一些类的和方法 * * @param securityManager * @return */ @Bean public AuthorizationAttributeSourceAdvisor authorizationAttributeSourceAdvisor(SecurityManager securityManager) { AuthorizationAttributeSourceAdvisor authorizationAttributeSourceAdvisor = new AuthorizationAttributeSourceAdvisor(); authorizationAttributeSourceAdvisor.setSecurityManager(securityManager); return authorizationAttributeSourceAdvisor; } 这里尤其是 AuthorizationAttributeSourceAdvisor ,这货是Advisor 子类,必然是用来增强类的。
Advisor 简单解释:Advisor 中包含 PointCut 和 Advice 。其中 PointCut 代表切点,代表要增强的点,Advice 中编写了具体的增强实现。Spring在启动时会通过自动代理创建器去扫描所有的Advisor 实现类,并在加载每个Bean的时候判断Advisor 是否适用于当前Bean,如果适用,则会通过Advice 来创建该Bean的增强代理。1. AuthorizationAttributeSourceAdvisor
Shiro 借助 AuthorizationAttributeSourceAdvisor 实现了权限注解的功能。
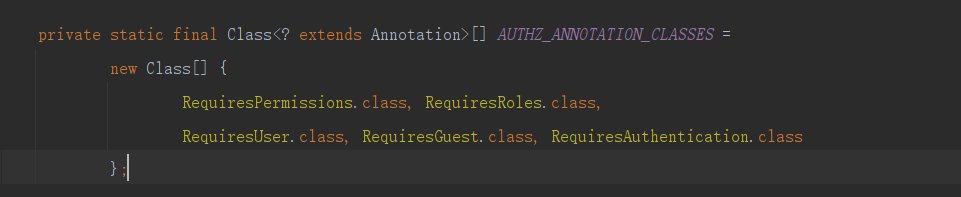
AuthorizationAttributeSourceAdvisor 的部分内容,如下: public class AuthorizationAttributeSourceAdvisor extends StaticMethodMatcherPointcutAdvisor { private static final Logger log = LoggerFactory.getLogger(AuthorizationAttributeSourceAdvisor.class); // 这里声明了需要增强的注解,被这些注解修饰的类或方法会被增强代理 private static final Class [] AUTHZ_ANNOTATION_CLASSES = new Class[] { RequiresPermissions.class, RequiresRoles.class, RequiresUser.class, RequiresGuest.class, RequiresAuthentication.class }; /** * Create a new AuthorizationAttributeSourceAdvisor. */ public AuthorizationAttributeSourceAdvisor() { // 设置增强点,即具体的增强策略实现在 AopAllianceAnnotationsAuthorizingMethodInterceptor 中 setAdvice(new AopAllianceAnnotationsAuthorizingMethodInterceptor()); } ... // 校验是否可以代理当前类或者方法。返回true,则说明 AuthorizationAttributeSourceAdvisor 可以增强代理该类 public boolean matches(Method method, Class targetClass) { Method m = method; // 如果方法 被 AUTHZ_ANNOTATION_CLASSES 中的注解修饰则返回true if ( isAuthzAnnotationPresent(m) ) { return true; } //The 'method' parameter could be from an interface that doesn't have the annotation. //Check to see if the implementation has it. if ( targetClass != null) { try { // 获取实现类的方法,method可能是接口的方法,而实现类的方法可能被注解修饰 m = targetClass.getMethod(m.getName(), m.getParameterTypes()); // 校验实现类或者实现类的方法是否被注解修饰 return isAuthzAnnotationPresent(m) || isAuthzAnnotationPresent(targetClass); } catch (NoSuchMethodException ignored) { } } return false; }} 这里面我们可以简单理解,如果是被 AUTHZ_ANNOTATION_CLASSES 修饰的方法 或者类,就是需要增强的点,其增强具体实现在 AopAllianceAnnotationsAuthorizingMethodInterceptor 中。下面我们进入 AopAllianceAnnotationsAuthorizingMethodInterceptor 中一探究竟。
1.1. AopAllianceAnnotationsAuthorizingMethodInterceptor
public class AopAllianceAnnotationsAuthorizingMethodInterceptor extends AnnotationsAuthorizingMethodInterceptor implements MethodInterceptor { public AopAllianceAnnotationsAuthorizingMethodInterceptor() { List interceptors = new ArrayList (5); //use a Spring-specific Annotation resolver - Spring's AnnotationUtils is nicer than the //raw JDK resolution process. AnnotationResolver resolver = new SpringAnnotationResolver(); //we can re-use the same resolver instance - it does not retain state: // 添加不同注解的拦截器, // 针对 @RequiresRoles interceptors.add(new RoleAnnotationMethodInterceptor(resolver)); // 针对 @RequiresPermissions interceptors.add(new PermissionAnnotationMethodInterceptor(resolver)); // 针对 @RequiresAuthentication interceptors.add(new AuthenticatedAnnotationMethodInterceptor(resolver)); // 针对 @RequiresUser interceptors.add(new UserAnnotationMethodInterceptor(resolver)); // 针对 @RequiresGuest interceptors.add(new GuestAnnotationMethodInterceptor(resolver)); setMethodInterceptors(interceptors); } ...} 这里可以看到针对不同的注解,Shiro 使用了不同的 过滤器来进行操作,这里我们以 @RequiresRoles 注解为例,对 RoleAnnotationMethodInterceptor 进行简单的分析
1.1. RoleAnnotationMethodInterceptor
RoleAnnotationMethodInterceptor 本身并没有什么实现。其全部实现交给了 RoleAnnotationHandler。
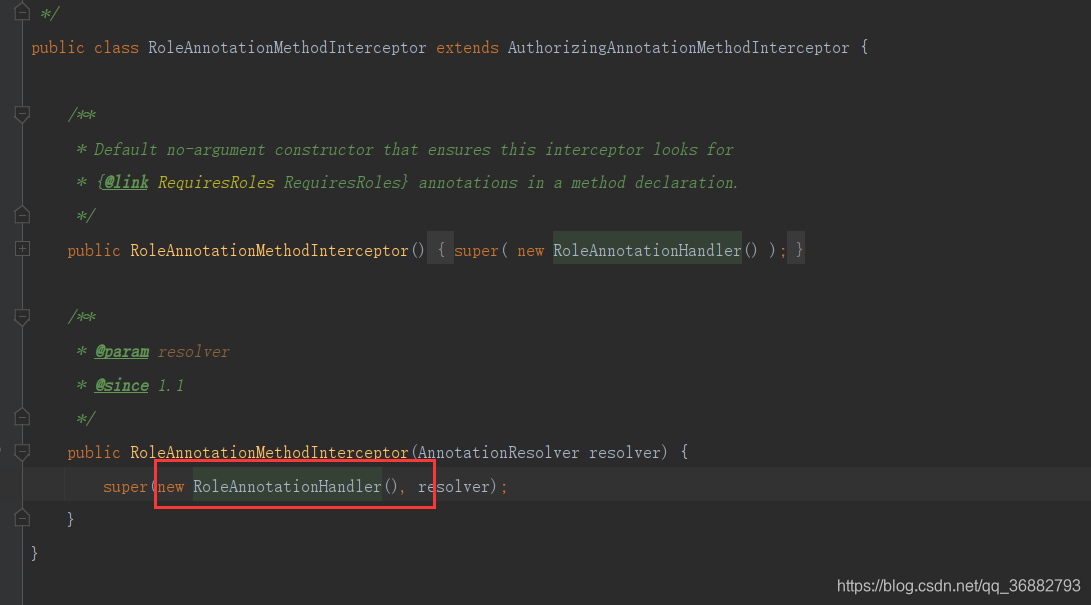
我们这里需要找到 invoke 方法。invoke 方法用来调用真实的被代理的方法,所有的增强实现也基于此。 RoleAnnotationMethodInterceptor 继承了 AuthorizingAnnotationMethodInterceptor,invoke方法的实现在 AuthorizingAnnotationMethodInterceptor#invoke 中,如下
public Object invoke(MethodInvocation methodInvocation) throws Throwable { // 校验是否有权限 assertAuthorized(methodInvocation); // 调用方法 return methodInvocation.proceed(); } ... // 校验是否有足够的权限 public void assertAuthorized(MethodInvocation mi) throws AuthorizationException { try { // 调用Handler 的 assertAuthorized 方法来进行校验。这里调用的自然就是 RoleAnnotationHandler ((AuthorizingAnnotationHandler)getHandler()).assertAuthorized(getAnnotation(mi)); } catch(AuthorizationException ae) { // ... 抛出异常 } } 上面的代码中,调用了Handler也进行校验,这里调用的handler 即为 RoleAnnotationHandler。下面我们来看RoleAnnotationHandler#assertAuthorized 方法实现如下:
public void assertAuthorized(Annotation a) throws AuthorizationException { if (!(a instanceof RequiresRoles)) return; // 获取 @RequiresRoles 注解上标注的角色 RequiresRoles rrAnnotation = (RequiresRoles) a; String[] roles = rrAnnotation.value(); // 进行角色校验 if (roles.length == 1) { getSubject().checkRole(roles[0]); return; } // 针对 Logical.AND 和 Logical.OR 的校验 if (Logical.AND.equals(rrAnnotation.logical())) { getSubject().checkRoles(Arrays.asList(roles)); return; } if (Logical.OR.equals(rrAnnotation.logical())) { // Avoid processing exceptions unnecessarily - "delay" throwing the exception by calling hasRole first boolean hasAtLeastOneRole = false; for (String role : roles) if (getSubject().hasRole(role)) hasAtLeastOneRole = true; // Cause the exception if none of the role match, note that the exception message will be a bit misleading if (!hasAtLeastOneRole) getSubject().checkRole(roles[0]); } } 这里我们看到,校验的实现在 getSubject().checkRole 中。由于调用链路太长,这里就不再追踪, getSubject().checkRole 方法最终会调用 CustomRealm#doGetAuthorizationInfo,并根据doGetAuthorizationInfo 方法的返回值来进行角色的校验。具体调用链路如下:

四、总结
至此,我们可以总结出Shiro 的整个执行流程如下:
-
用户登录,通过AbstractShiroFilter 。AbstractShiroFilter 创建一个Subject绑定当前请求线程,并将请求分发给合适的过滤器处理。(这里由于是登录请求,我们选择放行,anno对应的过滤器是 AnonymousFilter,会直接放行 ):
-
我们会在登录请求中调用 Subject subject = SecurityUtils.getSubject(); 获取到的 Subject就是上一步AnonymousFilter 中绑定到当前线程的Subject。
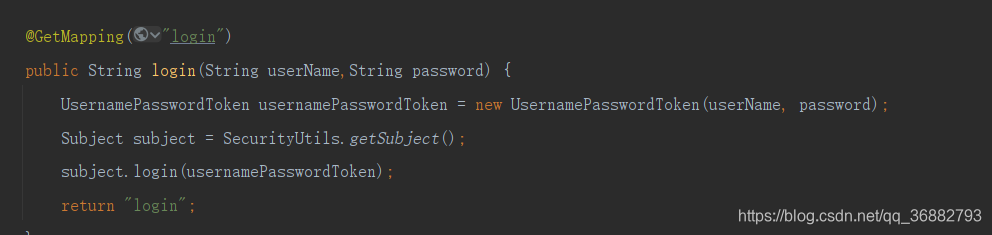
-
随后执行 subject.login(usernamePasswordToken);。会通过我们自定义的 Realm (CustomRealm) 进行认证和鉴权的操作(鉴权操作 doGetAuthorizationInfo 方法并非一定执行,需要权限时才会执行),认证成功后,将会创建一个Session来保存认证后的结果信息,同时将SessionId写入到客户端Cookies 中。
-
当我们进行其他请求时,此时请求会携带Cookies 过来,首先还是会经过 AbstractShiroFilter ,在 AbstractShiroFilter 中Shiro 解析Cookies 中的SessionId,从而获取到Session,再将Session中保存的认证结果信息解析保存到Subject中,再将Subject绑定到当前线程。由于在Session中保存了这次会话已经通过验证的信息,所以 FormAuthenticationFilter(这里用FormAuthenticationFilter 来举例) 会直接通过认证。
-
此时我们的其他请求已经通过了AbstractShiroFilter。便可以开始处理请求,请求处理结束后,会将请求后的信息和原先的信息在Session 中进行合并,简单来说就是新的信息覆盖旧的缓存。
以上:内容部分参考 如有侵扰,联系删除。 内容仅用于自我记录学习使用。如有错误,欢迎指正
发表评论
最新留言
关于作者
