Android中使用ViewPager和Fragment实现底部导航栏
发布日期:2021-05-07 23:25:56
浏览次数:12
分类:原创文章
本文共 8004 字,大约阅读时间需要 26 分钟。
1、最终效果展示
附:中间部分可以左右滑动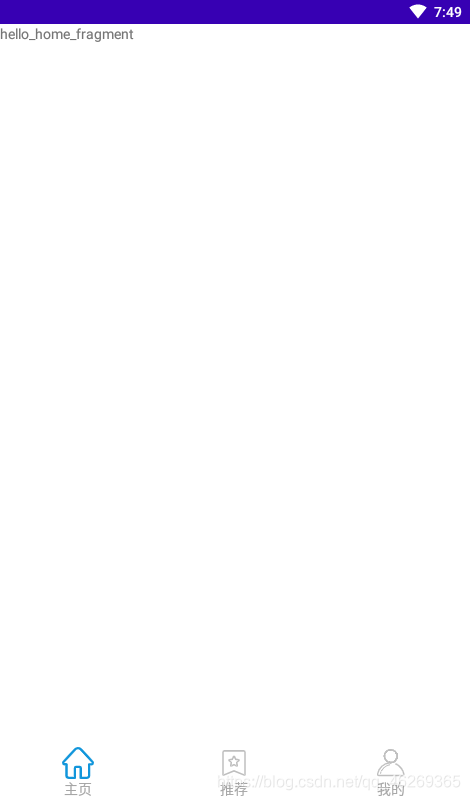
2、核心类和布局
(1)activity_main主页面布局
<?xml version="1.0" encoding="utf-8"?><LinearLayout xmlns:android="http://schemas.android.com/apk/res/android" xmlns:app="http://schemas.android.com/apk/res-auto" xmlns:tools="http://schemas.android.com/tools" android:layout_width="match_parent" android:layout_height="match_parent" android:orientation="vertical" tools:context=".MainActivity"> <!--中间内容部分--> <androidx.viewpager.widget.ViewPager android:id="@+id/id_viewpager" android:layout_width="match_parent" android:layout_height="0dp" android:layout_weight="1" > </androidx.viewpager.widget.ViewPager> <!--底部导航栏部分布局文件--> <include layout="@layout/bottom"/></LinearLayout>(2)底部导航栏部分bottom布局
<?xml version="1.0" encoding="utf-8"?><LinearLayout xmlns:android="http://schemas.android.com/apk/res/android" android:orientation="horizontal" android:layout_width="match_parent" android:layout_height="55dp" android:gravity="center"> <LinearLayout android:id="@+id/id_tab1" android:layout_width="0dp" android:layout_height="wrap_content" android:layout_weight="1" android:gravity="center" android:orientation="vertical" > <ImageButton android:id="@+id/id_tab_img1" android:clickable="false" android:layout_width="wrap_content" android:layout_height="wrap_content" android:src="@drawable/icon1" android:background="#00000000"/> <TextView android:layout_width="wrap_content" android:layout_height="wrap_content" android:textColor="#A6A6A6" android:text="@string/hometab"/> </LinearLayout> <LinearLayout android:id="@+id/id_tab2" android:layout_width="0dp" android:layout_height="wrap_content" android:layout_weight="1" android:gravity="center" android:orientation="vertical"> <ImageButton android:id="@+id/id_tab_img2" android:clickable="false" android:layout_width="wrap_content" android:layout_height="wrap_content" android:src="@drawable/icon2" android:background="#00000000"/> <TextView android:layout_width="wrap_content" android:layout_height="wrap_content" android:textColor="#A6A6A6" android:text="@string/recommendtab"/> </LinearLayout> <LinearLayout android:id="@+id/id_tab3" android:layout_width="0dp" android:layout_height="wrap_content" android:layout_weight="1" android:gravity="center" android:orientation="vertical"> <ImageButton android:id="@+id/id_tab_img3" android:clickable="false" android:layout_width="wrap_content" android:layout_height="wrap_content" android:src="@drawable/icon3" android:background="#00000000"/> <TextView android:layout_width="wrap_content" android:layout_height="wrap_content" android:textColor="#A6A6A6" android:text="@string/minetab"/> </LinearLayout></LinearLayout>(3)MainActivity.java
/** * 使用FragmentActivity,它是基于Fragment实现的活动类 */public class MainActivity extends FragmentActivity implements View.OnClickListener { //声明ViewPager private ViewPager mViewPager; //适配器 private FragmentPagerAdapter mAdapter; //装载Fragment的集合 private List<Fragment> mFragments; //三个Tab对应的布局 private LinearLayout mTab1,mTab2,mTab3; //三个Tab对应的ImageButton private ImageButton mImg1,mImg2,mImg3; @Override protected void onCreate(Bundle savedInstanceState) { super.onCreate(savedInstanceState); requestWindowFeature(Window.FEATURE_NO_TITLE); setContentView(R.layout.activity_main); initViews();//初始化控件 selectTab(0);//初始页面为主页面 initEvents();//初始化事件 initDatas();//初始化数据 } //初始化控件 private void initViews(){ mViewPager = (ViewPager) findViewById(R.id.id_viewpager); mTab1 = (LinearLayout) findViewById(R.id.id_tab1); mTab2 = (LinearLayout) findViewById(R.id.id_tab2); mTab3 = (LinearLayout) findViewById(R.id.id_tab3); mImg1 = (ImageButton) findViewById(R.id.id_tab_img1); mImg2 = (ImageButton) findViewById(R.id.id_tab_img2); mImg3 = (ImageButton) findViewById(R.id.id_tab_img3); } private void initEvents(){ //设置三个Tab的点击事件 mTab1.setOnClickListener(this); mTab2.setOnClickListener(this); mTab3.setOnClickListener(this); } private void initDatas(){ mFragments=new ArrayList<>(); //将三个Fragment加入集合中 mFragments.add(new HomeFragment()); mFragments.add(new RecommendFragment()); mFragments.add(new MineFragment()); //初始化适配器 mAdapter=new FragmentPagerAdapter(getSupportFragmentManager()) { @Override public Fragment getItem(int position) { return mFragments.get(position); } @Override public int getCount() { return mFragments.size(); } }; //设置ViewPager的适配器 mViewPager.setAdapter(mAdapter); //设置ViewPager的切换监听 mViewPager.addOnPageChangeListener(new ViewPager.OnPageChangeListener() { //页面滚动事件 @Override public void onPageScrolled(int position, float positionOffset, int positionOffsetPixels) { } //页面选中事件 @Override public void onPageSelected(int position) { //设置position对应的集合中的fragment mViewPager.setCurrentItem(position); resetImgs(); selectTab(position); } //页面滚动状态改变事件 @Override public void onPageScrollStateChanged(int state) { } }); } @Override public void onClick(View view) { //先将三个ImageButton置为灰色 resetImgs(); switch (view.getId()){ case R.id.id_tab1: selectTab(0); break; case R.id.id_tab2: selectTab(1); break; case R.id.id_tab3: selectTab(2); break; } } //将三个ImageButton设置为灰色 private void resetImgs() { mImg1.setImageResource(R.drawable.icon1); mImg2.setImageResource(R.drawable.icon2); mImg3.setImageResource(R.drawable.icon3); } private void selectTab(int i) { //根据点击的Tab设置对应的ImageButton为选中的颜色 switch (i) { case 0: mImg1.setImageResource(R.drawable.icon1_selected); break; case 1: mImg2.setImageResource(R.drawable.icon2_selected); break; case 2: mImg3.setImageResource(R.drawable.icon3_selected); break; } //设置当前点击的Tab所对应的页面 mViewPager.setCurrentItem(i); }}3、三个fragment,都一样
(1)新建三个blank fragment,我自己的是HomeFragment,RecommendFragment,MineFragment
/** * 首页HomeFragment */public class HomeFragment extends Fragment { @Override public View onCreateView(LayoutInflater inflater, ViewGroup container, Bundle savedInstanceState) { return inflater.inflate(R.layout.fragment_home, container, false); }}(2)三个fragment的布局文件也都一样
<?xml version="1.0" encoding="utf-8"?><FrameLayout xmlns:android="http://schemas.android.com/apk/res/android" xmlns:tools="http://schemas.android.com/tools" android:layout_width="match_parent" android:layout_height="match_parent" tools:context=".first_home.HomeFragment"> <!-- TODO: Update blank fragment layout --> <TextView android:layout_width="match_parent" android:layout_height="match_parent" android:text="@string/hello_home_fragment" /></FrameLayout>附:在此之前也试过另一种办法,可参考:
https://blog.csdn.net/guolin_blog/article/details/13171191
发表评论
最新留言
初次前来,多多关照!
[***.217.46.12]2025年03月31日 12时07分07秒
关于作者

喝酒易醉,品茶养心,人生如梦,品茶悟道,何以解忧?唯有杜康!
-- 愿君每日到此一游!
推荐文章
JDK 内置的多线程协作工具类的使用场景
2019-03-05
Java 中哪些对象可以获取类对象
2019-03-05
linux 的 cp 命令如何复制不提示覆盖
2019-03-05
缓存穿透 / 缓存击穿 / 缓存雪崩 / 缓存一致性
2019-03-05
linux 的 sleep 命令
2019-03-05
js 的 let var const 区别
2019-03-05
vue计算属性和监听器区别
2019-03-05
11.2.6 时间值的小数秒
2019-03-05
11.2.7 日期和时间类型之间的转换
2019-03-05
redis 内存溢出_从数据存储的角度告诉你Redis为什么这么快!
2019-03-05
实例分析Facebook激励视频广告接入
2019-03-05
实例:使用OKGO下载网络压缩包资源,然后解压缩放在本地使用
2019-03-05
解决mybatis嵌套查询使用PageHelper分页不准确
2019-03-05
Redis源码分析(七)--- zipmap压缩图
2019-03-05
大规模集群自动化部署工具--Chef的安装部署
2019-03-05
HDFS源码分析(六)-----租约
2019-03-05
自定义Hive Sql Job分析工具
2019-03-05
聊聊HDFS RBF第二阶段的主要改进
2019-03-05
【MySQL】(九)触发器
2019-03-05
关于Altium Designer 09导出BOM表不能正确分类问题
2019-03-05
白红宇的个人博客 - 记录点点滴滴的事 - 您是第 457264023 位访客