本文共 6688 字,大约阅读时间需要 22 分钟。
使用AVFoundation来录音并播放
使用AVFoundation来录音并播放,翻译自
AV Foundation提供了非常简单的方式来处理音频。在这个教程中,我们主要使用如下的两个类:
- AVAudioPlayer - 可以把它当做一个音频播放器,来播放音乐文件。使用这个播放器,你可以播放iOS支持的音频格式的音频。
- AVAudioRecorder - 用来录制音频。
使用项目模板来开始
首先,创建一个”Single View Application”,并命名为”AudioDemo”。也可以从。
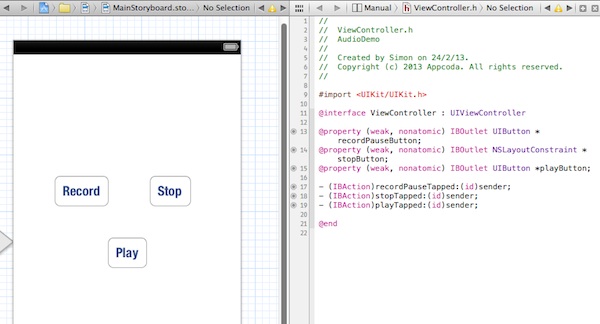
我已经设置好了简单的UI,包含了3个按钮,”Record”,”Stop”,”Play”。按钮已和代码绑定起来。
添加AVFoundation框架
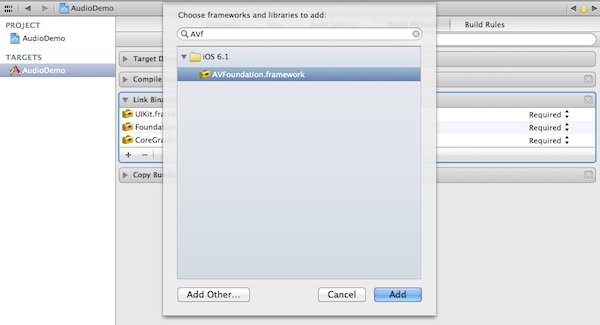
默认情况下,AVFoundation framework并没有和Xcode中的项目捆绑起来。因此,你必须把它手动的加进来。选择”AudioDemo”,在内容区域,在target下选择”AudioDemo”,并点击”Build Phases”。展开”Link Binary with Libraries”,点击”+”按钮,添加”AVFoundation.framework”。
为了使用AVAudioPlayer和AVAudioRecorder类,我们需要在ViewController.h中导入:
#import
使用AVAudioRecorder来录音
在ViewController.h中,添加AVAudioRecorderDelegate和AVAudioPlayerDelegate协议。
@interface ViewController : UIViewController
然后,在ViewController.m中声明AVAudioRecorder和AVAudioPlayer的实例变量:
@interface ViewController () { AVAudioRecorder *recorder; AVAudioPlayer *player;} AVAudioRecorder类提供一种非常容易的方式来录音。为使用recorder,你需要准备一些东西:
- 指定一个音频文件的URL
- 设置audio session
- 配置audio recorder的初始化状态
我们在ViewController.m的viewDidLoad方法中来设置。
- (void)viewDidLoad{ [super viewDidLoad]; // 在application加载时,禁用掉stop和play按钮 [stopButton setEnabled:NO]; [playButton setEnabled:NO]; // 设置音频文件 NSArray *pathComponents = [NSArray arrayWithObjects: [NSSearchPathForDirectoriesInDomains(NSDocumentDirectory, NSUserDomainMask, YES) lastObject], @"MyAudioMemo.m4a", nil]; NSURL *outputFileURL = [NSURL fileURLWithPathComponents:pathComponents]; // 设置audio session AVAudioSession *session = [AVAudioSession sharedInstance]; [session setCategory:AVAudioSessionCategoryPlayAndRecord error:nil]; // 定义录音器设置 NSMutableDictionary *recordSetting = [[NSMutableDictionary alloc] init]; [recordSetting setValue:[NSNumber numberWithInt:kAudioFormatMPEG4AAC] forKey:AVFormatIDKey]; [recordSetting setValue:[NSNumber numberWithFloat:44100.0] forKey:AVSampleRateKey]; [recordSetting setValue:[NSNumber numberWithInt: 2] forKey:AVNumberOfChannelsKey]; // 初始化并准备好录音器 recorder = [[AVAudioRecorder alloc] initWithURL:outputFileURL settings:recordSetting error:NULL]; recorder.delegate = self; recorder.meteringEnabled = YES; [recorder prepareToRecord];} 出于演示的目的,我们跳过了错误的处理。在现实的app中,要进行错误处理。
在上面的代码中,我们首先定义了保存录音文件的URL。然后,配置了audio session。iOS使用audio session来处理audio的行为。加载之后,app自动获取到了一个audio session。你可以通过调用[AVAudioSession sharedInstance]来获取像这样的session,并配置它。这里,我们告知iOS,app使用AVAudioSessionCategoryPlayAndRecord category来enable音频的输入和输出。在这里,我们不会详细的介绍audio session的细节,你可以通过来了解。
AVAudioRecorder使用了基于字典的设置来配置。在21-25行,我们使用了key来配置audio的数据格式,sample rate和number of channels。最后调用prepareToRecord:方法来initiate audio recorder。
对于其他的key,你可以参考
实现录音
当用户点击”Record”按钮的时候,app将会开始录音,button的文字将会改变为”Pause”。如果用户点击”Pause”按钮,app会暂停录音,直至”Record”被点击。在点击”Stop”按钮之后,录音将会停止。
编辑recordPauseTapped:方法,如下:
- (IBAction)recordPauseTapped:(id)sender { // 在录制之前停止音频播放 if (player.playing) { [player stop]; } if (!recorder.recording) { AVAudioSession *session = [AVAudioSession sharedInstance]; [session setActive:YES error:nil]; // 开始录音 [recorder record]; [recordPauseButton setTitle:@"Pause" forState:UIControlStateNormal]; } else { // 暂停录音 [recorder pause]; [recordPauseButton setTitle:@"Record" forState:UIControlStateNormal]; } [stopButton setEnabled:YES]; [playButton setEnabled:NO];} 在上面的代码中,我们首先检查audio player是否在播放。如果audio player正在播放,就使用stop:方法来停止播放。在第7行,检查app是否正在录音。如果不在录音的状态,app就启动audio session,并开始录音。For recording to work (or sound to play), your audio session must be active.
总的来说,你可以通过AVAudioRecorder类的如下的方法来控制录音:
- record - 开始/恢复录音
- pause - 暂停录音
- stop - 停止录音
实现停止录音
对于停止按钮,调用recorder的stop方法,然偶deactivating the audio session。
- (IBAction)stopTapped:(id)sender { [recorder stop]; AVAudioSession *audioSession = [AVAudioSession sharedInstance]; [audioSession setActive:NO error:nil];} 实现AVAudioRecorderDelegate协议
你可以使用AVAudioRecorderDelegate协议来处理audio的中断(例如录音的过程中来了电话),和录音的完成。在这个例子中,ViewController是代理的对象。AVAudioRecorderDelegate协议的方法是可选的。在这里,我们实现的是audioRecorderDidFinishRecording方法来处理录音的完成。在ViewController.m中加入如下的代码:
- (void) audioRecorderDidFinishRecording:(AVAudioRecorder *)avrecorder successfully:(BOOL)flag{ [recordPauseButton setTitle:@"Record" forState:UIControlStateNormal]; [stopButton setEnabled:NO]; [playButton setEnabled:YES]; } 在完成录音之后,改变”Pause”为”Record”。
使用AVAudioPlayer来播放声音
在ViewController.m中,编辑”playTapped:”方法,如下:
- (IBAction)playTapped:(id)sender { if (!recorder.recording){ player = [[AVAudioPlayer alloc] initWithContentsOfURL:recorder.url error:nil]; [player setDelegate:self]; [player play]; }} 上面的代码非常直白。通常情况下,要给audio player配置一些东西:
- 初始化audio player并指派一个声音文件
- 指定audio player的代理对象,来处理中断和完成事件。
- 调用
play方法来播放声音文件。
实现AVAudioPlayerDelegate协议
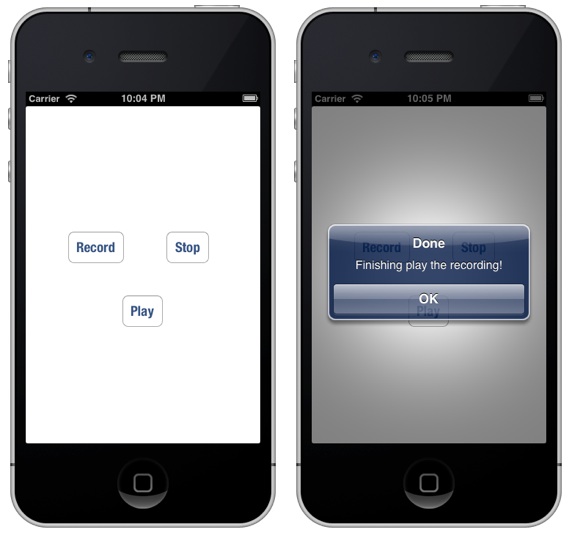
必须采用AVAudioPlayer的AVAudioPlayerDelegate协议。在这个例子中,代理对象是ViewController。代理可用来处理处理中断,audio编码错误和用户界面,当audio播放完成后。AVAudioplayerDelegate协议中方法都是可选的。为了展示它是机制,我们实现了audioPlayerDidFinishPlaying:方法,在audio播放结束后来显示一个alert。至于其它方法的使用,请参考关于。
在ViewController.m中,添加如下的代码:
- (void) audioPlayerDidFinishPlaying:(AVAudioPlayer *)player successfully:(BOOL)flag{ UIAlertView *alert = [[UIAlertView alloc] initWithTitle: @"Done" message: @"Finish playing the recording!" delegate: nil cancelButtonTitle:@"OK" otherButtonTitles:nil]; [alert show];} 编译并运行
你可以在真实设备或者模拟器上来测试。
你可以来参考。
补充
其它参考资料:
录音的设置如下:
NSURL *audioFileURL = [NSURL fileURLWithPath:[NSTemporaryDirectory() stringByAppendingString:@"audioRecording.m4a"]]; NSDictionary *audioSettings = [NSDictionary dictionaryWithObjectsAndKeys: [NSNumber numberWithFloat:44100],AVSampleRateKey, [NSNumber numberWithInt: kAudioFormatAppleLossless],AVFormatIDKey, [NSNumber numberWithInt: 1],AVNumberOfChannelsKey, [NSNumber numberWithInt:AVAudioQualityMedium],AVEncoderAudioQualityKey,nil];
- AVSampleRateKey – The sample rate, CD’s are usually sampled at 44100, so this float number should never usually change.
- AVFormatIDKey – This is the format for the audio, we chose apple lossless, but there are a few to choose from like mpeg 4 and many other common formats.
- AVNumberOfChannelsKey – This sets the channels we record, since we’re recording mono(单声道) there was no need for stereo so we chose 1. A mono recording. For stereo(立体声) choose 2.
- AVEncoderAudioQualityKey – Here again you have many to choose from (min,max,high,low) I chose medium for a good balance of quality and file size.
总结的很全面。
转载地址:https://windzen.blog.csdn.net/article/details/53610113 如侵犯您的版权,请留言回复原文章的地址,我们会给您删除此文章,给您带来不便请您谅解!
发表评论
最新留言
关于作者
