本文共 5847 字,大约阅读时间需要 19 分钟。
目标检测就是对目标进行动态实时跟踪定位,常见的目标检测算法有 R-CNN、Fast R-CNN、Faster R-CNN、SSD、Yolo 等,其中 Yolo 的速度和精确度都比较高,且只需训练一次,使用起来比较方便。
这里我们就使用官方现成的模型来检测图片,看一看效果,先学会使用流程,以后再训练自己的模型。
注意:opencv-python 目前只有 4.4.0 版本适配了 YOLOv4
导入库
import numpy as npimport timeimport cv2
- 1
- 2
- 3
设置标签和标注颜色
LABELS = open("coco.names").read().strip().split("\n")np.random.seed(666)COLORS = np.random.randint(0, 255, size=(len(LABELS), 3), dtype="uint8") - 1
- 2
- 3
coco.names 内包含了很多目标标签,如 person、bicycle、car 等,且按一定顺序排列,里面基本包含了 Yolo 官方模型中可检测的对象。该文件可从以下链接中提取:
每个对象配备了不一样的颜色,以便在图片中标记时便于区分。
加载网络
# 导入 YOLO 配置和权重文件并加载网络:net = cv2.dnn_DetectionModel('yolov4.cfg', 'yolov4.weights')# 获取 YOLO 未连接的输出图层layer = net.getUnconnectedOutLayersNames() - 1
- 2
- 3
- 4
yolov4.cfg 和 yolov4.weights 文件就是官方提供的模型,下载链接: 提取码:xsxb 。如果失效,可以直接百度搜索 Yolov4模型下载,有很多人都分享出来了。
cv2.dnn_DetectionModel 是 opencv 4.1.2 开始新增的方法,用于加载网络。以前是使用 cv2.dnn.readNetFromDarknet ,此处使用也可以达到同样的效果。
getUnconnectedOutLayersNames() 用于提取输出图层的名称,yolo 含有很多的图层,可以使用 getLayerNames() 将所有图层的名称提取出来。但在这里,我们只需要使用 yolo 的最后输出图层。
检测图片
# 导入图片image = cv2.imread('timg.jpg')# 获取图片尺寸(H, W) = image.shape[:2]# 从输入图像构造一个 blob,然后执行 YOLO 对象检测器的前向传递,给我们边界盒和相关概率blob = cv2.dnn.blobFromImage(image, 1/255.0, (416, 416), swapRB=True, crop=False)net.setInput(blob)start = time.time()# 前向传递,获得信息layerOutputs = net.forward(layer)# 用于得出检测时间end = time.time()print("[INFO] YOLO took {:.6f} seconds".format(end - start)) - 1
- 2
- 3
- 4
- 5
- 6
- 7
- 8
- 9
- 10
- 11
- 12
- 13
- 14
- 15
blobFromImage 用于对图像进行预处理
cv2.dnn.blobFromImage(image[, scalefactor[, size[, mean[, swapRB[, crop[, ddepth]]]]]]) - image:输入图像
- scalefactor:图像各通道数值的缩放比例
- size:输出图像的空间尺寸
- mean:用于各通道减去的值,以降低光照的影响
- swapRB:交换 RB 通道,默认为 False
- crop:图像裁剪,默认为 False。当值为 True 时,先按比例缩放,然后从中心裁剪成 size 尺寸
- ddepth:输出的图像深度,可选 CV_32F 或者 CV_8U
数据提取
boxes = []confidences = []classIDs = []# 循环提取每个输出层for output in layerOutputs: # 循环提取每个框 for detection in output: # 提取当前目标的类 ID 和置信度 scores = detection[5:] classID = np.argmax(scores) confidence = scores[classID] # 通过确保检测概率大于最小概率来过滤弱预测 if confidence > 0.5: # 将边界框坐标相对于图像的大小进行缩放,YOLO 返回的是边界框的中心(x, y)坐标, # 后面是边界框的宽度和高度 box = detection[0:4] * np.array([W, H, W, H]) (centerX, centerY, width, height) = box.astype("int") # 转换出边框左上角坐标 x = int(centerX - (width / 2)) y = int(centerY - (height / 2)) # 更新边界框坐标、置信度和类 id 的列表 boxes.append([x, y, int(width), int(height)]) confidences.append(float(confidence)) classIDs.append(classID) - 1
- 2
- 3
- 4
- 5
- 6
- 7
- 8
- 9
- 10
- 11
- 12
- 13
- 14
- 15
- 16
- 17
- 18
- 19
- 20
- 21
- 22
- 23
- 24
- 25
3 个列表内保存的内容:
- boxes:对象的边界框
- confidences :YOLO 分配给对象的置信度值,较低的置信度值表示该对象可能不是网络认为的对象。上面的代码中将过滤掉小于 0.5 阈值的对象
- classIDs:检测到的对象的类标签
这样每个被提取出的对象,都确定了标签和区域坐标就、位置。接下来就是在图片中标记出来,便于我们观看。
标记显示
# 非最大值抑制,确定唯一边框idxs = cv2.dnn.NMSBoxes(boxes, confidences, 0.5, 0.3)# 确定每个对象至少有一个框存在if len(idxs) > 0: # 循环画出保存的边框 for i in idxs.flatten(): # 提取坐标和宽度 (x, y) = (boxes[i][0], boxes[i][1]) (w, h) = (boxes[i][2], boxes[i][3]) # 画出边框和标签 color = [int(c) for c in COLORS[classIDs[i]]] cv2.rectangle(image, (x, y), (x + w, y + h), color, 1, lineType=cv2.LINE_AA) text = "{}: {:.4f}".format(LABELS[classIDs[i]], confidences[i]) cv2.putText(image, text, (x, y - 5), cv2.FONT_HERSHEY_SIMPLEX, 0.5, color, 1, lineType=cv2.LINE_AA)cv2.imshow("Tag", image)cv2.waitKey(0) - 1
- 2
- 3
- 4
- 5
- 6
- 7
- 8
- 9
- 10
- 11
- 12
- 13
- 14
- 15
- 16
- 17
对于每个对象,Yolo 会框出 3 个左右的区域,我们只需要显示出最合适的区域。非最大值抑制,就是搜索出局部最大值,将置信度最大的框保存,其余剔除。
cv2.dnn.NMSBoxes(bboxes, scores, score_threshold, nms_threshold, eta=None, top_k=None)
- bboxes:一组边框
- scores:一组对应的置信度
- score_threshold:置信度的阈值
- nms_threshold:非最大抑制的阈值
之后将每个对象的方框和标签都画出来
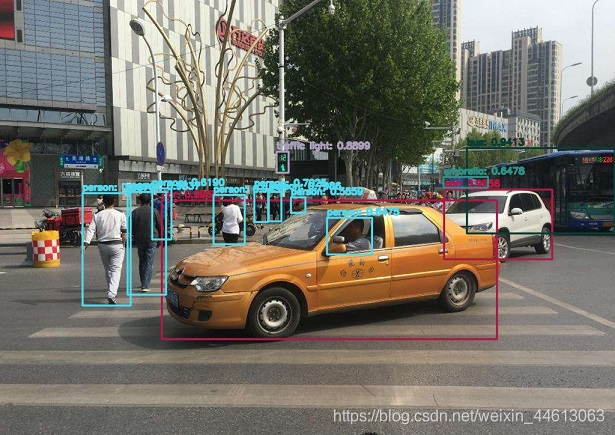
结果展示:
完整代码
import numpy as npimport timeimport cv2LABELS = open("coco.names").read().strip().split("\n")np.random.seed(666)COLORS = np.random.randint(0, 255, size=(len(LABELS), 3), dtype="uint8")# 导入 YOLO 配置和权重文件并加载网络:net = cv2.dnn_DetectionModel('yolov4.cfg', 'yolov4.weights')# 获取 YOLO 未连接的输出图层layer = net.getUnconnectedOutLayersNames()image = cv2.imread('timg.jpg')# 获取图片尺寸(H, W) = image.shape[:2]# 从输入图像构造一个 blob,然后执行 YOLO 对象检测器的前向传递,给我们边界盒和相关概率blob = cv2.dnn.blobFromImage(image, 1/255.0, (416, 416), swapRB=True, crop=False)net.setInput(blob)start = time.time()# 前向传递,获得信息layerOutputs = net.forward(layer)# 用于得出检测时间end = time.time()print("YOLO took {:.6f} seconds".format(end - start))boxes = []confidences = []classIDs = []# 循环提取每个输出层for output in layerOutputs: # 循环提取每个框 for detection in output: # 提取当前目标的类 ID 和置信度 scores = detection[5:] classID = np.argmax(scores) confidence = scores[classID] # 通过确保检测概率大于最小概率来过滤弱预测 if confidence > 0.5: # 将边界框坐标相对于图像的大小进行缩放,YOLO 返回的是边界框的中心(x, y)坐标, # 后面是边界框的宽度和高度 box = detection[0:4] * np.array([W, H, W, H]) (centerX, centerY, width, height) = box.astype("int") # 转换出边框左上角坐标 x = int(centerX - (width / 2)) y = int(centerY - (height / 2)) # 更新边界框坐标、置信度和类 id 的列表 boxes.append([x, y, int(width), int(height)]) confidences.append(float(confidence)) classIDs.append(classID)# 非最大值抑制,确定唯一边框idxs = cv2.dnn.NMSBoxes(boxes, confidences, 0.5, 0.3)# 确定每个对象至少有一个框存在if len(idxs) > 0: # 循环画出保存的边框 for i in idxs.flatten(): # 提取坐标和宽度 (x, y) = (boxes[i][0], boxes[i][1]) (w, h) = (boxes[i][2], boxes[i][3]) # 画出边框和标签 color = [int(c) for c in COLORS[classIDs[i]]] cv2.rectangle(image, (x, y), (x + w, y + h), color, 1, lineType=cv2.LINE_AA) text = "{}: {:.4f}".format(LABELS[classIDs[i]], confidences[i]) cv2.putText(image, text, (x, y - 5), cv2.FONT_HERSHEY_SIMPLEX, 0.5, color, 1, lineType=cv2.LINE_AA)cv2.imshow("Tag", image)cv2.waitKey(0) 发表评论
最新留言
关于作者
