Android 自定义流式布局
发布日期:2021-05-14 01:37:43
浏览次数:20
分类:原创文章
本文共 6508 字,大约阅读时间需要 21 分钟。
前言
自定义布局FlowLayout实现了界面的流式布局,子控件水平排列,直到排满后换行显示。
FlowLayout需要继承ViewGroup类,覆盖onMeasure(int, int)和onLayout(boolean, int, int, int, int)的方法。
1. 自定义LayoutParams
为了控制子控件的布局,自定义LayoutParams类,设置对齐方式。
public static class LayoutParams extends ViewGroup.LayoutParams { public static final int GRAVITY_TOP = 0; public static final int GRAVITY_MIDDLE = 1; public static final int GRAVITY_BOTTOM = 2; int gravity = GRAVITY_TOP; public LayoutParams(Context c, AttributeSet attrs) { super(c, attrs); TypedArray a = c.obtainStyledAttributes(attrs, R.styleable.FlowLayout_Layout); gravity = a.getInt(R.styleable.FlowLayout_Layout_gravity, GRAVITY_TOP); a.recycle(); } public LayoutParams(int width, int height) { super(width, height); } public LayoutParams(ViewGroup.LayoutParams source) { super(source); if (source instanceof LayoutParams) { gravity = ((LayoutParams) source).gravity; } }}同时定义FlowLayout_Layout
<declare-styleable name="FlowLayout_Layout"> <attr name="gravity"> <enum name="top" value="0"/> <enum name="middle" value="1"/> <enum name="bottom" value="2"/> </attr></declare-styleable>在FlowLayout中添加支持LayoutParams代码。
@Overrideprotected boolean checkLayoutParams(ViewGroup.LayoutParams p) { return p != null && p instanceof LayoutParams;}@Overrideprotected LayoutParams generateDefaultLayoutParams() { return new LayoutParams(LayoutParams.WRAP_CONTENT, LayoutParams.WRAP_CONTENT);}@Overrideprotected LayoutParams generateLayoutParams(ViewGroup.LayoutParams p) { return new LayoutParams(p);}@Overridepublic LayoutParams generateLayoutParams(AttributeSet attrs) { return new LayoutParams(getContext(), attrs);}2. onMeasure方法
onMeasure(int, int)方法通过计算子控件的高度和宽度获取自身高度。
@Overrideprotected void onMeasure(int widthMeasureSpec, int heightMeasureSpec) { int width = MeasureSpec.getSize(widthMeasureSpec); int height = 0; int count = getChildCount(); int startX = 0; int childHeight = 0; for (int index = 0; index < count; index++) { View child = getChildAt(index); if (child.getVisibility() != View.GONE) { // 计算child宽高 measureChild(child, widthMeasureSpec, heightMeasureSpec); // 如果超过一行,换行重新开始 if (startX + child.getMeasuredWidth() > width) { height += childHeight; childHeight = child.getMeasuredHeight(); startX = child.getMeasuredWidth(); } else { childHeight = Math.max(childHeight, child.getMeasuredHeight()); startX += child.getMeasuredWidth(); } } } height += childHeight; setMeasuredDimension(widthMeasureSpec, MeasureSpec.makeMeasureSpec(height, MeasureSpec.EXACTLY));}3. onLayout方法
onLayout(boolean, int, int, int, int)方法对子控件进行布局显示。 其中left、top、right和bottom代表在父View中的距离,宽度是right-left,高度是bottom-top。
@Overrideprotected void onLayout(boolean changed, int left, int top, int right, int bottom) { int count = getChildCount(); int startX = 0; int height = 0; int width = right - left; int childHeight = 0; int startIndex = 0; for (int index = 0; index < count; index++) { View child = getChildAt(index); if (child.getVisibility() != View.GONE) { // 如果超过一行,换行显示 if (startX + child.getMeasuredWidth() > width) { if (index > startIndex) { layoutChildren(height, childHeight, startIndex, index); } startIndex = index; height += childHeight; startX = child.getMeasuredWidth(); childHeight = child.getMeasuredHeight(); } else { childHeight = Math.max(childHeight, child.getMeasuredHeight()); startX += child.getMeasuredWidth(); } } } if (startIndex < count) { layoutChildren(height, childHeight, startIndex, count); }}private void layoutChildren(int top, int childHeight, int startIndex, int endIndex) { int startX = 0; for (int index = startIndex; index < endIndex; index++) { View child = getChildAt(index); if (child.getVisibility() != View.GONE) { LayoutParams lp = (LayoutParams) child.getLayoutParams(); int offsetY = 0; if (lp.gravity == LayoutParams.GRAVITY_MIDDLE) { offsetY = (childHeight - child.getMeasuredHeight()) / 2; } else if (lp.gravity == LayoutParams.GRAVITY_BOTTOM) { offsetY = childHeight - child.getMeasuredHeight(); } child.layout(startX, top + offsetY, startX + child.getMeasuredWidth(), top + offsetY + child.getMeasuredHeight()); startX += child.getMeasuredWidth(); } }}4. 布局文件
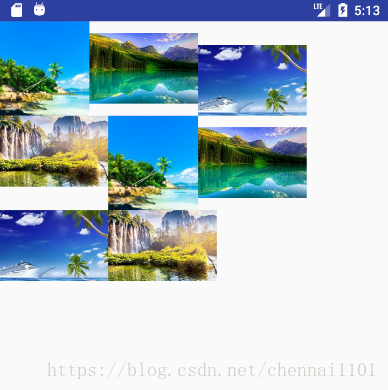
<com.blog.demo.custom.widget.FlowLayout android:layout_width="match_parent" android:layout_height="match_parent"> <ImageView android:layout_width="95dp" android:layout_height="100dp" android:src="@drawable/flow_1" android:scaleType="fitXY" /> <ImageView android:layout_width="115dp" android:layout_height="75dp" android:src="@drawable/flow_2" android:scaleType="fitXY" app:gravity="middle"/> <ImageView android:layout_width="115dp" android:layout_height="75dp" android:src="@drawable/flow_3" android:scaleType="fitXY" app:gravity="bottom"/> <ImageView android:layout_width="115dp" android:layout_height="75dp" android:src="@drawable/flow_4" android:scaleType="fitXY" /> <ImageView android:layout_width="95dp" android:layout_height="100dp" android:src="@drawable/flow_1" android:scaleType="fitXY" /> <ImageView android:layout_width="115dp" android:layout_height="75dp" android:src="@drawable/flow_2" android:scaleType="fitXY" app:gravity="middle"/> <ImageView android:layout_width="115dp" android:layout_height="75dp" android:src="@drawable/flow_3" android:scaleType="fitXY" app:gravity="bottom"/> <ImageView android:layout_width="115dp" android:layout_height="75dp" android:src="@drawable/flow_4" android:scaleType="fitXY" /></com.blog.demo.custom.widget.FlowLayout>效果如下
源码下载:
相关文章
发表评论
最新留言
路过,博主的博客真漂亮。。
[***.116.15.85]2025年04月21日 19时53分08秒
关于作者

喝酒易醉,品茶养心,人生如梦,品茶悟道,何以解忧?唯有杜康!
-- 愿君每日到此一游!
推荐文章
包装类
2021-05-14
JDK9-15新特性
2021-05-14
集合继承结构
2021-05-14
ArrayList 实现类
2021-05-14
LinkedList 实现类
2021-05-14
Vector 实现类
2021-05-14
HashMap类、HashSet
2021-05-14
HashTable类
2021-05-14
TreeSet、TreeMap
2021-05-14
PrintStream
2021-05-14
白红宇的个人博客 - 记录点点滴滴的事 - 您是第 461196368 位访客
访问时间: 2025-05-04 16:45:56
访问IP: 18.227.49.178
Copyright © 2020 - 2025 css8.cn 京ICP备2021015314号-1
手机版