本文共 9499 字,大约阅读时间需要 31 分钟。
文章目录
系统信息显示及磁盘空间统计
项目目标
- 统计磁盘某个文件目录下子目录、子文件所占空间的大小
- 通过曲线图实时展示CPU 占有率
项目使用技术栈与平台
- 所用技术:javaSE/javafx
- 平台与环境:windows 10/jdk1.8/idea
项目功能
- 显示CPU 占有率,OS 版本,内存大小,操作系统架构等系统信息
- 文件目录扫描
项目展示:
(1)显示CPU 占有率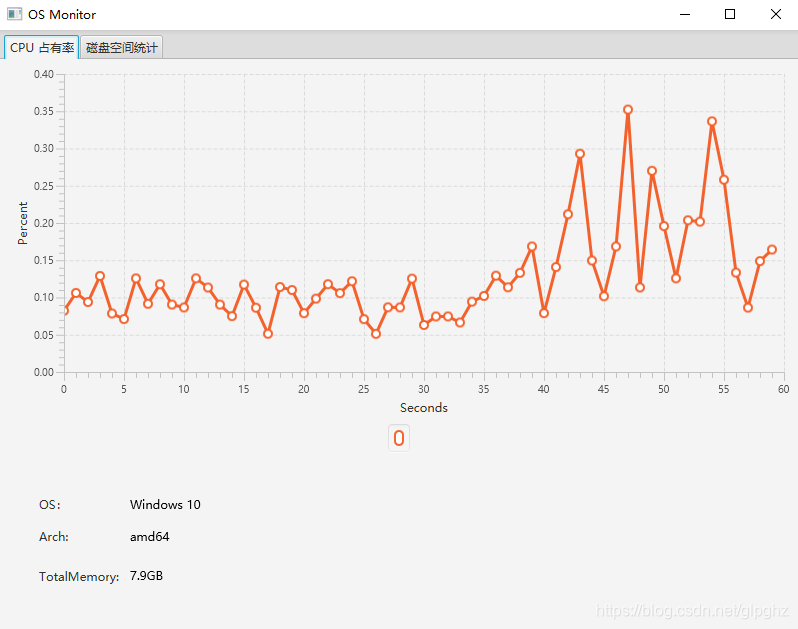 (2) 磁盘空间统计
Ⅰ 项目模块
- 项目总体模块框图
- 创建主程序
- fxml 描述UI
- CPU 占有率Tab 页设计
- 磁盘扫描Tab 页设计
- Controller 模块
- 系统资源获取模块
- 文件目录扫描模块
(1)项目总体模块框图
OS Monitor 项目结构分为两部分:UI 部分和逻辑部分。
UI 部分:主程序、磁盘空间扫描Tab 页、CPU 占有率Tab 页、Controller。UI 部分是通过javafx来实现。 逻辑部分:系统资源获取、文件目录扫描。系统资源是通过OperatingSystemMXBean 来获取。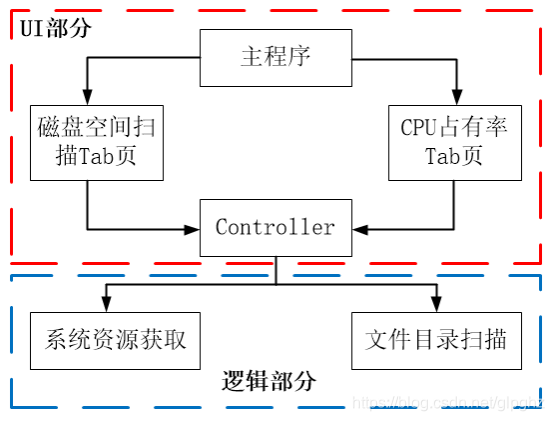 (2)JavaFX javaFX 是JAVA 的GUI (图形用户界面)工具箱,javafx能够使用布局文件(XML)设计GUI 并使用CSS 设置样式。JavaFX 还将2D 和3D 图形、图表,以及音频、视频和嵌入式Web应用程序集成到一个GUI工具包中。 javafx 的核心构架:
 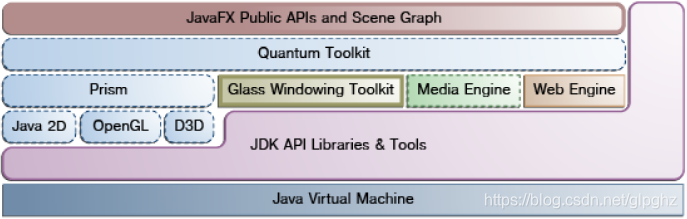 javafx 控件:
 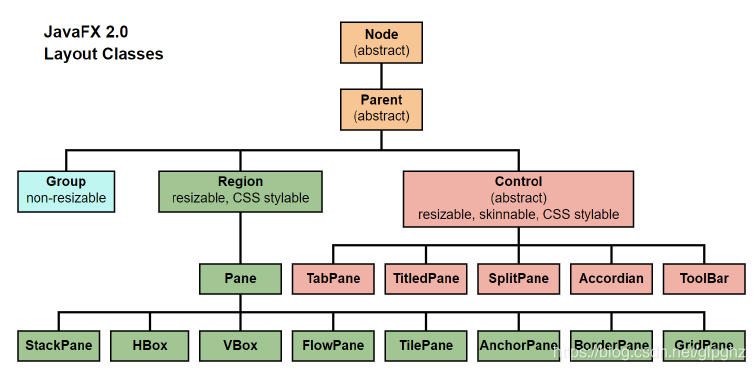 javafx 中的控件是一个树形结构,每个节点都是一个控件,所有控件都是从Node 派生下来的,所以每个控件都可以叫做Node。 JavaFX编程指南:
 (3)创建项目:
打开Idea,选择菜单"file" -> “new” -> “project” 。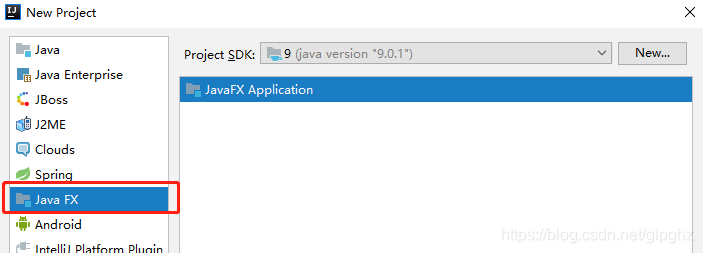 (4)创建主程序 将项目自动生成的主程序Main替换成我们的OSMonitorApplication。
 public class OSMonitorApplication extends Application { @Override public void start(Stage primaryStage) throws Exception { // 1. 加载.fxml 文件 FXMLLoader loader = newFXMLLoader(getClass().getClassLoader().getResource("os_monitor_tab1.fxml")); Parent root = loader.load();// 2. 创建一个场景对象 Scene scene = new Scene(root, 800, 600); // 3. 给舞台对象设置标题 primaryStage.setTitle("OS Monitor"); // 4. 给舞台对象stage 设置场景对象scene primaryStage.setScene(scene); // 5. 展示舞台 primaryStage.show(); }} 加载.fxml 文件:
//getResource从resource下获取资源,类加载器FXMLLoader loader = new FXMLLoader(getClass().getClassLoader().getResource("os_monitor_tab.fxml")); 真正的加载:
Parent root = loader.load();
注意:
- 所有javafx 主程序必须派生自Application 类
- 子类必须override 父类的start 方法
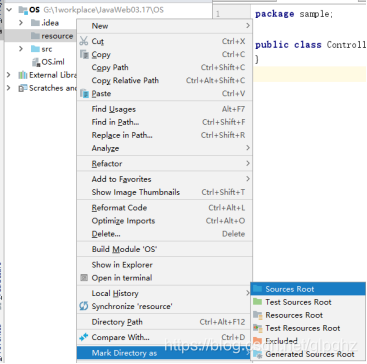
创建一个资源文件夹resource,并将其标记为资源路径:
 (5)fxml 描述UI 我们要用自己设计的UI 替换工程自动生成的.fxml 文件(UI的设计部分主要由SceneBuilder来完成)。UI 的主题框架是通过fxml 来描述。UI 交互比较简单,只有两个tab 页。fxml 中所有元素名称都是Javafx 中的类名或者是类的属性名,元素的属性是javafx 中类的属性。
 UI 主框架包含两个tab 页,用到的控件是<TabPane> 和<Tab> 。<TabPane> 代表tab页所在的容器面板,代表一个个的tab 页。
// 导入类路径... ...
(6)CPU 占有率Tab 页设计
CPU 占有率= CPU 执行程序时间/ 统计周期时间。比如,每100ms 统计一次占用率,如果CPU 执行程序用了90ms,那么CPU 占用率是90/100 = 90%。CPU 执行程序时间包括:用户程序执行时间和内核空间执行时间。CPU 占有率Tab 页主要是通过<LineChart> 控件绘制曲线图,x 轴和y 轴都用<NumberAxis> 控件。通过<Tab> 控件的onSelectionChanged 属性设置监听事件的方法:handleCPUSelectionChanged。 (7)磁盘扫描Tab 页设计
磁盘扫描Tab 页主要是用到了<TreeTableView> 控件,绘制一个树形表格。另外设计了一个<Button> 控件来选择文件目录,通<Button> 控件的onAction 属性设置监听事件的方法:handleSelectFile。 (8)Controller 模块(只有Controller和xml文件是直接关联的)
Controller 主要是用于处理UI 事件,需要将此类添加到.fxml 文件中,我们用到的顶级容器是<VBox> ,通过fx:controller 属性设置Controller 类的包路径,方法如下:
在Controller 中,我们需要处理两个事件:CPU 占有率和目录结构统计,代码如下:
// 磁盘目录扫描事件处理方法public void handleSelectFile(ActionEvent actionEvent){ // 1. 打开文件选择对话框 // 2. 开启磁盘目录扫描线程 // 3. 渲染TreeTableView}// CPU 占有率事件处理方法public void handleCPUSelectionChanged(Event event) { // 1. 创建一个定时器,每隔一秒获取一次CPU资源绘制曲线图 // 2. 绘制LineChart} 注意:
在Controller中可以通过xml中控件的id名对控件进行调用。(9) 系统资源获取模块
系统资源获取采用的是OperatingSystemMXBean,这是一个JMX 接口,用于获取运行JVM 的系统的资源信息,比如,CPU 占有率,OS 版本,内存大小等等。我们用的是com.sun.management.OperatingSystemMXBean 类。 绘制CPU 占有率曲线的核心思想:
- 每隔一秒对CPU 占有率进行一次采样,作为数轴的y 坐标
- 我们一共保存60 秒,即1 分钟的样本点,时间作为x 坐标。
- 用一个数组保存坐标(x,y),每一次采样,需要把之前采样的坐标点的x 坐标减1,这样绘制的时候就会产生移动的效果。
private static final int DATA_LENGH = 60;private static XYPair[] cpuDatas = new XYPair[DATA_LENGH];private static int firstIndex = DATA_LENGH;private static void moveCPUData(double cpuPercetage){ int movIdx = -1; if (firstIndex == 0){ movIdx = firstIndex + 1; }else { movIdx = firstIndex; firstIndex--; } for (; movIdx < cpuDatas.length; ++movIdx){ cpuDatas[movIdx-1].setX(cpuDatas[movIdx].getX()-1); cpuDatas[movIdx-1].setY(cpuDatas[movIdx].getY()); } movIdx--; cpuDatas[movIdx] = new XYPair(movIdx, cpuPercetage);} (10) 文件目录扫描模块
文件目录扫描比较简单,核心思想是:用递归的方式遍历文件目录结构,统计某个目录下面所有子目录占用总的磁盘空间大小,然后再做一个汇总。File[] files = node.getFile().listFiles();if (files == null) { return;}for (File file : files) { FileTreeNode child = new FileTreeNode(); child.setFile(file); child.setFileName(file.getName()); if (file.isDirectory()) { scannerDirectory(child); } else { child.setTotalLength(file.length()); } node.setTotalLength(node.getTotalLength() + child.getTotalLength()); node.addChildNode(child);} Ⅱ CPU占有率小记
利用JMX 获取系统资源,内存,cpu占有率等
private static OperatingSystemMXBean mxBean = ManagementFactory.getPlatformMXBean(OperatingSystemMXBean.class);
需要将CPUchart和我们构建的坐标点联系起来,cpuChart即为xml中的id名。
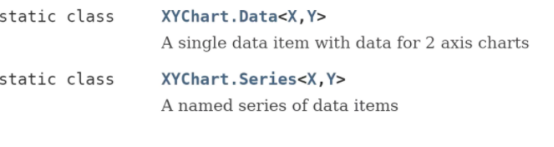 逻辑部分和Ui部分的坐标点转换:
 //拿到坐标点OSResource.XYPair[] xyPairs = OSResource.getCPUPercetage();XYChart.Series series = new XYChart.Series();//用XYChart存放坐标点,Series里面有很多坐标点for(OSResource.XYPair xyPair:xyPairs){ //将数据转换为XYChart的坐标 XYChart.Data data = new XYChart.Data(xyPair.getX(),xyPair.getY()); series.getData().add(data);} 加入定时器:每隔一段时间,执行一次任务;
//定时器线程private Timer timer = new Timer();//定时器任务private TimerTask timerTask = null;//创建一个线程任务timerTask = new TimerTask() { @Override public void run() { //具体任务//将数据转换为XYChart的坐标};//0代表任务安排后,立刻执行,1000ms为周期执行时间timer.schedule(timerTask,0,1000); 拿到要触发事件的对象
Tab tab = (Tab)event.getTarget();//拿到触发事件的对象
注意:
在gui程序中,ui界面的渲染需要在主线程完成,不能在子线程中完成。ui里提供了一个方法,可以将线程切换到主线程中执行。
//将渲染逻辑切换到主线程执行Platform.runLater( () ->{ //清除上一次图表中的数据点 if(cpuChart.getData().size()>0){ cpuChart.getData().remove(0); } cpuChart.getData().add(series);//数据点 osType.setText(OSResource.getOSName()); cpuArch.setText(OSResource.getcpuArch()); Version.setText(OSResource.getVersion()); }); Ⅲ 磁盘统计小记
创建一个目录选择器
DirectoryChooser directoryChooser = new DirectoryChooser();
拿到OSmonistor的窗体primaryStage
//定义一个空的窗体private Stage primaryStage = null;public void setPrimaryStage(Stage primaryStage) { this.primaryStage = primaryStage;} 在主函数中,将窗体传给Controller。
OSMonitorController controller=loader.getController();//加载fxml时,loader包含controller//将主窗口primaryStage传给OSMonitorControllercontroller.setPrimaryStage(primaryStage);
将弹出的对话框附着在primaryStage,并返回一个我们选择的目录或文件对象
File file = directoryChooser.showDialog(primaryStage);//file代表返回的选择目录或文件
TreeTableView是一个泛型类:@FXML private TreeTableView<FileTreeNode> fileStat;
//准备好逻辑部分后开始渲染TreeItem rootItem = new TreeItem(rootNode, new ImageView(image));
这只是将根节点转换过来了。
注意:
private String fileName;//文件名private long totalLength;//文件的总长Listchildrens = new ArrayList<>();//记录子目录
这里的文件名和文件总长要和xml中的一致
xml和Controller中的一致:
@FXML private TreeTableView fileStat;
组建逻辑部分树结构的时候采用的递归,那么渲染的时候也要采用递归 逻辑部分:
import java.io.File;public class FileScanner { //深序遍历 public static void scannerDirectory(FileTreeNode node) { //获取当前目录的子目录或文件列表 File[] files = node.getFile().listFiles();//File的一个方法listFiles返回一个文件对象的数组 if (files == null) { return; } //遍历子目录或者文件 for (File file : files) { FileTreeNode child = new FileTreeNode(); child.setFile(file); child.setFileName(file.getName()); if (file.isDirectory()) { //继续递归子目录 scannerDirectory(child); } else { //计算文件大小 child.setTotalLength(file.length()); } node.setTotalLength(node.getTotalLength() + child.getTotalLength()); node.addChildNode(child); } }} 树表渲染部分:
//递归渲染 FileTreeNode转为TreeItemprivate void fillTreeItem(FileTreeNode rootNode, TreeItem rootItem){ List childs = rootNode.getChildrens(); for(FileTreeNode node:childs){ //树转换 TreeItem item = new TreeItem(node); //如果孩子节点大于0,说明还有子目录 if(node.getChildrens().size()>0){ item.setGraphic(new ImageView(image)); } rootItem.getChildren().add(item); //递归 fillTreeItem(node,item); }} 对根节点进行渲染
//转换到主线程执行Platform.runLater( () ->{ fileStat.setRoot(rootItem); }); 注意:
设置setDaemon,当线程结束时,自动释放资源。thread.setDaemon(true);//线程执行完毕自动释放资源
允许树自动展开
rootItem.setExpanded(true);//树展开
加载文件夹图标:
private final Image image = new Image(getClass().getClassLoader().getResourceAsStream("Folder.png")); TreeItem的构造方法中允许插入图标
public TreeItem(final T value, final Node graphic)
设置根节点图标:
TreeItem rootItem = new TreeItem(rootNode, new ImageView(image));
将子树也设置文件夹图标:
//如果孩子节点大于0,说明还有子目录if(node.getChildrens().size()>0){ item.setGraphic(new ImageView(image));} 清空上一次选择的数据:
//在重新选择时,清空数据fileStat.setRoot(null);
关掉定时器:
//Tab页没被选中时,关掉定时器TimerTaskif(timerTask!=null){ timerTask.cancel(); timerTask = null;} //程序退出时,退出timer线程public void shutdown(){ if(timer !=null){ timer.cancel(); }} 当请求关闭窗口时,调用shutdown方法
//当关闭窗口时,关闭timer线程primaryStage.setOnCloseRequest((e) -> controller.shutdown());
发表评论
最新留言
关于作者
