本文共 8577 字,大约阅读时间需要 28 分钟。
文章目录
安装 wxPython:
对于 Python3.0 以上版本,需要安装一个叫 Phoenix 的东东。
https://www.wxpython.org/当然,建议用 pip install 啦
文档
https://docs.wxpython.org/wx.1moduleindex.html
初始案例
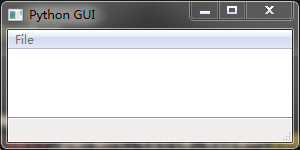
import wxclass GUI(wx.Frame): #继承 wx.Frame def __init__(self,parent,title,size=(200,100)): wx.Frame.__init__(self,parent,title=title,size=size) self.SetBackgroundColour('white') self.CreateStatusBar() #创建状态栏 menu = wx.Menu() #菜单栏设置 menu.Append(wx.ID_ABOUT,"About",'wxPython GUI') #‘wxPython GUI’ 是状态栏中显示的提示文本。。 menu.AppendSeparator() menu.Append(wx.ID_EXIT,"Exit",'wxPython GUI') menuBar = wx.MenuBar() menuBar.Append(menu,'File') self.SetMenuBar(menuBar) #创建菜单栏 self.Show() #一定要加上这句,否则无法显示app = wx.App() GUI(None,"Python GUI",(300,150))app.MainLoop() # 注意与之前章节的对比,之前是直接创建对象 OOP,调用 OOP.win.mainloop#这里是创建一个 App,在用 app.MainLoop(),而把创建对象的代码写在中间,且不需要赋给任何变量 效果如下:
更进一步
在上一节中,我们将 GUI 对象继承自 wx.Frame。下面,我们将继承 wx.Panel。并将 wx.Frame 作为构造方法的参数。
在 wxPython 中,GUI 的顶层窗口必须是 frame。wxPython 构建的 GUI 控件,不能独立于 frame 而存在。
frame 必须称为 wxPython 应用(App)的一部分 在下面代码中,我们将在最后面创建 App 和 frame
为了配置我们的 GUI 控件,我们必须将所有控件都附加给一个 Panel 对象。而 Panel 对象的 parent(相当于 tkiner 中的 master)是 frame,也即我们 GUI 的 top-level。
代码:
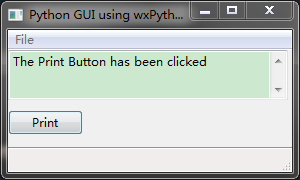
import wxclass GUI(wx.Panel): def __init__(self,parent): wx.Panel.__init__(self,parent) parent.CreateStatusBar() menu = wx.Menu() menu.Append(wx.ID_ABOUT, "About","zhuo") menu.AppendSeparator() menu.Append(wx.ID_EXIT,"Exit","muniao") menuBar = wx.MenuBar() menuBar.Append(menu,"File") parent.SetMenuBar(menuBar) button = wx.Button(self,label='Print',pos=(0,60)) self.Bind(wx.EVT_BUTTON,self.printButton,button) self.textBox = wx.TextCtrl(self,size=(280,50), style=wx.TE_MULTILINE) #有点迷,传入 self 看不懂?评论区走起 #(提示:self 是 wx.Panel) def printButton(self,event): self.textBox.AppendText("The Print Button has been clicked") app = wx.App()frame = wx.Frame(None,title='Python GUI using wxPython',size=(300,180)) #这个作为 参数 parent,必须要有GUI(frame)frame.Show() #务必要加上这一句,否则运行代码,什么都没有app.MainLoop() 张这样
动态添加、删除按钮
效果如下:
 点击一下 add,就增加一个按钮。点击一下 remove,就删除一个按钮
 代码
# -*- coding: utf-8 -*-"""Created on Thu Jul 9 11:17:59 2020@author: Administrator"""import wxclass MainPanel(wx.Panel): #集成自 wx.Panel,也即,这是一个 panel 对象 def __init__(self,parent): #传入参数 parent wx.Panel.__init__(self,parent) #调用﹣类的构建函数 self.numOfButs = 0 self.frame = parent #将父类赋值给变量 frame self.mainSizer = wx.BoxSizer(wx.VERTICAL) #创建一个 BoxSizer 对象,分布方式为垂直分布 controlSizer = wx.BoxSizer(wx.HORIZONTAL) #同上,分布方式为横线分布 self.widgetSizer = wx.BoxSizer(wx.VERTICAL) self.addButton = wx.Button(self,label='Add') #创建一个按键对象 self.addButton.Bind(wx.EVT_BUTTON,self.onAddWidget) #给按键绑定一个事件 controlSizer.Add(self.addButton,0,wx.CENTER|wx.ALL,5) #把按键“安装” 到 Sizer 对象中 # 其中 0,和 5 表示 间隔.. self.removeButton = wx.Button(self,label='Remove') self.removeButton.Bind(wx.EVT_BUTTON,self.onRemoveWidget) controlSizer.Add(self.removeButton,0,wx.CENTER|wx.ALL,5) self.mainSizer.Add(controlSizer,0,wx.CENTER) # self.mainSizer.Add(self.widgetSizer,0,wx.CENTER) self.SetSizer(self.mainSizer) #这句代码,才把 mainSizer 弄成 panel 的(总)Szier # 无论是 panel 还是 frame,都需要有一个主 Sizer,这个 Sizer 决定了 界面的大小、宽度、和控件的位置组织。 def onAddWidget(self,event): self.numOfButs +=1 label = "Button %s"% self.numOfButs name = "button%s"% self.numOfButs new_button = wx.Button(self,label=label,name=name) self.widgetSizer.Add(new_button,0,wx.ALL,5) # self.frame.fSizer.Layout() self.frame.Fit() #重新调整大小(父类) def onRemoveWidget(self,event): if self.widgetSizer.GetChildren(): self.widgetSizer.Hide(self.numOfButs-1) self.widgetSizer.Remove(self.numOfButs-1) self.numOfButs -= 1 # self.frame.fSizer.Layout() self.frame.Fit() class MainFrame(wx.Frame): def __init__(self): wx.Frame.__init__(self,parent=None,title='Add/Remove Buttons') self.fSizer = wx.BoxSizer(wx.VERTICAL) panel = MainPanel(self) self.fSizer.Add(panel,1,wx.EXPAND) self.SetSizer(self.fSizer) self.Fit() self.Show()if __name__ == "__main__": app = wx.App(False) frame = MainFrame() app.MainLoop()
解释
wx.BoxSizer:
The basic idea behind a box sizer is that windows will most often be laid out in rather simple basic geometry, typically in a row or a column or several hierarchies of either.
修改 ICON
首先,在 Python 的安装包中,找到 img2py.py 文件,我的是在这里:E:\Anaconda3\Lib\site-packages\wx\tools\img2py.py
然后,打开 cmd,跳转到所在路径,之后,运行如下命令:img2py python.ico my_icon.py
其中,python.ico 是你的 ICON 图片。当然,也要加上具体路径,除非在同一个文件夹下。
首先我们尝试一下 img2.py,会弹出下面的提示字符:
img2py.py -- Convert an image to PNG format and embed it in a Python module with appropriate code so it can be loaded into a program at runtime. The benefit is that since it is Python source code it can be delivered as a .pyc or 'compiled' into the program using freeze, py2exe, etc.Usage: img2py.py [options] image_file python_fileOptions: -m <#rrggbb> If the original image has a mask or transparency defined it will be used by default. You can use this option to override the default or provide a new mask by specifying a colour in the image to mark as transparent. -nNormally generic names (getBitmap, etc.) are used for the image access functions. If you use this option you can specify a name that should be used to customize the access functions, (getNameBitmap, etc.) -c Maintain a catalog of names that can be used to reference images. Catalog can be accessed via catalog and index attributes of the module. If the -n option is specified then is used for the catalog key and index value, otherwise the filename without any path or extension is used as the key. -a This flag specifies that the python_file should be appended to instead of overwritten. This in combination with -n will allow you to put multiple images in one Python source file. -i Also output a function to return the image as a wxIcon. -f Generate code compatible with the old function interface. (This option is ON by default in 2.8, use -f to turn off.)You can also import this module from your Python scripts, and use its img2py()function. See its docstring for more info.
然后运行如下命令:
$ img2py dog.ico dog_ico.pyWarning: -n not specified. Using filename (dog) for name of image and/or catalog entry.Embedded dog.ico using "dog" into dog_ico.py
就会生成一个 dog_ico,py 的 .py 文件。
或者这样:
....import wximport dog_icoclass MainFrame(wx.Frame): def __init__(self): .... ico = dog_ico.PyEmbeddedImage(dog_ico.dog) self.SetIcon(ico.data.GetIcon()) ....
其中 dog_ico.dog 的 dog 是你之前的图像名称。
也可以转换 png 图像,这点不再展示。。。。。。
修改软件的背景

# -*- coding: utf-8 -*-"""Created on Thu Jul 9 16:16:24 2020@author: Administrator"""import wxclass MainFrame(wx.Frame): def __init__(self): wx.Frame.__init__(self,None,title='Background Example') panel = wx.Panel(self) sizer = wx.BoxSizer(wx.VERTICAL) hSizer = wx.BoxSizer(wx.HORIZONTAL) for num in range(4): label = 'Button%s'%num btn = wx.Button(panel,label=label) sizer.Add(btn,0,wx.ALL,5) hSizer.Add((1,1),1,wx.EXPAND) hSizer.Add(sizer,0,wx.TOP,100) hSizer.Add((1,1),0,wx.ALL,75) panel.SetSizer(hSizer) panel.Bind(wx.EVT_ERASE_BACKGROUND,self.onEraseBackground) def onEraseBackground(self,event): dc = event.GetDC() if not dc: dc = wx.ClientDC(self) rect = self.GetUpdataRegion().GetBox() dc.SetClippingRect(rect) dc.Clear() bmp = wx.Bitmap("img.jpg") dc.DrawBitmap(bmp,0,0)if __name__ == "__main__": app = wx.App(False) frame = MainFrame() frame.Show() app.MainLoop() 发表评论
最新留言
关于作者
