SpringCloud-Stream介绍

 想要自定义分组只需要在消费者的yml文件中加上下面的一行:
 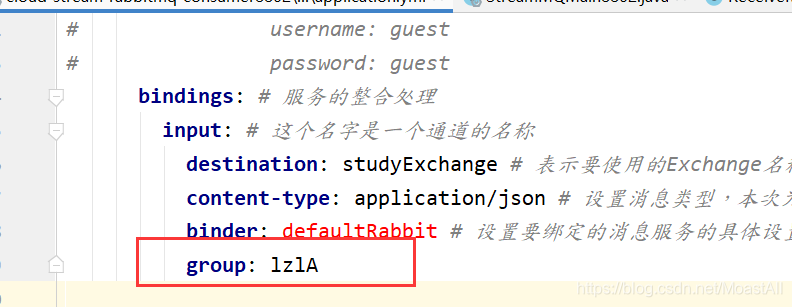 如果有多个消费者,为了避免出现重复消费的问题,应将组名设置成一样的。一个组的成员轮循消费,不同组的成员进行相同的消费。
发布日期:2021-05-07 13:39:30
浏览次数:22
分类:精选文章
本文共 5905 字,大约阅读时间需要 19 分钟。
SpringCloudStream
官方定义Spring Cloud Stream 是一个构建消息驱动微服务的框架。
应用通过inputs和outputs来与Spring Cloud Stream中binder对象交互。通过我们配置来binding(绑定),而Spring Cloud Stream中的binder对象负责与消息中间件交互。所以,我们只需要搞清楚如何与Spring Cloud Stream 交互就可以方便使用消息驱动的方式。 通过使用Spring Integration来连接消息代理中间件以及实现消息事件驱动。 目前仅支持RabbitMQ和kafka
下面用RabbitMQ来说明使用!
案例之消息驱动之生产者
1.建一个项目,并添加如下的依赖:
org.springframework.boot spring-boot-starter-web org.springframework.boot spring-boot-starter-actuator org.springframework.cloud spring-cloud-starter-netflix-eureka-client org.springframework.cloud spring-cloud-starter-stream-rabbit
2.编写下面的yml文件
server: port: 8801spring: application: name: cloud-stream-provider rabbitmq: host: 192.168.43.76 port: 5672 username: guest password: guest cloud: stream: binders: # 在此处配置要绑定的rabbitmq的服务信息; defaultRabbit: # 表示定义的名称,用于于binding整合 type: rabbit # 消息组件类型# environment: # 设置rabbitmq的相关的环境配置,(本机方式)# spring:# rabbitmq:# host: localhost# port: 5672# username: guest# password: guest bindings: # 服务的整合处理 output: # 这个名字是一个通道的名称 destination: studyExchange # 表示要使用的Exchange名称定义 content-type: application/json # 设置消息类型,本次为json,文本则设置“text/plain” binder: defaultRabbit # 设置要绑定的消息服务的具体设置(爆红不要管)eureka: client: # 客户端进行Eureka注册的配置 service-url: defaultZone: http://localhost:7001/eureka instance: lease-renewal-interval-in-seconds: 2 # 设置心跳的时间间隔(默认是30秒) lease-expiration-duration-in-seconds: 5 # 如果现在超过了5秒的间隔(默认是90秒) instance-id: send-8801.com # 在信息列表时显示主机名称 prefer-ip-address: true # 访问的路径变为IP地址
3.编写service,下面仅展示实现类:
import org.lzl.springcloud.service.IMessageProvider;import org.springframework.cloud.stream.annotation.EnableBinding;import org.springframework.cloud.stream.messaging.Source;import org.springframework.messaging.MessageChannel;import org.springframework.messaging.support.MessageBuilder;import javax.annotation.Resource;import java.util.UUID;//注意这里不需要写@Service,因为该service是跟rabbitmq打交道的@EnableBinding(Source.class)//定义消息的推送管道public class MessageProviderImpl implements IMessageProvider { @Resource private MessageChannel output; @Override public String send() { String serial = UUID.randomUUID().toString(); output.send(MessageBuilder.withPayload(serial).build()); System.out.println("*****serial:"+serial); return null; }} 4.编写controller
import org.lzl.springcloud.service.IMessageProvider;import org.springframework.web.bind.annotation.GetMapping;import org.springframework.web.bind.annotation.RestController;import javax.annotation.Resource;@RestControllerpublic class SendMessageController { @Resource private IMessageProvider messageProvider; @GetMapping(value = "/sendMessage") public String sendMessage(){ return messageProvider.send(); }} 案例之消息驱动消费者
1.写pom,加上下面的依赖
org.springframework.boot spring-boot-starter-web org.springframework.cloud spring-cloud-starter-netflix-eureka-client org.springframework.cloud spring-cloud-starter-stream-rabbit org.springframework.boot spring-boot-starter-actuator
2.编写yml,和生产者唯一的区别在于,下面是input
server: port: 8802spring: application: name: cloud-stream-consumer rabbitmq: host: 192.168.43.76 port: 5672 username: guest password: guest cloud: stream: binders: # 在此处配置要绑定的rabbitmq的服务信息; defaultRabbit: # 表示定义的名称,用于于binding整合 type: rabbit # 消息组件类型# environment: # 设置rabbitmq的相关的环境配置# spring:# rabbitmq:# host: localhost# port: 5672# username: guest# password: guest bindings: # 服务的整合处理 input: # 这个名字是一个通道的名称 destination: studyExchange # 表示要使用的Exchange名称定义 content-type: application/json # 设置消息类型,本次为对象json,如果是文本则设置“text/plain” binder: defaultRabbit # 设置要绑定的消息服务的具体设置eureka: client: # 客户端进行Eureka注册的配置 service-url: defaultZone: http://localhost:7001/eureka instance: lease-renewal-interval-in-seconds: 2 # 设置心跳的时间间隔(默认是30秒) lease-expiration-duration-in-seconds: 5 # 如果现在超过了5秒的间隔(默认是90秒) instance-id: receive-8802.com # 在信息列表时显示主机名称 prefer-ip-address: true # 访问的路径变为IP地址
3.编写controller,该controller不向外界暴露端口,起到实时监控消息管道的作用!
import lombok.extern.slf4j.Slf4j;import org.springframework.beans.factory.annotation.Value;import org.springframework.cloud.stream.annotation.EnableBinding;import org.springframework.cloud.stream.annotation.StreamListener;import org.springframework.cloud.stream.messaging.Sink;import org.springframework.messaging.Message;import org.springframework.stereotype.Component;import org.springframework.web.bind.annotation.RestController;import javax.annotation.Resource;@Component@EnableBinding(Sink.class)public class ReceiveMessageListenerController { @Value("${server.port}") private String serverPort; @StreamListener(Sink.INPUT)//只要8801发送消息,8802就会接收到8801的消息 public void input(Message message){ System.out.println("消费者1号--------》接收到的消息:"+message.getPayload()+"\t port: "+serverPort); }} 测试
启动rabbitMQ和上面的两个项目,访问http://localhost:8801/sendMessage
补充说明
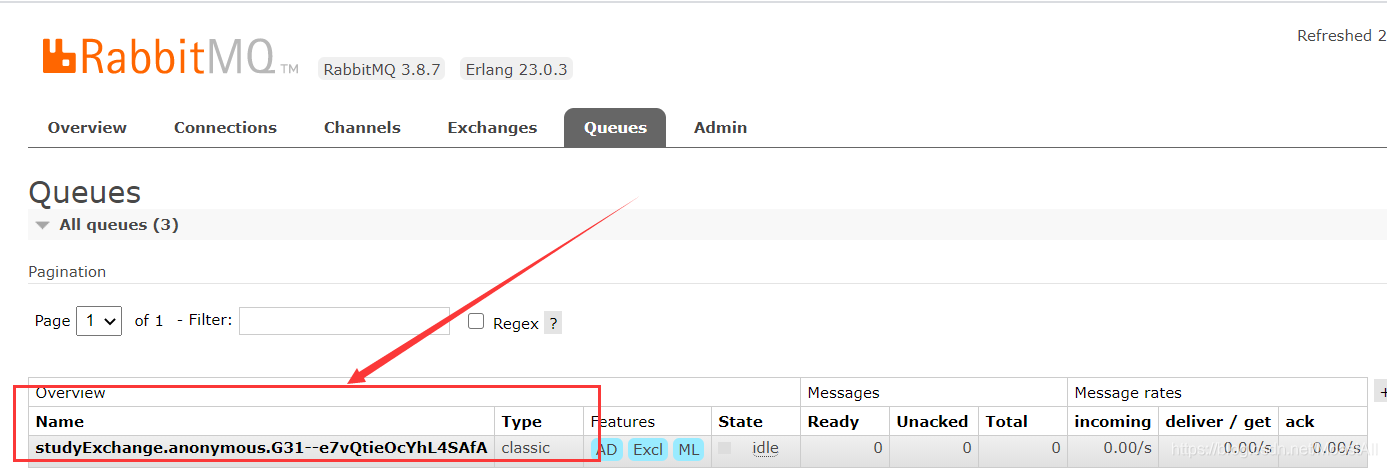
我们打开rabbitmq的监控界面:发现默认是帮我们分组的
想要自定义分组只需要在消费者的yml文件中加上下面的一行: 如果有多个消费者,为了避免出现重复消费的问题,应将组名设置成一样的。一个组的成员轮循消费,不同组的成员进行相同的消费。 发表评论
最新留言
很好
[***.229.124.182]2025年04月24日 21时33分45秒
关于作者

喝酒易醉,品茶养心,人生如梦,品茶悟道,何以解忧?唯有杜康!
-- 愿君每日到此一游!
推荐文章
PHP系列:使用PHP实现登录注册功能的完整指南
2023-01-23
"WARNING: Increasing RAM size to 1GB" and "Cannot set up guest memory 'xxx.ram': Invalid argument".
2023-01-23
04-docker-commit构建自定义镜像
2023-01-23
05-docker系列-使用dockerfile构建镜像
2023-01-23
09-docker系列-docker网络你了解多少(下)
2023-01-23
#C8# UVM中的factory机制 #S8.2.3# 重载sequence哪些情形
2023-01-24
cytoscape安装java_Cytoscape史上最全攻略
2023-01-24
c语言编写单片机中断,C语言AVR单片机中断程序写法
2023-01-24
java教学团队管理系统(ssm)
2023-01-24
java教师管理系统(ssm)
2023-01-24
java教师课堂助手app(ssm)
2023-01-24
java教育辅导班信息网(ssm)
2023-01-24
DDNS动态域名无固定IPSEC配置实战
2023-01-24
DELL笔记本UEFI+GPT安装window10与Ubuntu双系统
2023-01-24
EasyUi的使用与代码编写(一)
2023-01-24
Ehcache Java开源缓存框架
2023-01-24
el-select下拉框修改背景色
2023-01-24
ElasticSearch - 基于 JavaRestClient 操作索引库和文档
2023-01-24
ElasticSearch - 索引库和文档相关命令操作
2023-01-24
elasticsearch 7.7.0 单节点配置x-pack
2023-01-24
白红宇的个人博客 - 记录点点滴滴的事 - 您是第 465765005 位访客