本文共 13452 字,大约阅读时间需要 44 分钟。
文章目录
一、SpringBoot的特点
1.依赖管理
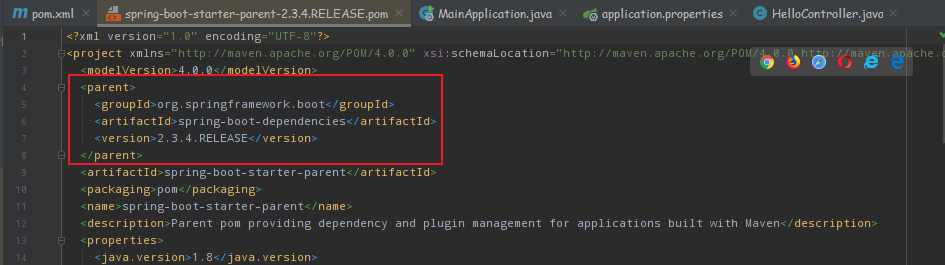
1.1 父项目做依赖管理
org.springframework.boot spring-boot-starter-parent 2.3.4.RELEASE
打开 org.springframework.boot ,进入到他的父工程内部,可以看到如下图所示的内容:
再点击 spring-boot-dependencies,进入依赖配置文件,可以看到如下内容:
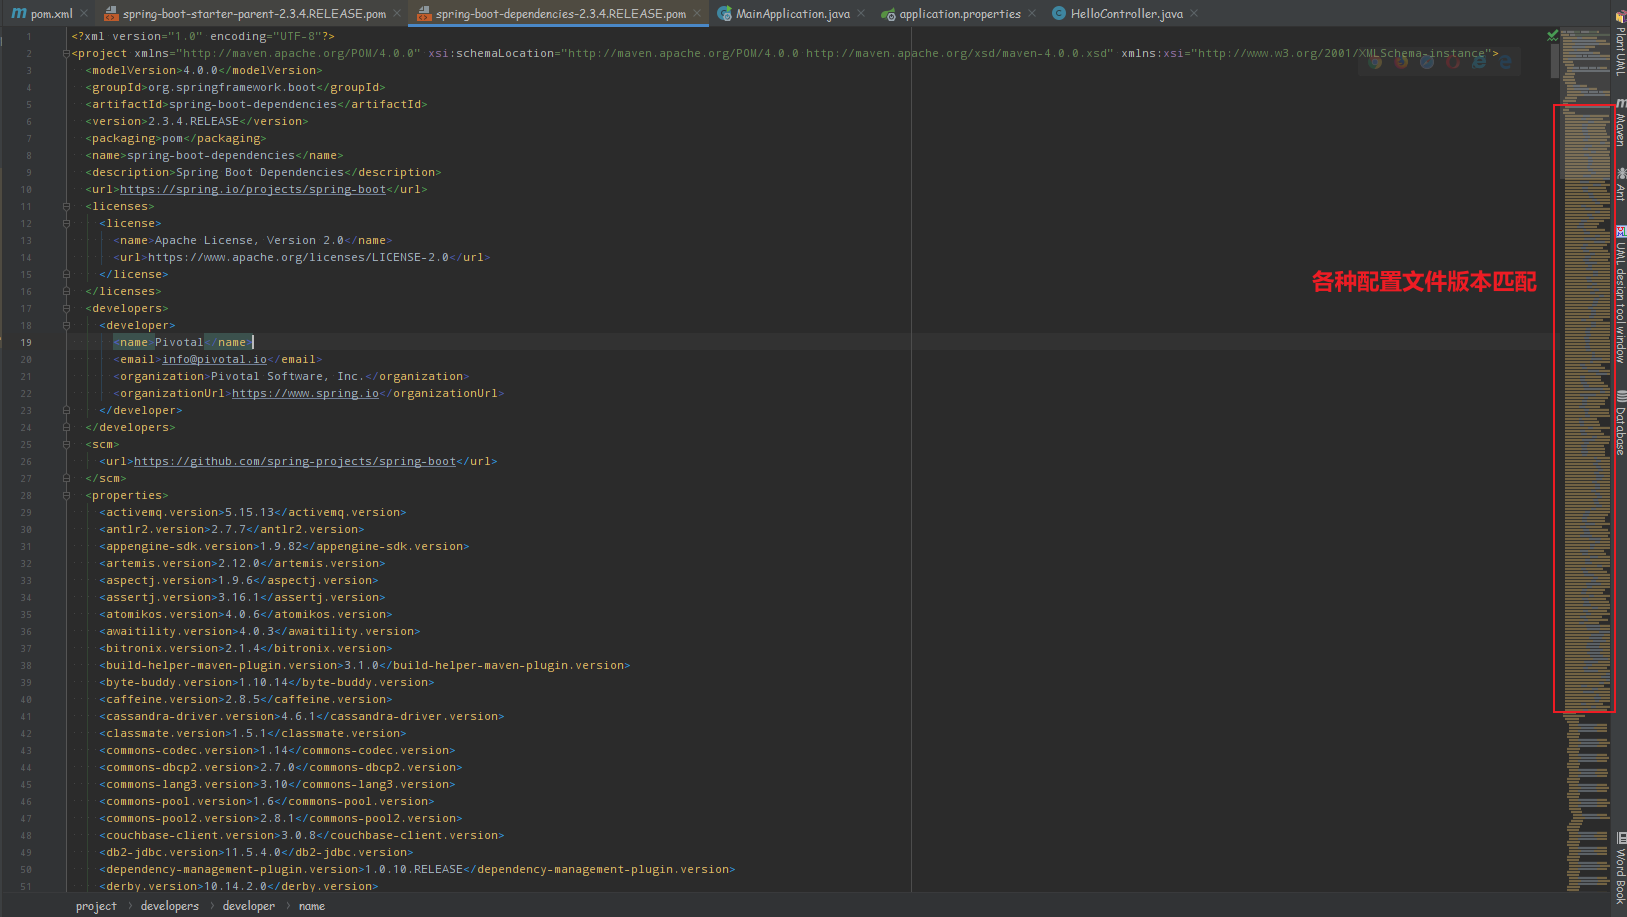
父项目中的依赖管理,几乎声明了所有开发中常用的依赖的版本号,自动版本仲裁机制!!!
1.2 开发导入场景启动器 Starters
Starters are a set of convenient dependency descriptors that you can include in your application. You get a one-stop shop for all the Spring and related technologies that you need without having to hunt through sample code and copy-paste loads of dependency descriptors. For example, if you want to get started using Spring and JPA for database access, include the spring-boot-starter-data-jpa dependency in your project.
有了项目的依赖管理后,我们在做开发的时候只需要进一步导入场景启动器的配置,就可以自动导入相对应的场景所需要的所有依赖配置,例如下面的web场景启动器:
org.springframework.boot spring-boot-starter-web
点击 spring-boot-starter-web ,进入内部配置我们可以看到其中具体的依赖配置,下面是场景依赖树
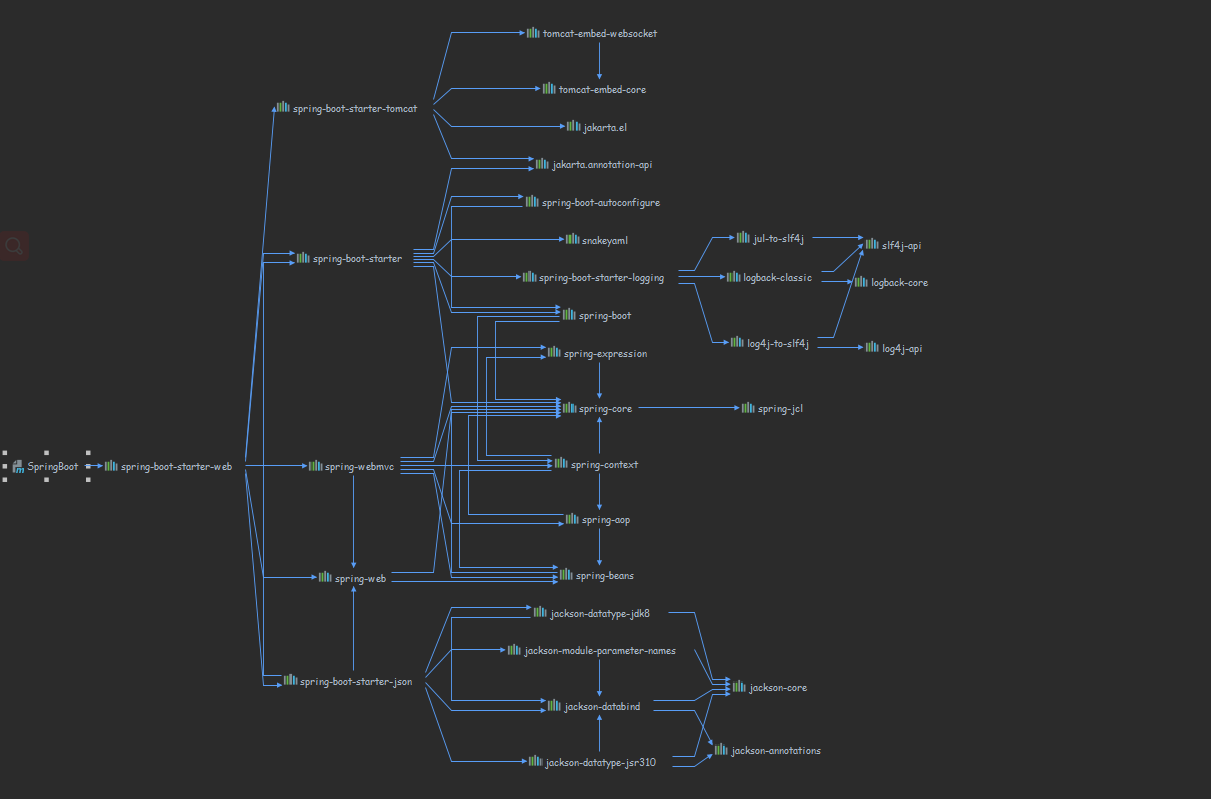
其中,spring-boot-starter 是所有场景最基础的启动器:
org.springframework.boot spring-boot-starter 2.3.4.RELEASE compile
1.3 修改版本号
通过使用父项目的依赖管理,我们无序关注版本号的关联,它内部使用自动版本仲裁机制,可以自动匹配,但是如果某些依赖需要改动版本号,这里以数据库连接为例:
-
首先查看父项目的数据库连接配置版本


-
明确需要修改的数据库版本号
- 假设这里我的数据库版本为5.1.43的
-
进入配置 pom.xml进行版本号配置
5.1.43
2.自动配置
2.1 自动配置 Tomcat
-
引入Tomcat 依赖
org.springframework.boot spring-boot-starter-tomcat 2.3.4.RELEASE compile -
自动配置好Tomcat
2.2 自动配置 Spring MVC 的全套組件
org.springframework spring-webmvc 5.2.9.RELEASE compile
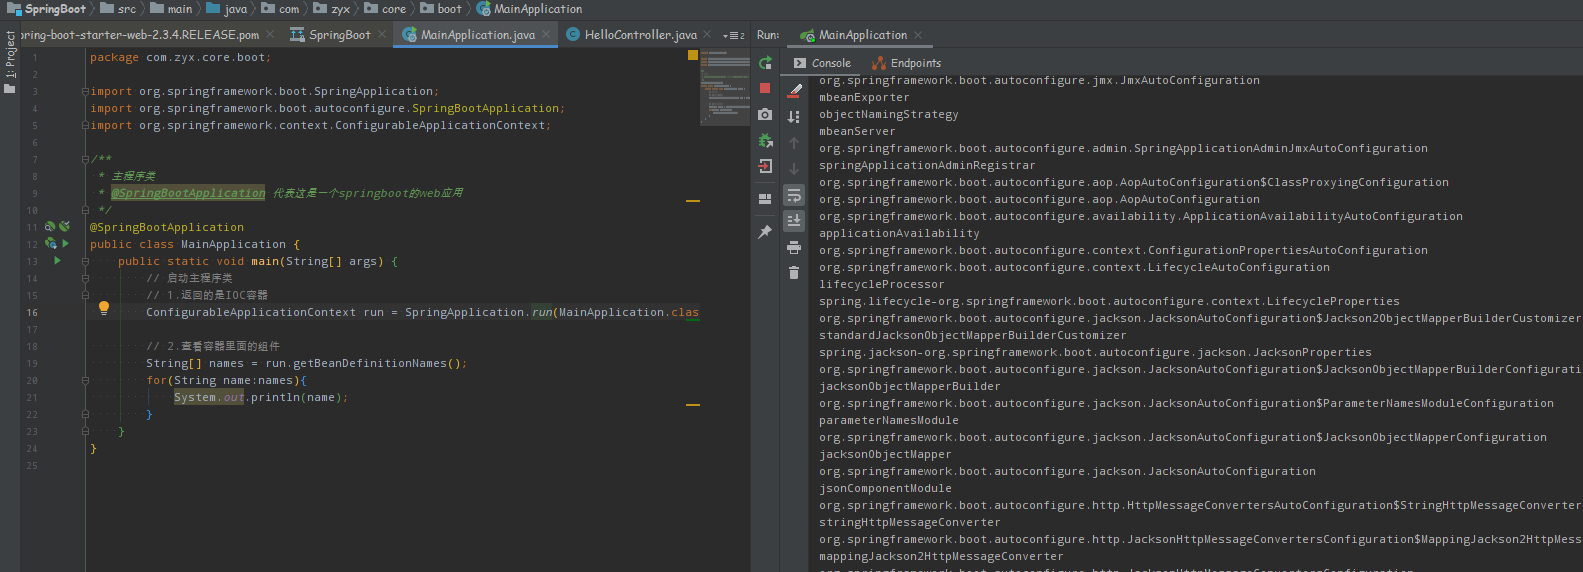
我们可以通过运行的主程序获取IOC容器 ConfigurableApplicationContext对象,去getBeanDefinitionNames()获取组件的名称,做个简单的浏览:
2.3 自动配置好Web常见功能
- 例如:字符编码、视图等
2.4 默认包结构
**官方解释: ** We generally recommend that you locate your main application class in a root package above other classes. The is often placed on your main class, and it implicitly defines a base “search package” for certain items. For example, if you are writing a JPA application, the package of the @SpringBootApplication annotated class is used to search for @Entity items. Using a root package also allows component scan to apply only on your project.
整体意思就是,我们通常建议您将主应用程序类放在根包中,置于其他类之上。@SpringBootApplication注释经常放在主类上,它隐式地为某些项定义了一个基本的“搜索包”。例如,如果您正在编写一个|PA应用程序,则使用@springBootApplication注释类的包来搜索@Entity项。使用根包还允许组件扫描只应用于您的项目。
结构示意:
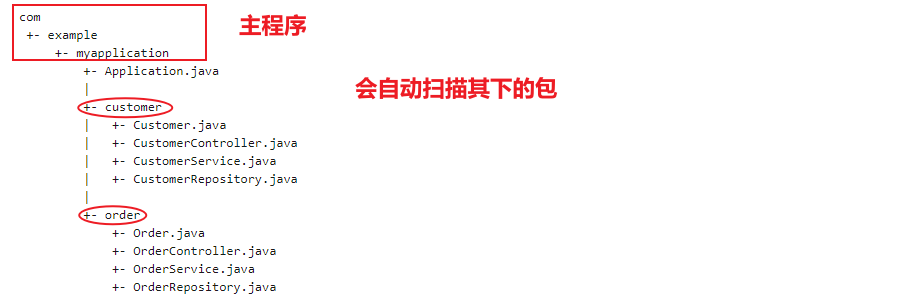
总的来说,也就是主程序同包及其下面的子包中的组件都会被自动扫描进去!(如果放在其上级包中的组件不会被扫描到,测试时 404)
注意:
-
想要改变扫描路径,@SpringBootApplication(scanBasePackages=“指定组件所在的包路径”)
-
或者@ComponentScan 指定扫描路径
-
@SpringBootApplication等同于@SpringBootConfiguration@EnableAutoConfiguration@ComponentScan("com.zyx.core.boot")
2.5 各种配置都有默认值
- 后期可以通过 application.properties 自定义的配置文件进行修改!
- 默认配置最终都是映射到某个类上,如:MultipartProperties、ServerProperties

- 配置文件的值最终会绑定每个类上,这个类会在容器中创建对象
2.6 按需加载所有自动配置项
-
非常多的starter
-
引入了哪些场景这个场景的自动配置才会开启
-
SpringBoot所有的自动配置功能都在 spring-boot-autoconfigure 包里面
等等。。。。。
二、容器功能 — 底层注解
1.组件添加
1.1 @Configuration
基本使用
创建类
package com.zyx.core.boot.bean;/** * 电脑工具 */public class Computer { private String typeName; public Computer(String s) { this.typeName = s; } public void setTypeName(String typeName) { this.typeName = typeName; } public String getTypeName() { return typeName; } @Override public String toString() { return "Computer{" + "typeName='" + typeName + '\'' + '}'; }}package com.zyx.core.boot.bean;/** * 用户 */public class User { private String name; // 用户名称 private Integer age; // 用户年龄 // 有参构造 public User(String name, Integer age) { this.name = name; this.age = age; } // setter、getter方法集 public String getName() { return name; } public void setName(String name) { this.name = name; } public Integer getAge() { return age; } public void setAge(Integer age) { this.age = age; } // toString() @Override public String toString() { return "User{" + "name='" + name + '\'' + ", age=" + age + '}'; }} 配置
- @Configuration的使用其实就是完全注解形式的开发
- 创建一个Config配置类
- 使用@Configuration进行注释
- 添加组件实现功能
package com.zyx.core.boot.config;import com.zyx.core.boot.bean.Computer;import com.zyx.core.boot.bean.User;import org.springframework.context.annotation.Bean;import org.springframework.context.annotation.Configuration;@Configuration // 使用完全注解形式开发public class MyConfig { /** * 使用注解来给容器中添加组件 --- 创建User对象 * 方法名 --- 组件的id id * 返回类型 --- 组件的类型 class * 返回值 --- 组件在容器中的实例 * @return */ @Bean public User user01(){ return new User("小赵",21); } @Bean public Computer computer(){ return new Computer("Dell"); }} 使用上面的配置类,实际上实现的功能与下面的xml配置文件效果相同,只是在实际现实中使用注解开发更加方便容易。
注意
-
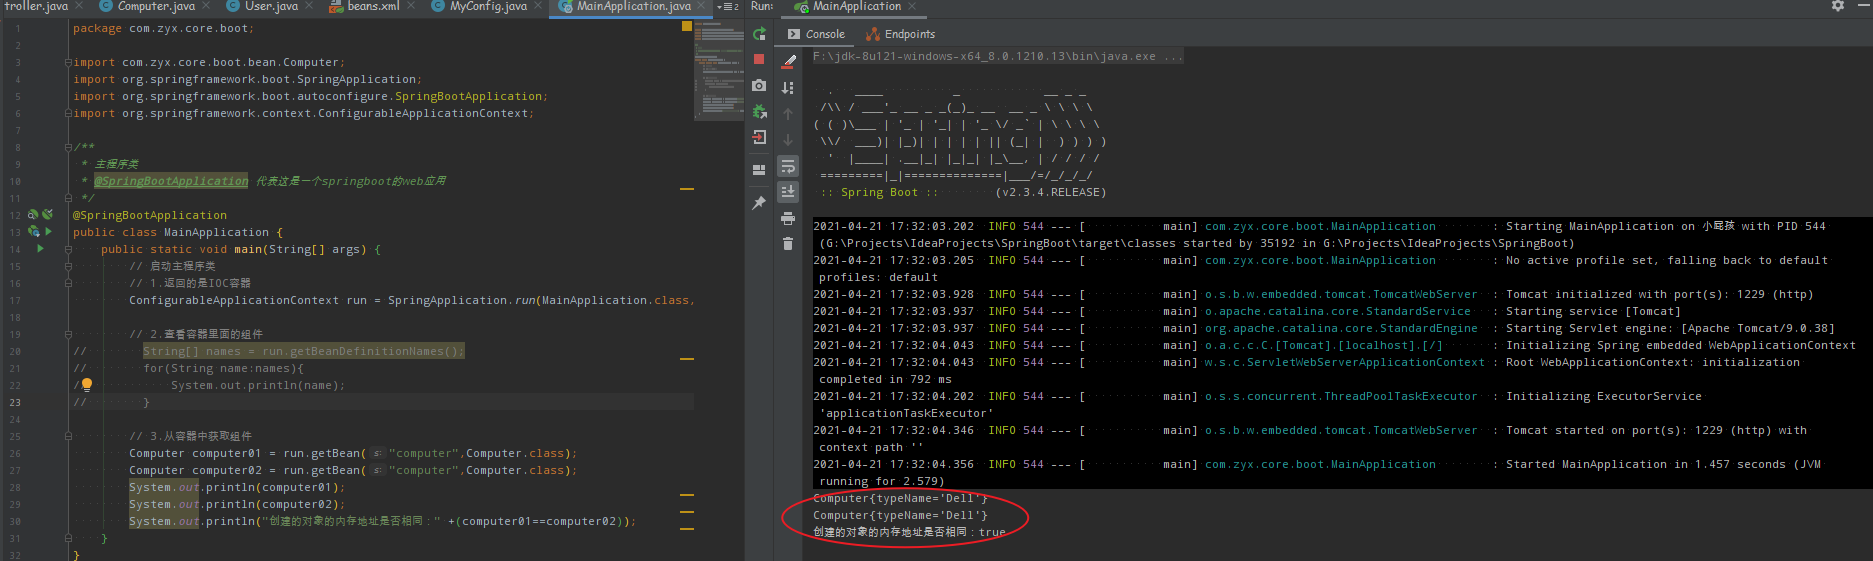
1.使用默认的形式创建的所有对象都是单例模式,即无论引用多少次对象的获取,都是同一个对象(内存地址相同!)
- 2.当前我们的配置类也是一个组件
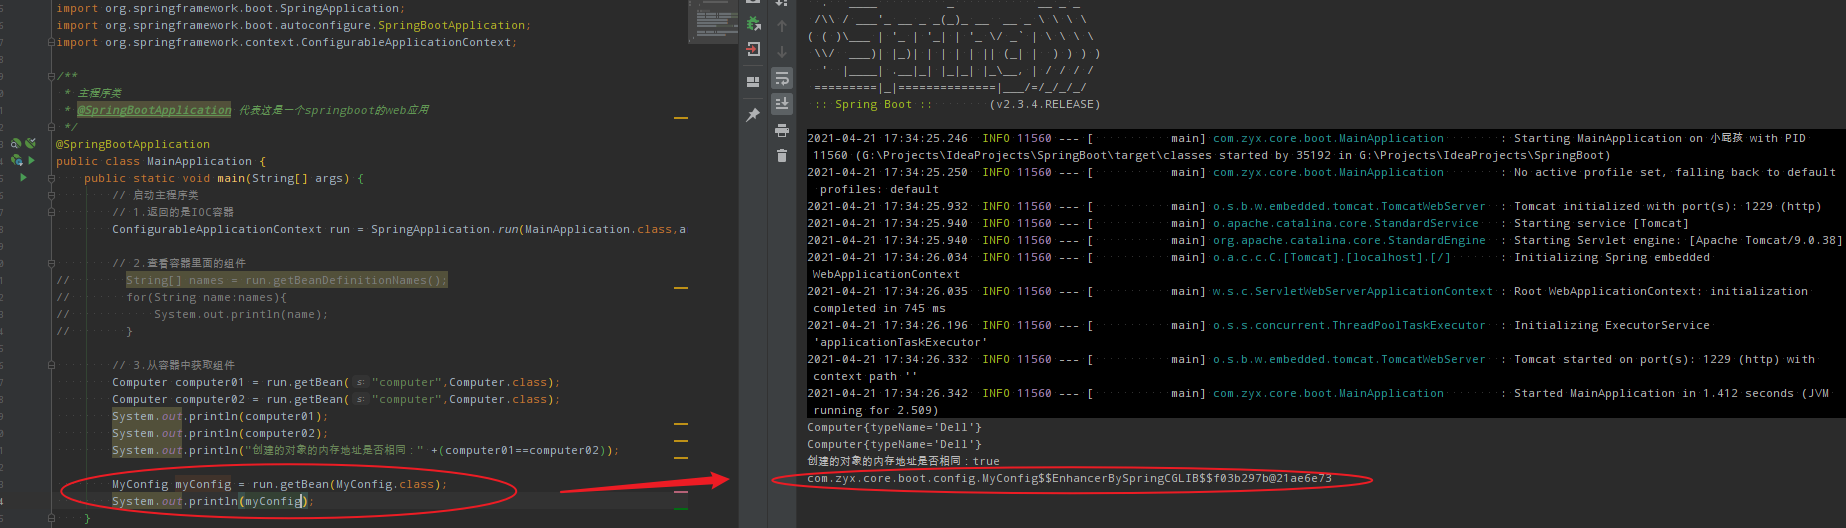
-
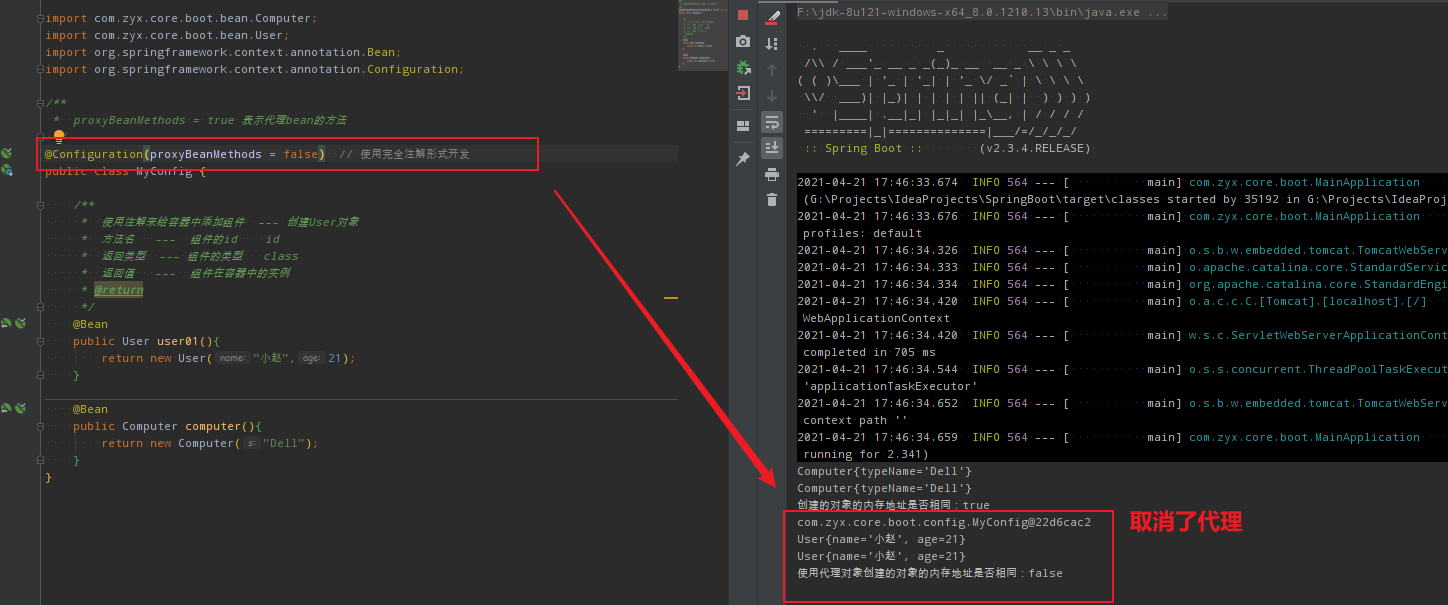
3.proxyBeanMethods参数默认为true表示当前的配置类使用代理对象
/** * proxyBeanMethods = true 表示代理bean的方法 */@Configuration(proxyBeanMethods = true) // 使用完全注解形式开发
-
我们通过代理对象去调用方法,获取容器中的组件时,SpringBoot总会检查这个组件是否在容器中存在,存在就直接去调。默认情况下也是单例模式!!!
-
**当我们取消了代理,也就是 ==@Configuration(proxyBeanMethods = false)==的时候 ,我们再去通过代理对象获取具体类对象进行比较,结果就变了~同时,此时的myConfig对象也不再是代理对象。 ** 注意此时,直接通过容器对象获取的结果保持不变!
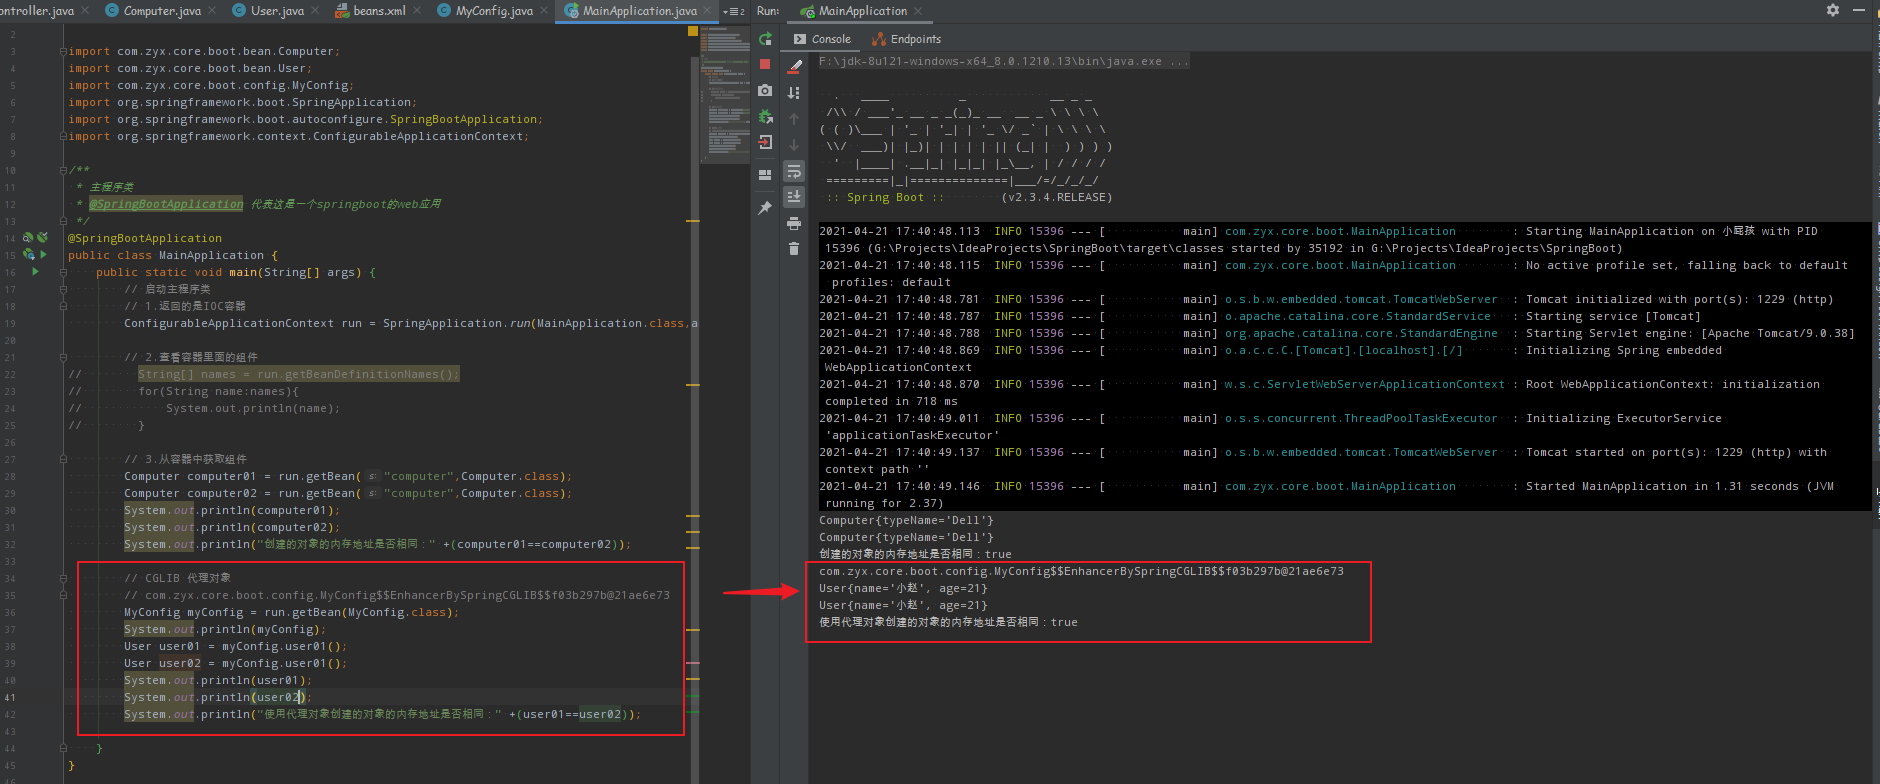
- Full 全配置(proxyBeanMethods = true)
- 此模式下,会生成代理对象,每次外部查询组件的时候都会通过代理对象去容器中找所需组件
- Lite 轻量级配置(proxyBeanMethods = false)
- 此模式下,不会保留代理对象,每次查询组件时都会创建新的。
- 此模式下,不会保留代理对象,每次查询组件时都会创建新的。
- Full 全配置(proxyBeanMethods = true)
-
-
4.探究Full、Lite模式
-
我们将代码部分修改,在user类中添加Computer对象属性
package com.zyx.core.boot.bean;/** * 用户 */public class User { private String name; // 用户名称 private Integer age; // 用户年龄 private Computer computer; // 有参构造 public User(String name, Integer age) { this.name = name; this.age = age; } // setter、getter方法集 public String getName() { return name; } public void setName(String name) { this.name = name; } public Integer getAge() { return age; } public void setAge(Integer age) { this.age = age; } public Computer getComputer() { return computer; } public void setComputer(Computer computer) { this.computer = computer; } // toString() @Override public String toString() { return "User{" + "name='" + name + '\'' + ", age=" + age + ", computer=" + computer + '}'; }}-
Full 模式下

-
Lite模式下

-
-
在两种不同的模式下,对于对象的引用方式不同(是否使用代理对象)。Full模式下使用代理对象实现,我们创建的对象就是从容器中找,而Lite模式,则是创建新的对象。
1.2 @Import
@Import 给容器中自动创建出这两个类型的组件、默认组件的名字就是全类名
package com.zyx.core.boot.config;import ch.qos.logback.core.db.DBHelper;import com.zyx.core.boot.bean.Computer;import com.zyx.core.boot.bean.User;import org.springframework.context.annotation.Bean;import org.springframework.context.annotation.Configuration;import org.springframework.context.annotation.Import;/** * proxyBeanMethods = true 表示代理bean的方法 * @Import({User.class, DBHelper.class}) 自动创建出User、DBHelper类型的组件 */@Import({ User.class, DBHelper.class})@Configuration(proxyBeanMethods = true) // 使用完全注解形式开发public class MyConfig { /** * 使用注解来给容器中添加组件 --- 创建User对象 * 方法名 --- 组件的id id * 返回类型 --- 组件的类型 class * 返回值 --- 组件在容器中的实例 * @return */ @Bean public User user01(){ User user = new User("小赵",21); // user组件依赖了pet组件 user.setComputer(computer()); return user; } @Bean public Computer computer(){ return new Computer("Dell"); }} 
1.3 @Conditional
-
满足Conditional指定的条件,则进行组件注入
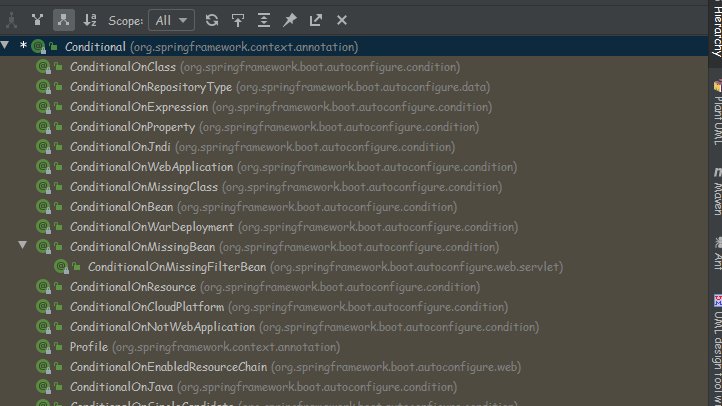
-
我们可以看到@ Conditional下面有很多的继承注解,举个@ConditionalOnBean小例子:
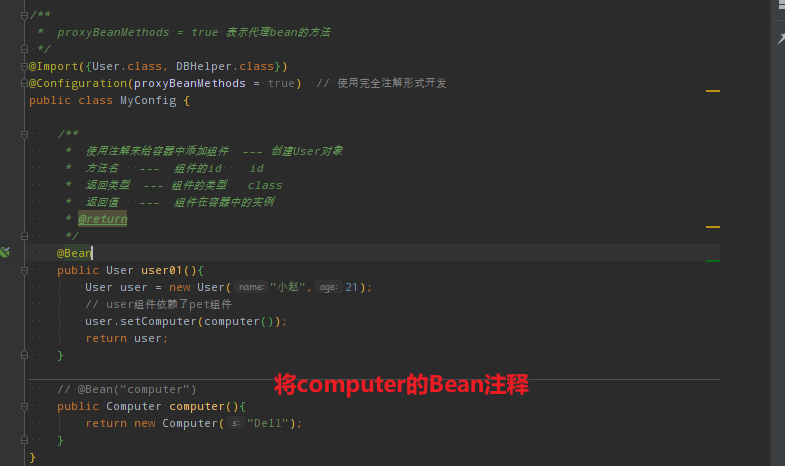
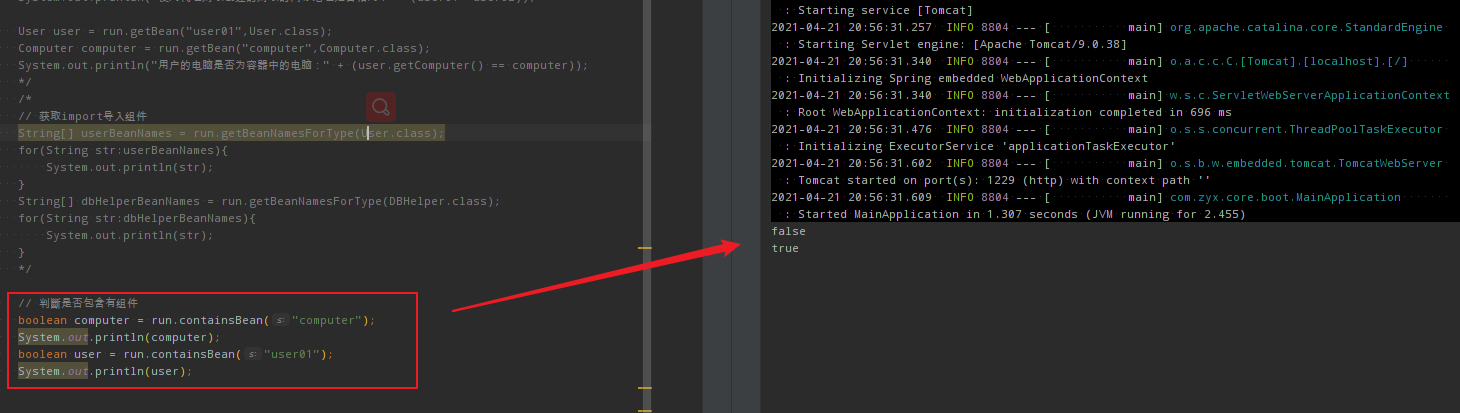
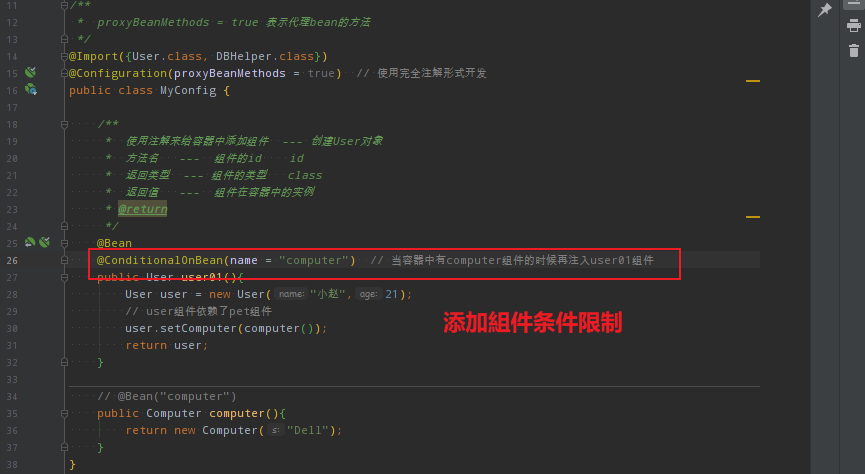
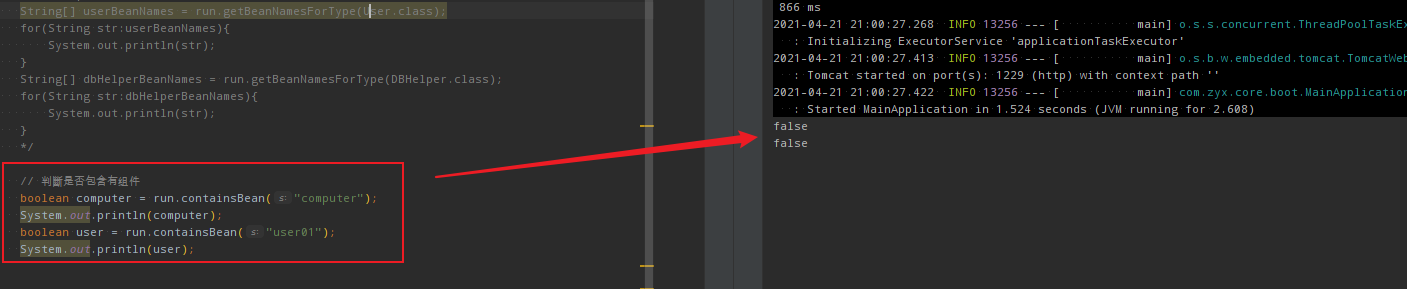
可以看到在在添加了@ConditionalOnBean注解并且注释掉computer的@Bean注解后,原来的User01组件未能够添加。
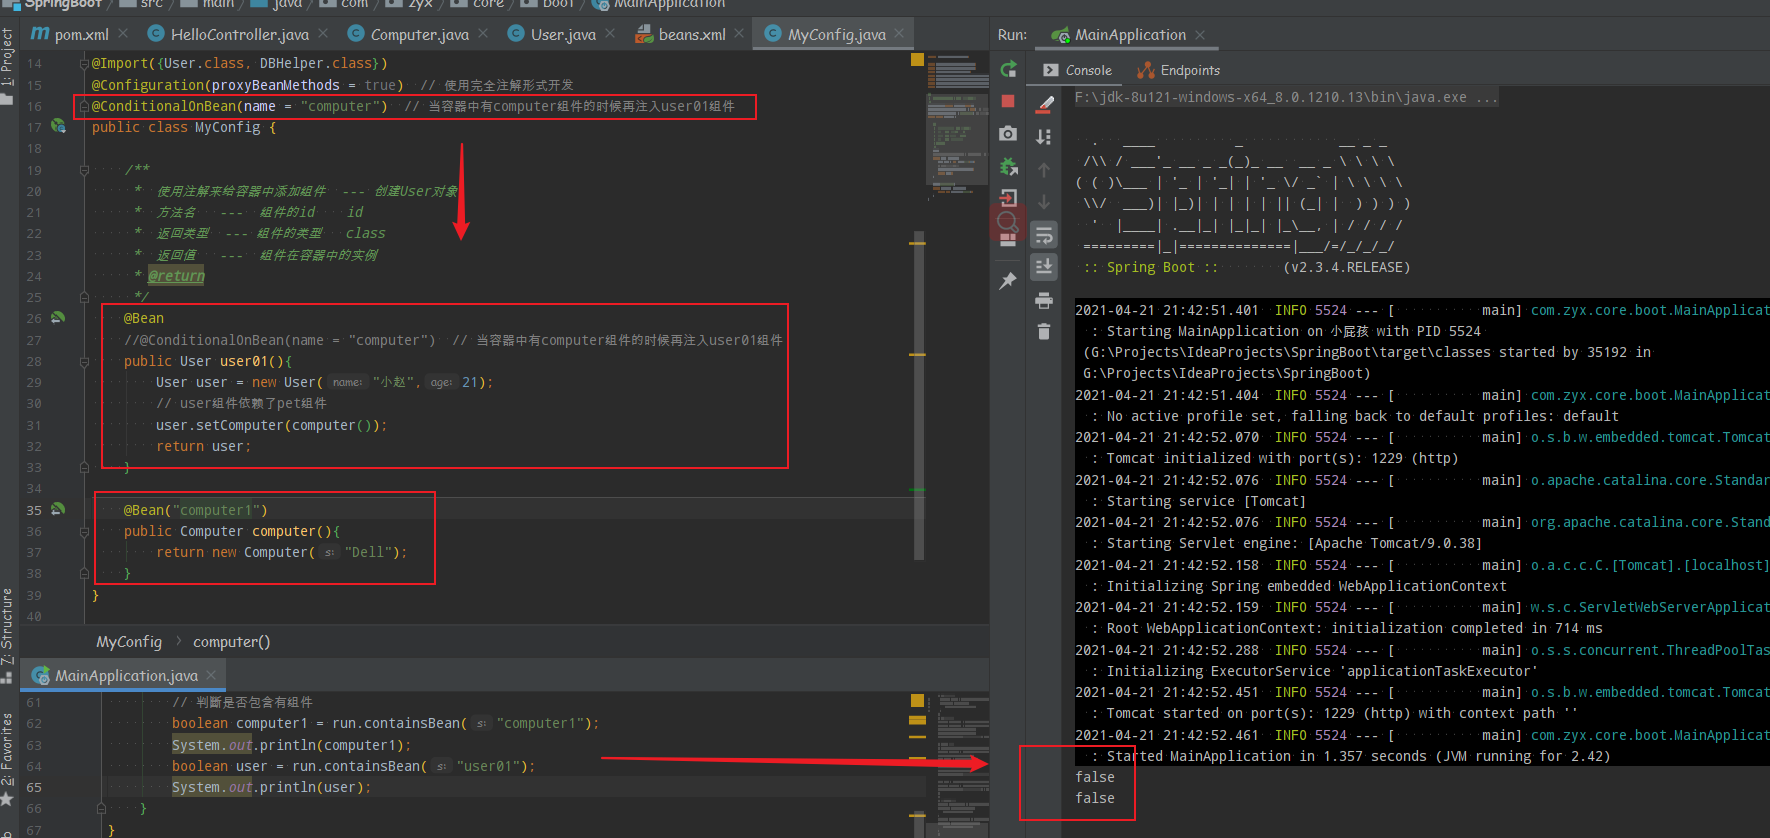
我们也可以将其添加在类上面,我们放出computer上的Bean注解,并创建computer1组件,此时在类上的注解表示在容器中含有名为computer的容器时,添加该类中的user01、computer1组件,由于并没有创建过computer的组件,所以结果全为false。如果这里使用的是@ConditionalMissingBean注解,则以上的情况全部相反。
2.xml配置文件导入
2.1 @ImportResource
当我们在项目中既使用了xml配置文件,又使用了注解的方式或者使用了注解方式,需要用到之前配置的xml文件。可以使用
@ImportResource注解来导入配置文件,方便注解的迁移。
之前的xml配置文件:
通过测试,xml配置文件中的组件并没有加入到容器中。

加入@ImportResource(“classpath:beans.xml”) 注解后:

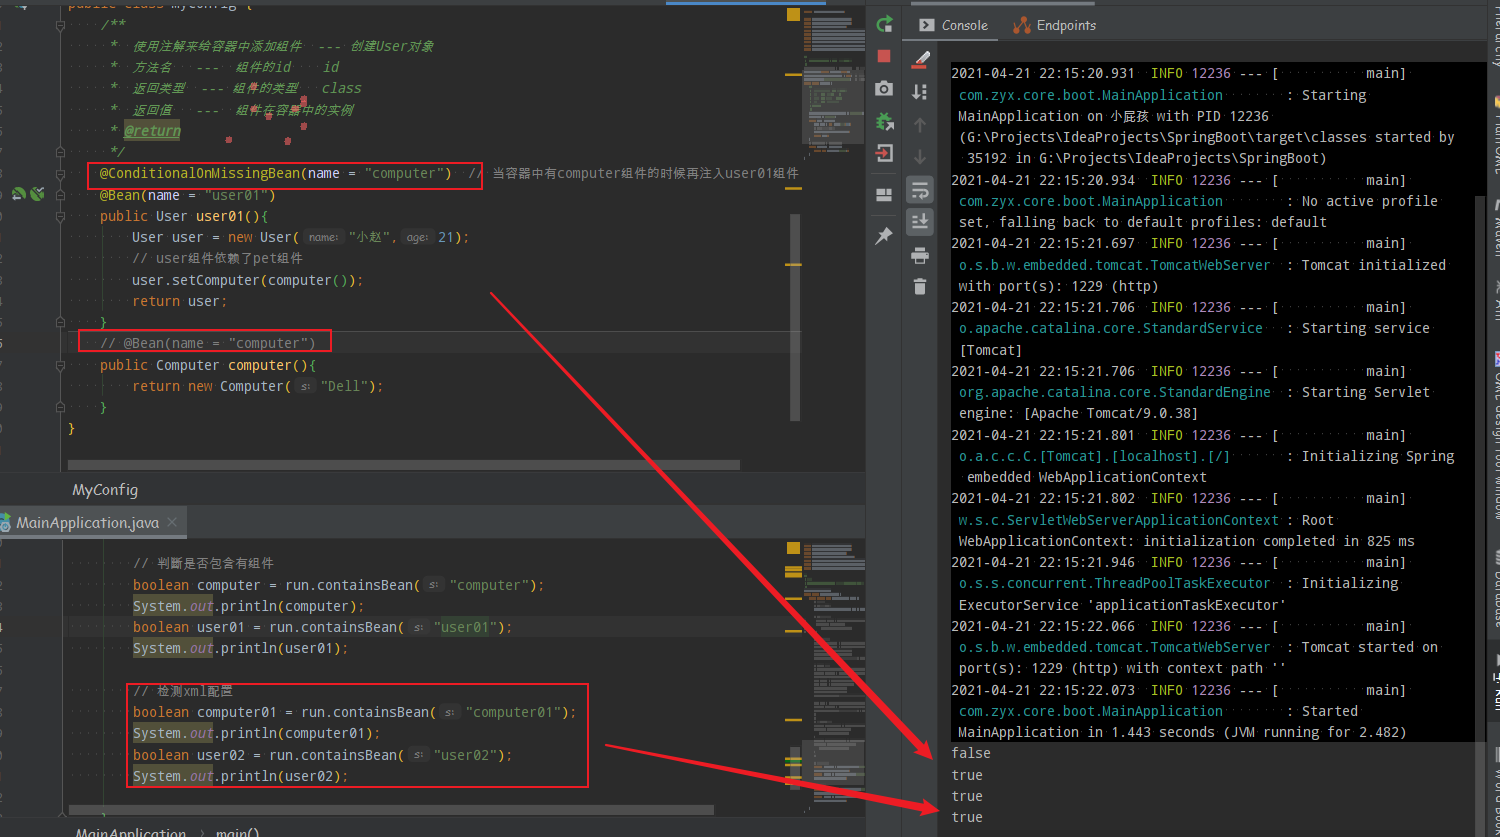
可以看到,配置文件中的computer01、user02组件都添加到了容器中。同时,我们注释掉了computer的@Bean,则此时容器中不会添加,user01组件创建的时候添加了@ConditionalOnMissingBean,所以此时user01的组件会被创建(添加到容器中)。
3.配置绑定
在数据库操作的时候,我们通常都是使用properties配置文件,创建组件的时候获取其中的数据库配置信息。然而在这里,我们利用java读取到properties文件中的内容,并且把它封装到JavaBean中,以供随时使用。
3.1 @ConfigurationProperties + @Component
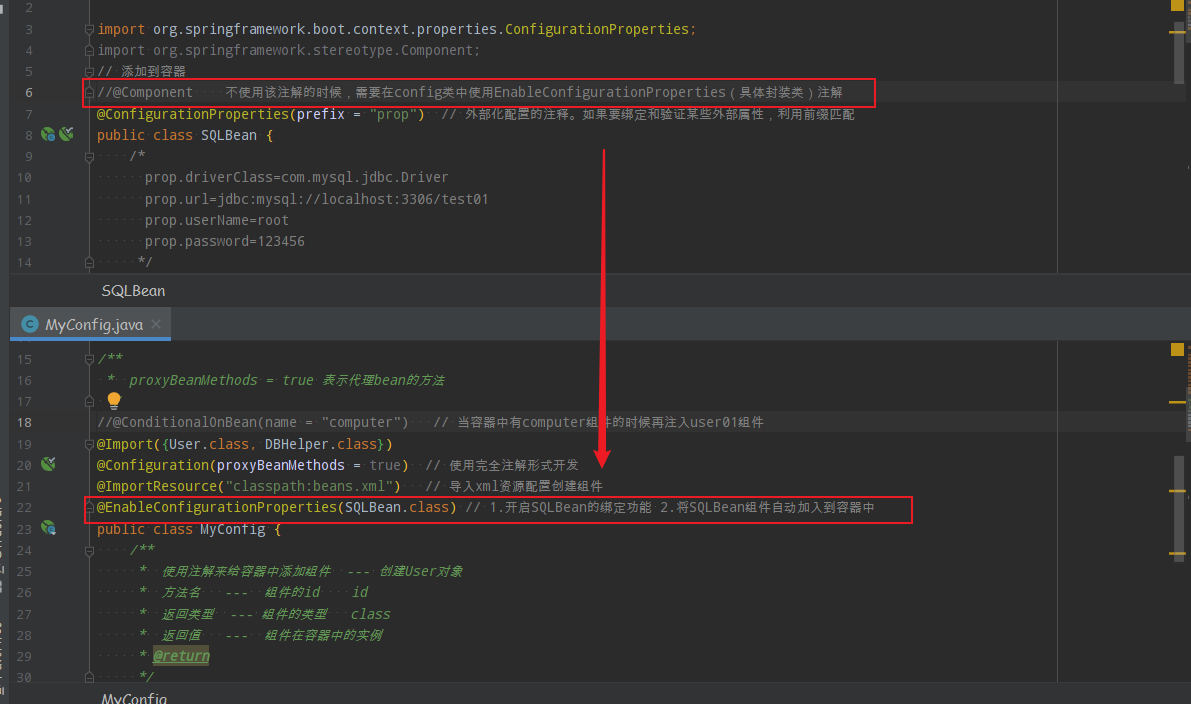
@ConfigurationProperties(prefix = “prop”) 是外部化配置的注释。如果要绑定和验证某些外部属性,利用前缀匹配。
package com.zyx.core.boot.bean;import org.springframework.boot.context.properties.ConfigurationProperties;import org.springframework.stereotype.Component;@Component // 添加到容器@ConfigurationProperties(prefix = "prop") // 外部化配置的注释。如果要绑定和验证某些外部属性,利用前缀匹配public class SQLBean { /* prop.driverClass=com.mysql.jdbc.Driver prop.url=jdbc:mysql://localhost:3306/test01 prop.userName=root prop.password=123456 */ private String driverClass; private String url; private String userName; private String password; public String getDriverClass() { return driverClass; } public void setDriverClass(String driverClass) { this.driverClass = driverClass; } public String getUrl() { return url; } public void setUrl(String url) { this.url = url; } public String getUserName() { return userName; } public void setUserName(String userName) { this.userName = userName; } public String getPassword() { return password; } public void setPassword(String password) { this.password = password; } @Override public String toString() { return "SQLBean{" + "driverClass='" + driverClass + '\'' + ", url='" + url + '\'' + ", userName='" + userName + '\'' + ", password='" + password + '\'' + '}'; }} Controller层编写代码,展示请求:
package com.zyx.core.boot.controller;import com.zyx.core.boot.bean.SQLBean;import org.springframework.beans.factory.annotation.Autowired;import org.springframework.stereotype.Controller;import org.springframework.web.bind.annotation.RequestMapping;import org.springframework.web.bind.annotation.ResponseBody;@Controller@ResponseBodypublic class SQLController { @Autowired SQLBean sqlBean; @RequestMapping("/mySQL") public SQLBean mySQL(){ return sqlBean; }} 主程序运行成功后,登陆页面发送请求:

显然,我们通过测试检测了数据库信息的配置绑定!
3.2 @ConfigurationProperties + @EnableConfigurationProperties
也可以通过@EnableConfigurationProperties的形式进行~
三、自动配置原理入门
1.引导加载自动配置类
前面说到过:
@SpringBootApplication效果等同于下面三个注解@SpringBootConfiguration@EnableAutoConfiguration@ComponentScan("com.zyx.core.boot") @Target(ElementType.TYPE)@Retention(RetentionPolicy.RUNTIME)@Documented@Inherited@SpringBootConfiguration@EnableAutoConfiguration@ComponentScan(excludeFilters = { @Filter(type = FilterType.CUSTOM, classes = TypeExcludeFilter.class), @Filter(type = FilterType.CUSTOM, classes = AutoConfigurationExcludeFilter.class) })public @interface SpringBootApplication { ............} 1.1 @SpringBootConfiguration

可以看到该注解接口上使用的是@Configuration,也就是说明当前的MainApplication也是一个配置类。
1.2 @EnableAutoConfiguration
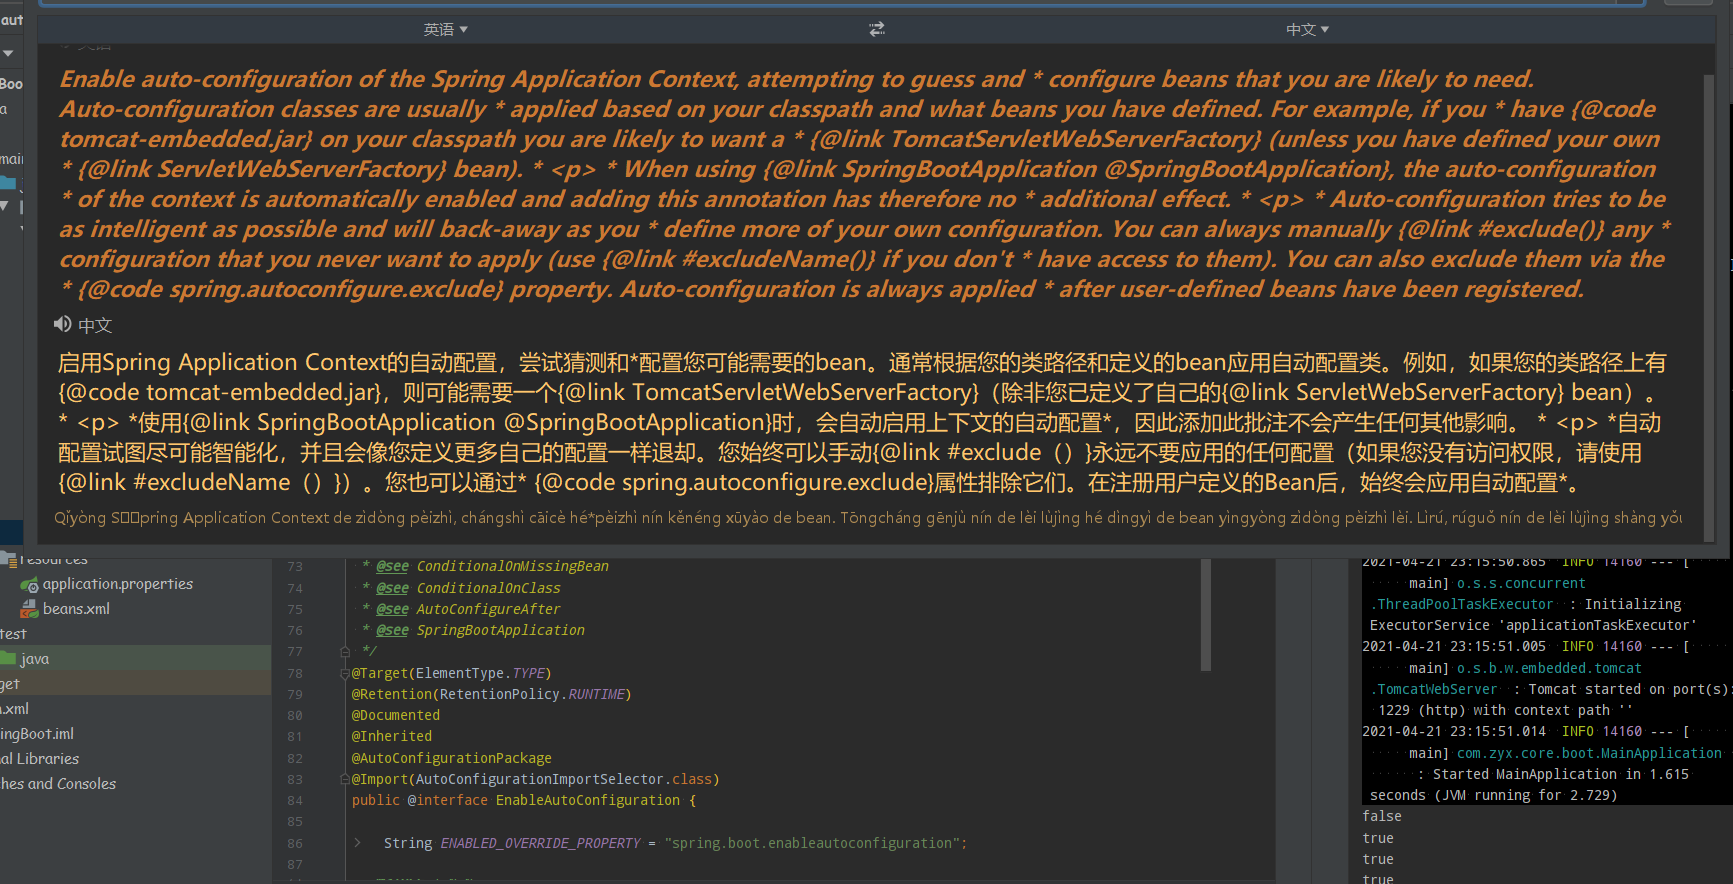
@Target(ElementType.TYPE)@Retention(RetentionPolicy.RUNTIME)@Documented@Inherited@AutoConfigurationPackage@Import(AutoConfigurationImportSelector.class)public @interface EnableAutoConfiguration { } @AutoConfigurationPackage
@Import(AutoConfigurationPackages.Registrar.class)public @interface AutoConfigurationPackage { ...} 可以发现@AutoConfigurationPackage底层实际上就是@Import,利用Registrar来批量导入组件:
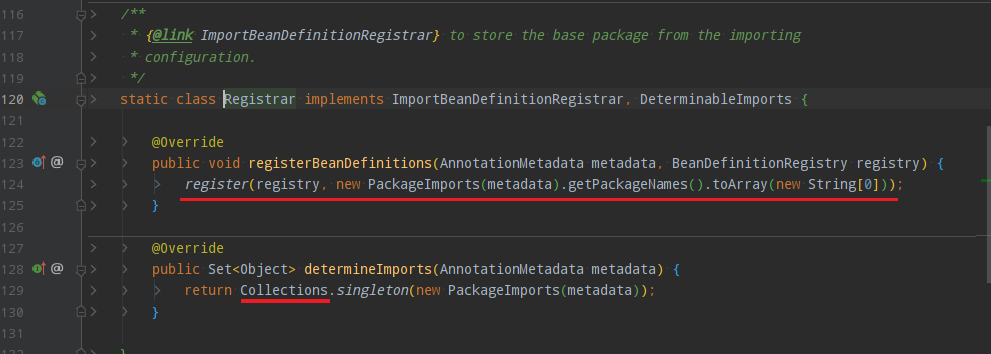

利用注解原信息获取到所在的包名,然后将包转换成一个数组,其实就是将这一个包中的组件进行批量添加!
@Import(AutoConfigurationImportSelector.class)
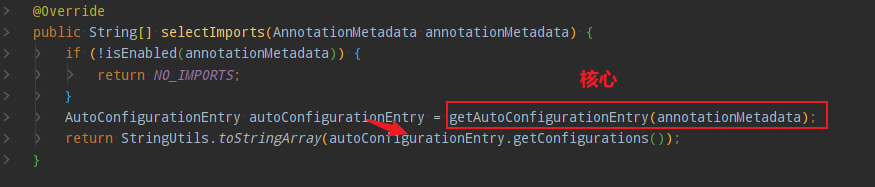
1、利用getAutoConfigurationEntry(annotationMetadata);给容器中批量导入一些组件
2、调用List< String > configurations = getCandidateConfigurations(annotationMetadata, attributes)获取到所有需要导入到容器中的配置类(組件)

3.利用工厂加载 Map<String, List< String >> loadSpringFactories(@Nullable ClassLoader classLoader);得到所有的组件

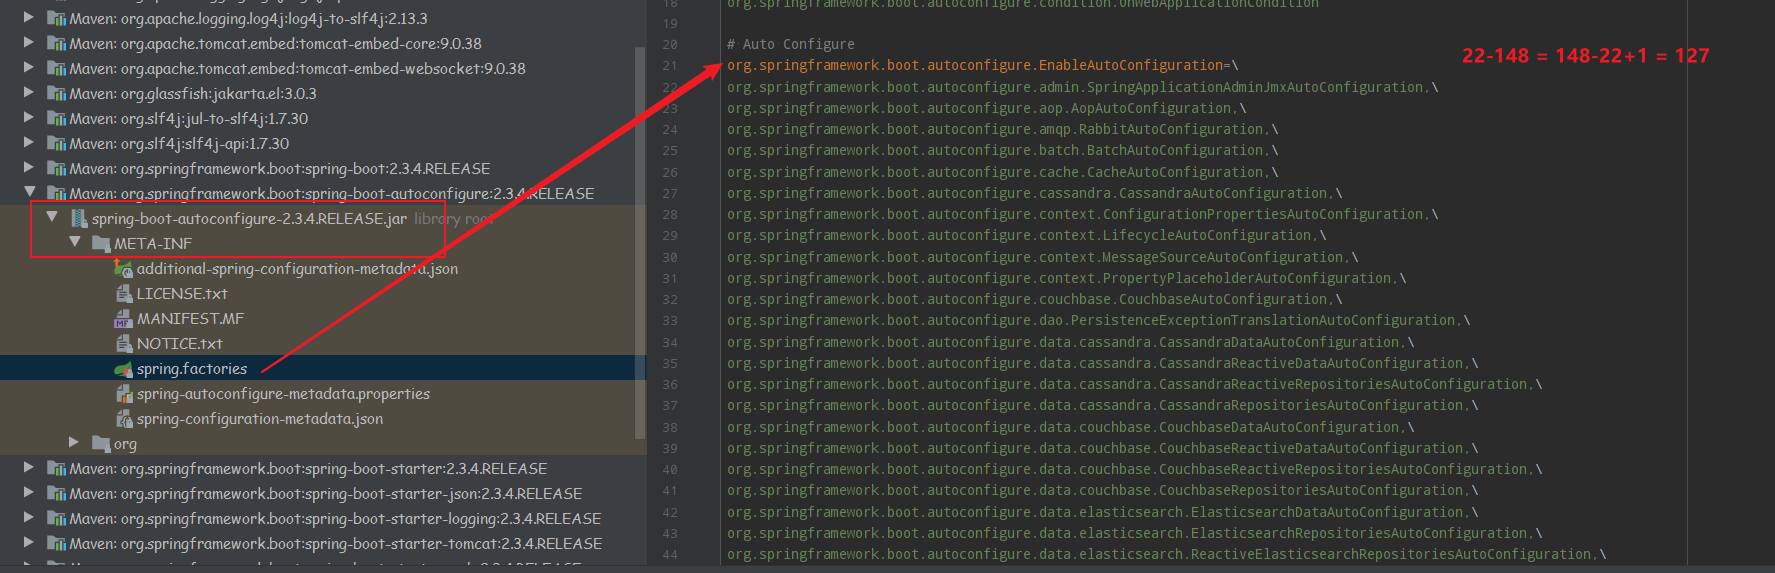
4、从META-INF/spring.factories位置来加载一个文件。
-
默认扫描我们当前系统里面所有META-INF/spring.factories位置的文件

-
spring-boot-autoconfigure-2.3.4.RELEASE.jar包里面也有META-INF/spring.factories,文件里面写死了spring-boot一启动就要给容器中加载的所有配置类(基础127个)
 实际上,我们容器中添加的组件还包含有我们自行加入的。
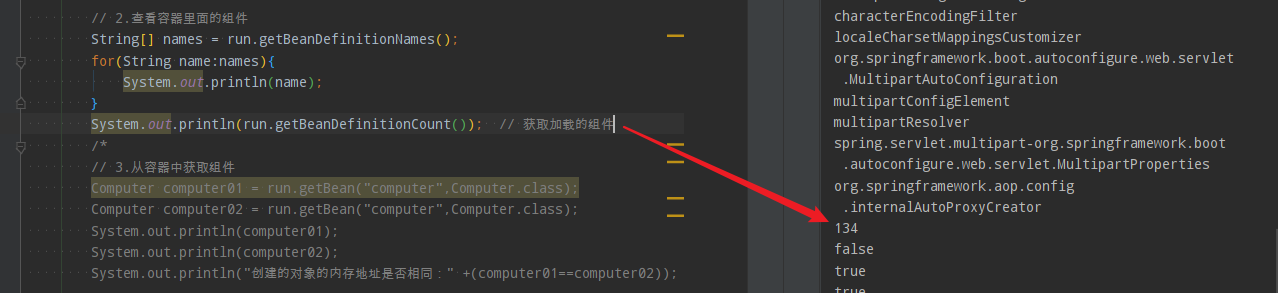
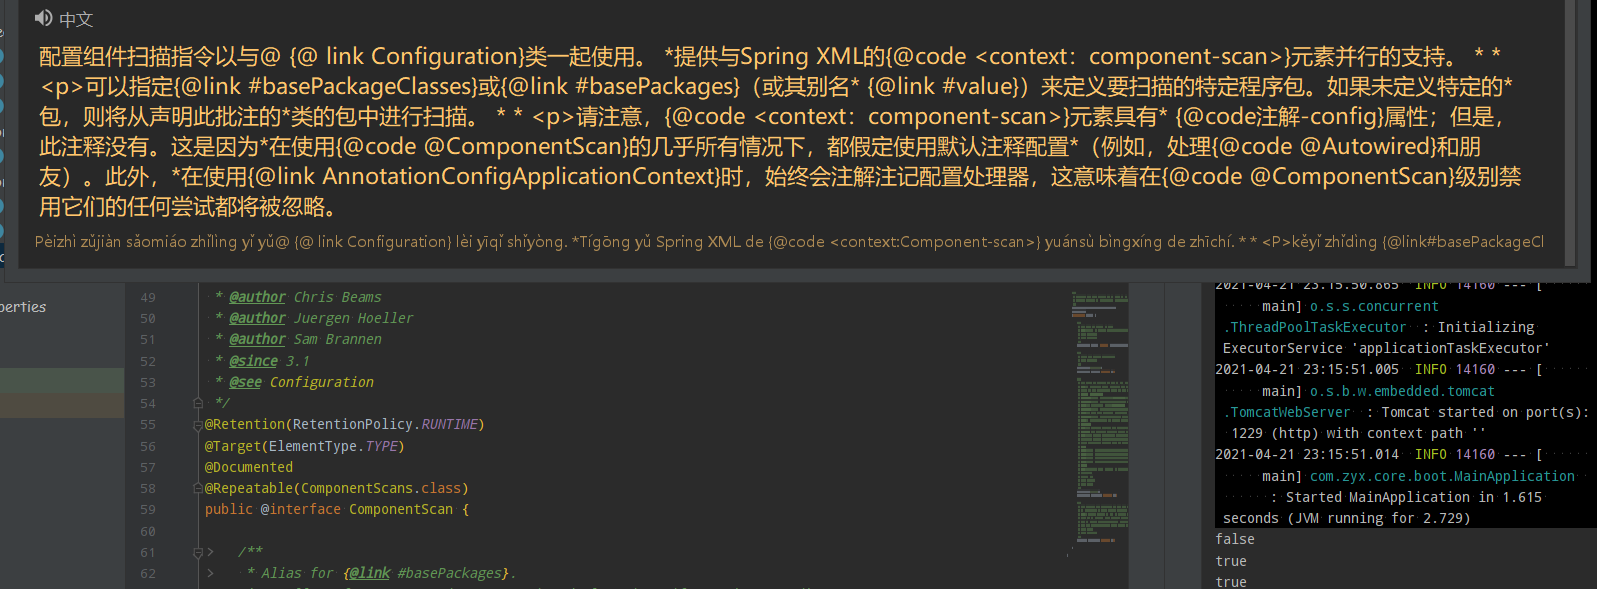
1.3 @ComponentScan
包扫描注解!
2.按需求开启自动配置项
虽然我们127个场景的所有自动配置启动的时候默认全部加载 ——— xxxxAutoConfiguration
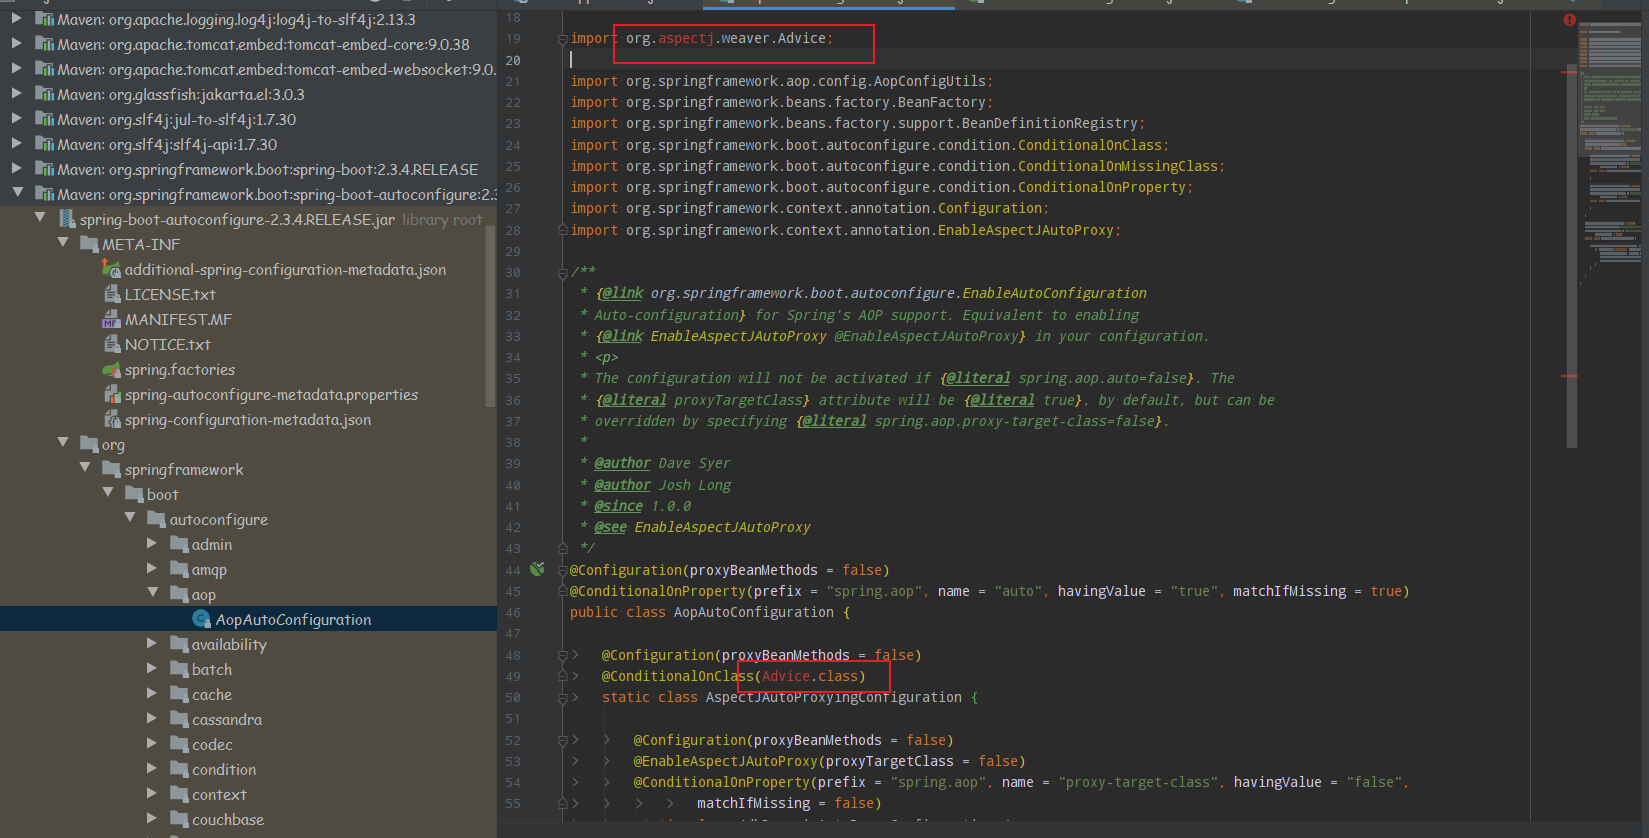
aop切面编程:
batch批处理:

以批处理、aop切面编程为例,均需要按照条件装配规则(@Conditional),最终满足了条件才会按需配置。
3.修改自动配置
SpringBoot默认会在底层配好所有的组件。但是如果用户自己配置了以用户的优先。
@Bean@ConditionalOnMissingBean // 该注解表示没有创建characterEncodingFilter的组件,就自动配置public CharacterEncodingFilter characterEncodingFilter() { } 总结:
-
SpringBoot先加载所有的自动配置类 xxxxxAutoConfiguration
-
每个自动配置类按照条件进行生效,默认都会绑定配置文件指定的值。xxxxProperties里面拿。xxxProperties和配置文件进行了绑定
-
生效的配置类就会给容器中装配很多组件
-
只要容器中有这些组件,相当于这些功能就有了
-
定制化配置
-
- 用户直接自己@Bean替换底层的组件
- 用户去看这个组件是获取的配置文件什么值就去修改。(简单说就是修改application.properties配置文件)
xxxxxAutoConfiguration —> 组件 —> xxxxProperties里面拿值 ----> application.properties
参考:
参考:
发表评论
最新留言
关于作者
