Linux:线程控制
 例子:
例子:  注意:编译多线程程序的时候一定要加上-lpthread选项 接下来我们通过两个代码来验证一下在创建多线程的时候应该传递什么样的参数: 代码1:
 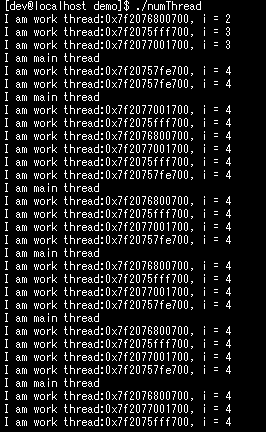 在上面的代码中,我们创建出了四个线程,发现打印的时候漏掉了0和1,而且后面一直打印的i都等于4,产生这样结果的原因是:i的作用域仅在循环内,出了for循环就被释放了,其次最后i的内容为4,即传给每个线程的值都变成4,且由于i是在栈上开辟的,出了作用域后在栈上开辟的空间也被释放了,但是线程依然在访问i,也就造成了越界,程序崩溃(没有崩溃的原因是这段空间还没有被其它的程序使用到)。 代码2:
  对比代码1和代码2,显然代码1的结果是和实际不符的,仔细对比代码我们发现代码1中的i是临时变量,是在栈中存储的,而代码2中的d是在堆中存储的,所以我们得出的结论是:创建线程时传递的参数的是在堆中开辟的变量才可以
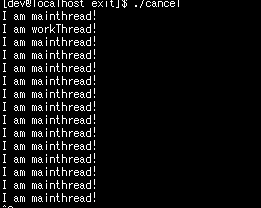
 上面的代码运行结果都出现在打印“I am workThread!”以后就一直打印”I am mainThread!“的情况,因为此时我们创建的线程已经被退出了,只剩下主线程了。我们也可以使用pstack [进程号]命令查看。 把上面程序里的睡眠时间从3秒改到20秒,然后用ps命令产看线程标识符
  用pstack [进程号命令查看]
 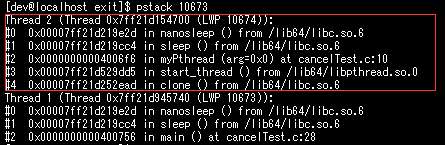 这里我们就看到了我们创建的进程,过了20秒后我们在看一下
  这次我们就只看到主线程了,因为我们创建的工作线程已经被我们退出掉了。
 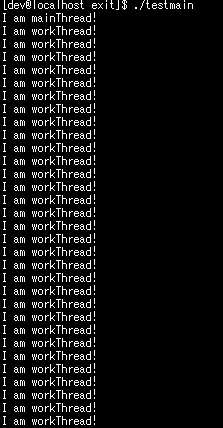 我们看到主线程退出以后,工作线程还在继续工作,我们用ps命令查看一下它的状态,结果显示它正在处于僵尸状态
  再用top -H -p [进程号]查看一下
 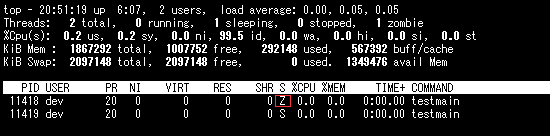 因为已经退出的线程,他的空间没有被释放,还在进程的地址空间内,而新创建的线程是不会复用刚退出的地址空间的(线程在创建出来的时候属性默认的是joinable属性,这就意味着线程退出的时候需要其它执行流来回收线程的资源),这就需要线程等待了。 线程等待我们需要用到的函数是pthread_join函数。
 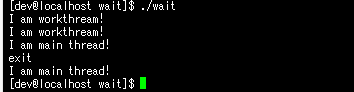 这个程序主线程会阻塞在pthread_join函数,直到工作线程退出以后,才继续往下执行,也就不会产生僵尸进程了。
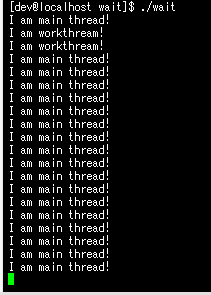
发布日期:2021-05-07 02:16:08
浏览次数:32
分类:精选文章
本文共 9541 字,大约阅读时间需要 31 分钟。
Linux:线程控制
线程的创建
前面我们已经基本了解了线程的基本概念,接下来我们面临的问题就是是怎让创建一个线程了,在Linux中可以用pthread_create函数来创建线程.
函数原型:#includeint pthread_create(pthread_t *thread, const pthread_attr_t *attr,void *(*start_routine) (void *), void *arg);参数解释: thread:返回线程ID attr:设置线程的属性,为NULL表示使用默认属性 start_routine:是一个函数地址,线程启动后要执行的函数 arg:传给线程启动的参数返回值: 成功返回0;失败返回错误码
可以看到这个函数在3号手册,证明这个函数是一个库函数,这也就证明了线程不是操作系统为我们提供的
例子: #include#include #include #include void* TStart(void* arg){ while(1) { printf("I am work thread!\n"); sleep(1); } return NULL;}int main(){ pthread_t tid; int ret = pthread_create(&tid, NULL, TStart, NULL); if(ret < 0) { perror("pthread_create"); return -1; } while(1) { printf("I am main thread!\n"); sleep(1); } return 0;}
运行结果:
注意:编译多线程程序的时候一定要加上-lpthread选项 接下来我们通过两个代码来验证一下在创建多线程的时候应该传递什么样的参数: 代码1: #include#include #include #include void *myThread(void* arg) { int* p = (int*)arg; while(1) { printf("I am work thread:%p, i = %d\n",pthread_self(),*p); sleep(1); } return NULL; } int main() { pthread_t tid; for(int i = 0;i < 4;++i) { int ret = pthread_create(&tid,NULL ,myThread, &i); if(ret < 0) { perror("pthread_create"); return -1; } } while(1) { printf("I am main thread\n"); sleep(1); } return 0; }
运行结果:
在上面的代码中,我们创建出了四个线程,发现打印的时候漏掉了0和1,而且后面一直打印的i都等于4,产生这样结果的原因是:i的作用域仅在循环内,出了for循环就被释放了,其次最后i的内容为4,即传给每个线程的值都变成4,且由于i是在栈上开辟的,出了作用域后在栈上开辟的空间也被释放了,但是线程依然在访问i,也就造成了越界,程序崩溃(没有崩溃的原因是这段空间还没有被其它的程序使用到)。 代码2: #include#include #include struct Data { int data_; }; void* myPthread(void* arg) { Data* d = (Data*)arg; while(1) { printf("i am workthread %p, i = %d\n", pthread_self(), d->data_); sleep(1); } delete d; d = NULL; return NULL; } int main() { pthread_t tid; for(int i = 0;i < 4;i++) { Data* d = new Data(); d->data_ = i; int ret = pthread_create(&tid, NULL, myPthread, (void*)d); if(ret < 0) { perror("pthread_create"); return -1; } } while(1) { printf("I am mainpthread!\n"); sleep(1); } return 0; }
运行结果:
对比代码1和代码2,显然代码1的结果是和实际不符的,仔细对比代码我们发现代码1中的i是临时变量,是在栈中存储的,而代码2中的d是在堆中存储的,所以我们得出的结论是:创建线程时传递的参数的是在堆中开辟的变量才可以 线程的终止
线程的终止和进程的终止一样,也是有三种方法:
(1)从入口函数的return饭hi,该线程就退出掉了 代码:#include#include #include void* myPthread(void* arg) { while(1) { printf("I am workThread!\n"); sleep(3); return NULL; } return NULL; } int main() { pthread_t tid; int ret = pthread_create(&tid,NULL,myPthread,NULL); if(ret < 0) { perror("pthread_create"); return -1; } while(1) { printf("I am mainthread!\n"); sleep(1); } return 0; }
(2)pthread_exit函数
函数原型:#includevoid pthread_exit(void *retval);参数解释: retval:返回信息,可以给也可以不给,是返回给等待线程退出的执行流的,如果不给,则传递NULL
代码:
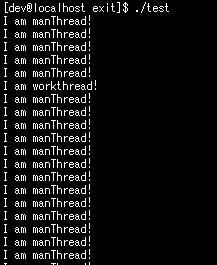
#include#include #include #include void* myPthread(void* arg) { sleep(5); printf("I am workthread!\n"); pthread_exit(NULL); return NULL; } int main() { pthread_t tid; int ret = pthread_create(&tid,NULL,myPthread,NULL); if(ret < 0) { perror("pthread_create"); return -1; } while(1) { printf("I am manThread!\n"); sleep(1); } return 0; }
运行结果:
(3)pthread_cancel函数
函数原型: #includeint pthread_cancel(pthread_t thread); 参数解释: thread:线程标识符返回值: 成功,返回0;错误返回错误码
注意:调用该函数的执行流可以取消其它线程,但是需要知道其他线程的线程标识符,也可以执行自己的取消自己,传入自己的线程标识符
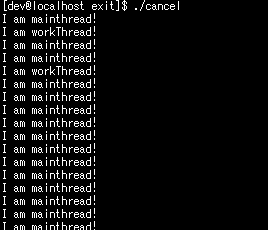
获取自己的线程标识符的方法:pthread_self();#include#include #include void* myPthread(void* arg) { while(1) { printf("I am workThread!\n"); sleep(3); pthread_cancel(pthread_self()); } return NULL; } int main() { pthread_t tid; int ret = pthread_create(&tid,NULL,myPthread,NULL); if(ret < 0) { perror("pthread_create"); return -1; } while(1) { printf("I am mainthread!\n"); sleep(1); } return 0; }
运行结果:
上面的代码运行结果都出现在打印“I am workThread!”以后就一直打印”I am mainThread!“的情况,因为此时我们创建的线程已经被退出了,只剩下主线程了。我们也可以使用pstack [进程号]命令查看。 把上面程序里的睡眠时间从3秒改到20秒,然后用ps命令产看线程标识符 用pstack [进程号命令查看] 这里我们就看到了我们创建的进程,过了20秒后我们在看一下 这次我们就只看到主线程了,因为我们创建的工作线程已经被我们退出掉了。 线程等待
如果上面的主线程先于我们创建的线程退出了会出现什么情况呢?我们写一个程序来看一下,在这个程序中我们让主线程退出掉。
代码:#include#include #include #include void* myPthread(void* arg) { while(1) { printf("I am workThread!\n"); sleep(1); } } int main() { pthread_t tid; int ret = pthread_create(&tid,NULL,myPthread,NULL); if(ret < 0) { perror("pthread_create"); return -1; } while(1) { printf("I am mainThread!\n"); pthread_cancel(pthread_self()); sleep(1); } return 0; }
运行结果:
我们看到主线程退出以后,工作线程还在继续工作,我们用ps命令查看一下它的状态,结果显示它正在处于僵尸状态 再用top -H -p [进程号]查看一下 因为已经退出的线程,他的空间没有被释放,还在进程的地址空间内,而新创建的线程是不会复用刚退出的地址空间的(线程在创建出来的时候属性默认的是joinable属性,这就意味着线程退出的时候需要其它执行流来回收线程的资源),这就需要线程等待了。 线程等待我们需要用到的函数是pthread_join函数。 函数原型: #includeint pthread_join(pthread_t thread, void**retval);参数说明: thread:要等待的线程的标识符 **retval: return:接受入口函数的返回值 pthread_exit:接收pthread_exit函数的参数 pthread_cancel:void**当中保存了一个常数PTHREAD_CANCELED返回值: 成功返回0,失败返回错误码。
注意:调用该函数的执行流在等待线程退出的时候,该执行流是阻塞在pthread_join函数中的
代码:#include#include #include #define PTHREADCOUNT 1 void* myPthread(void* arg) { while(1) { printf("I am workthream!\n"); sleep(1); pthread_cancel(pthread_self()); } } int main() { pthread_t tid[PTHREADCOUNT]; for(int i = 0;i < 1;i++) { int ret = pthread_create(&tid[i],NULL,myPthread,NULL); if(ret < 0) { printf("pthread_create"); return -1; } for(int i = 0;i < PTHREADCOUNT;i++) { pthread_join(tid[i],NULL); } while(1) { printf("I am main thread!\n"); sleep(6); printf("exit\n"); pthread_cancel(pthread_self()); } } return 0; }
运行结果:
这个程序主线程会阻塞在pthread_join函数,直到工作线程退出以后,才继续往下执行,也就不会产生僵尸进程了。 线程分离
与线程等待相对应的就是线程分离,线程分离的作用就是改变线程的属性,将joinable属性改为detach属性,这样,当线程退出的时候就不需要其它线程来回收退出线程的资源,操作系统会默认回收掉。
线程分离我们使用的函数叫pthread_detach函数原型: #includeint pthread_detach(pthread_t thread); 参数解释: thread:想要被分离线程的线程标识符 返回值:成功返回0,失败返回错误码
代码:
#include#include #include #define PTHREADCOUNT 1 void* myPthread(void* arg) { while(1) { printf("I am workthream!\n"); sleep(1); pthread_cancel(pthread_self()); } } int main() { pthread_t tid[PTHREADCOUNT]; for(int i = 0;i < 1;i++) { int ret = pthread_create(&tid[i],NULL,myPthread,NULL); if(ret < 0) { printf("pthread_create"); return -1; } for(int i = 0;i < PTHREADCOUNT;i++) { pthread_detach(tid[i],NULL); } while(1) { printf("I am main thread!\n"); sleep(6); } } return 0; }
运行结果:
发表评论
最新留言
网站不错 人气很旺了 加油
[***.192.178.218]2025年04月09日 13时48分25秒
关于作者

喝酒易醉,品茶养心,人生如梦,品茶悟道,何以解忧?唯有杜康!
-- 愿君每日到此一游!
推荐文章
redis向数组中添加值并查看数组长度
2019-03-05
JS编写一个函数,计算三个不同数字的大小,按从小到大顺序打印(穷举法)
2019-03-05
技术美术面试问题整理
2019-03-05
C++学习记录 五、C++提高编程(2)
2019-03-05
ORB-SLAM2:LoopClosing线程学习随笔【李哈哈:看看总有收获篇】
2019-03-05
js求阶乘
2019-03-05
简单的xml读取存储方法(未优化)
2019-03-05
Nginx---惊群
2019-03-05
项目中常用的审计类型概述
2019-03-05
(九)实现页面底部购物车的样式
2019-03-05
python-day3 for语句完整使用
2019-03-05
ButterKnife使用问题
2019-03-05
为什么讨厌所谓仿生AI的说法
2019-03-05
ORACLE 客户端工具
2019-03-05
使用第三方sdk,微信wechat扫码登录
2019-03-05
基于LabVIEW的入门指南
2019-03-05
“/”应用程序中的服务器错误。
2019-03-05
weblogic之cve-2015-4852
2019-03-05
白红宇的个人博客 - 记录点点滴滴的事 - 您是第 459516472 位访客
访问时间: 2025-04-19 10:41:13
访问IP: 18.117.250.210
Copyright © 2020 - 2025 css8.cn 京ICP备2021015314号-1
手机版