git head指向老版本_git工具的使用以及部署gitlab仓库详解
2.git相关概念 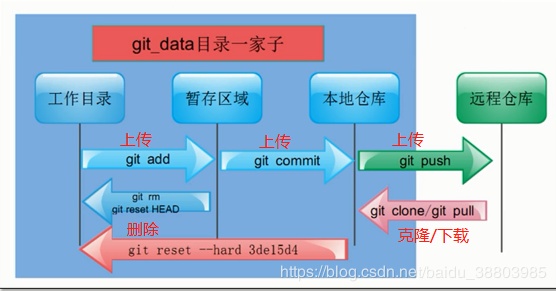 2.创建版本库 3.客户端配置 4.版本回退 5.删除和修改文件
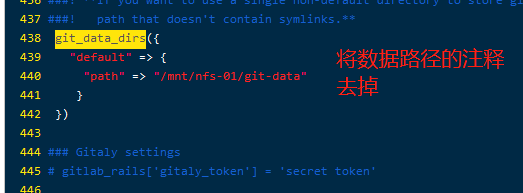
 新建文件
新建文件 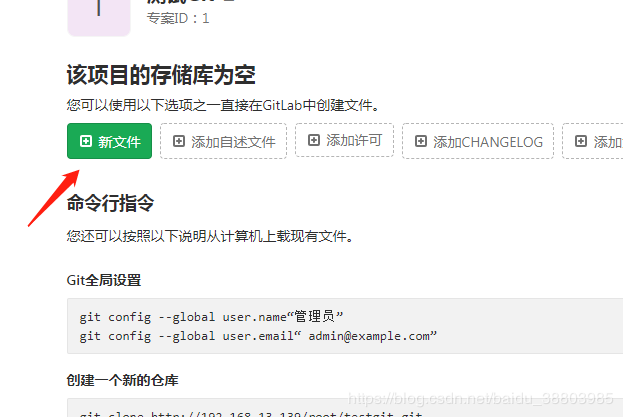
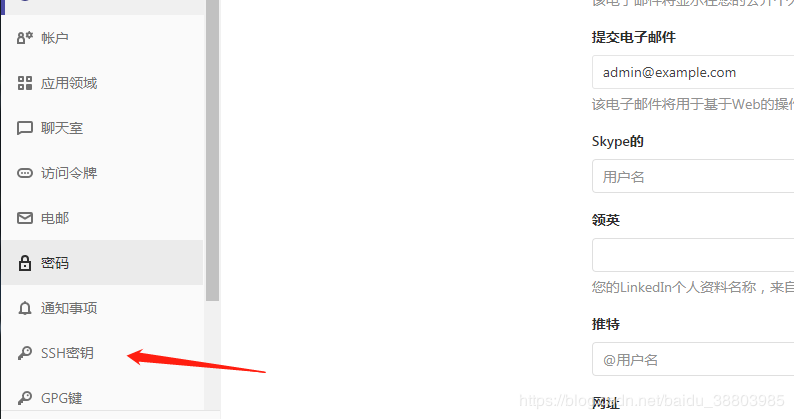
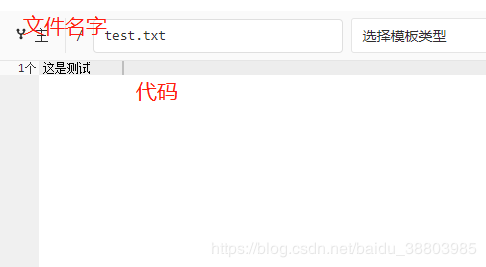 点击下面的提交变更。 创建秘钥:
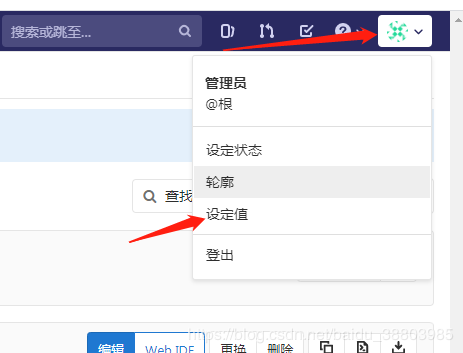
发布日期:2022-02-19 00:02:21
浏览次数:1
分类:技术文章
本文共 7525 字,大约阅读时间需要 25 分钟。
1.git介绍
1.git属于分布式版本控制系统:客户端并不只提取最新版本的文件,而是把原始的代码仓库完整地克隆下来。优点:a.由于任何人每次提取操作,实际上都是一次对代码仓库的完整备份,因此近乎所有的操作都可以在本地执行,速度就是相当的快,并且可以在网络断开的时候操作仍然不受影响(只是更新到自己版本库里面),可以频繁的进行提交更新,等到有网络的时候再上传到远程的仓库就可以了。b.git的分支模型,相当的轻量级,被称为“必杀技”。缺点:a.每个开发人员都拥有所有的代码,不利于核心代码的保密(如果有重要代码需要保密,则不建议使用git)
服务端和客户端都有:工作区 存放git版本仓库的目录就是工作区(放源代码的地方)版本库 工作区有一个隐藏目录.git,这个不算工作区,而是Git的版本库。暂存区 Git的版本库里存了很多东西,其中最重要的就是称为stage(或者叫index)的暂存区,(会将代码添加到缓存区,没有问题之后在提交到本地版本库)HEAD 指向你最近一次提交后的结果。(现在是哪个版本,头就会指向这个版本)版本号 一个版本号对应一个版本,一般通过版本号来恢复版本版本日志 里面存放版本号
添加文件到暂存区stage:# git add 文件名 添加该文件到暂存区# git add * 将工作目录中所有文件添加到暂存区从暂存区stage提交到当前master分支的HEAD:# git commit -m “版本描述信息” #版本描述信息自定义,但是要有意义,能看懂# git push origin master #上传到master分支# git log #查看日志,里面有所有的版本号
2.git部署
1.准备前提准备两台虚拟机,一台作为服务端,一台作为客户端
git-server 192.168.13.139 充当中央服务器git-client 192.168.13.140
两台虚拟机需要1.关闭selinux和防火墙2.安装git3.添加邮箱和用户因为Git是分布式版本控制系统,所以,每个机器都必须自报家门:你的名字和Email地址(客户端和服务端的邮箱和用户名要不一样)[root@git-server ~]# systemctl stop firewalld && setenforce 0[root@git-server ~]# yum -y install git [root@git-server ~]# git config --global user.email "yjssjm@163.com" #邮箱可以自定义,不存在的也行[root@git-server ~]# git config --global user.name "yjssjm" #添加用户[root@git-server ~]# cat /root/.gitconfig #查看刚刚配置的邮箱和用户[root@git-server ~]# git config --global color.ui true #语法高亮(有颜色)[root@git-server ~]# git config --list #查看全局配置user.email=yjssjm@163.comuser.name=yjssjmcolor.ui=true
服务端:192.168.13.139[root@git-server ~]# mkdir /git-test[root@git-server ~]# useradd git #创建一个git用户用来运行git[root@git-server ~]# passwd git #给用户设置密码[root@git-server ~]# cd /git-test/[root@git-server git-test]# git init --bare testgit #创建裸库(testgit工作目录)Initialized empty Git repository in /git-test/testgit/[root@git-server git-test]# chown git.git /git-test -R #修改权限2.仓库创建完成后查看库目录:[root@git-server git-test]# cd testgit/[root@git-server testgit]# lsbranches config description HEAD hooks info objects refs
192.168.13.139[root@git-client ~]# cd[root@git-client ~]# ssh-keygen #生成秘钥[root@git-client ~]# ssh-copy-id -i git@192.168.13.139 #将秘钥传输到git服务器中的git用户[root@git-client ~]# yum install -y git[root@localhost ~]# git clone git@192.168.13.139:/git-test/testgit/ #用git克隆仓库正克隆到 'testgit'...warning: 您似乎克隆了一个空版本库。#因为没有数据,所以警告是一个空的版本库[root@git-client ~]# ls #查看仓库已经克隆下来了anaconda-ks.cfg testgit#如果你客户端忘了创建用户和邮箱的话,下面测试可能会报错git config --global user.email "gaigai@163.com" ----设置邮箱(自定义的也行)git config --global user.name "gaigai" ----加添用户
测试创建文件模拟代码提交到仓库
1.在testgit目录下创建一个测试文件test.txt[root@git-client ~]# cd testgit/[root@git-client testgit]# cat test.txt #随便写点东西this is test2.把文件添加到暂存区:使用 "git add" 建立跟踪[root@git-client testgit]# git add test.txt注: 这里可以使用 git add * 或者 git add -A[root@git-client testgit]# git status #查看# 位于分支 master## 初始提交## 要提交的变更:# (使用 "git rm --cached..." 撤出暂存区)## 新文件: test.txt#3.提交文件到仓库分支:[root@git-client testgit]# git commit -m "test1"[master(根提交) 514b8a7] test1 1 file changed, 1 insertion(+) create mode 100644 test.tx 4.查看git状态:[root@git-client testgit]# git status # 位于分支 master无文件要提交,干净的工作区5.修改文件后再此查看状态:[root@git-client testgit]# echo 'yjssjm' >> test.txt[root@git-client testgit]# git status# 位于分支 master# 尚未暂存以备提交的变更:# (使用 "git add ..." 更新要提交的内容)# (使用 "git checkout -- ..." 丢弃工作区的改动)## 修改: test.txt#修改尚未加入提交(使用 "git add" 和/或 "git commit -a")6.添加到暂存区[root@git-client testgit]# git add -A7.再次提交commit:[root@git-client testgit]# git commit -m "test2" test.txt[master 3eb7397] test2 1 file changed, 1 insertion(+)
已经提交了不合适的修改到版本库时,想要撤销本次提交,使用版本回退,不过前提是没有推送到远程库。 查看现在的版本:
[root@git-client testgit]# git log #查看版本显示的哪个版本在第一个就是当前使用的版本。
版本回退(切换): 在Git中,上一个版本就HEAD^,上上一个版本就是HEAD^^,当然往上100个版本写100个^比较容易数不过来,所以写成HEAD~100(一般使用id号来恢复)回到上一个版本比较方便
[root@git-client testgit]# git reset --hard HEAD^ #回到test1版本HEAD 现在位于 514b8a7 test1#注:消失的ID号:#回到早期的版本后再查看git log会发现最近的版本消失,可以使用reflog查看消失的版本ID,用于回退到消失的版本[root@git-client testgit]# git reflog514b8a7 HEAD@{0}: reset: moving to HEAD^3eb7397 HEAD@{1}: commit: test2514b8a7 HEAD@{2}: commit (initial): test1[root@git-client testgit]# git reset --hard 3eb7397 #我们再通过版本号回到test2版本HEAD 现在位于 3eb7397 test2 1.删除文件只需要注意一点,如果文件还没有添加到暂存区,可以直接删除[root@git-client testgit]# rm -rf 文件名 # 未添加到暂存区,可直接删除如果文件已经添加到暂存区,必须先从把它从暂存区移出来再删除[root@git-client testgit]# git rm --cache 文件名 #先从暂存区里面删除[root@git-client testgit]# rm -rf 文件名 #然后就可以删了2.暂存区修改文件名称[root@git-client testgit]# git mv 想要修改的文件名 修改之后的文件名3.创建分支[root@client testgit]# git push origin master #上传到本地仓库master分支,前提是先传到仓库[root@client testgit]# git branch dev #创建分支。[root@client testgit]# git branch #查看分支。*在哪里就表示当前是哪个分支 dev* master[root@client testgit]# git checkout dev #切换分支#切换分支后,再上传的话回传到当前分支上
3.部署gitlab服务(仓库)
此时在服务端上操作
1.配置环境192.168.13.1391.配置yum源[root@git-server ~]# cd /etc/yum.repos.d/[root@git-server yum.repos.d]# vi gitlab-ce.repo[gitlab-ce]name=Gitlab CE Repositorybaseurl=https://mirrors.tuna.tsinghua.edu.cn/gitlab-ce/yum/el$releasevergpgcheck=0enabled=12.安装相关依赖[root@git-server yum.repos.d]# yum -y install curl policycoreutils-python openssh-server[root@git-server yum.repos.d]# systemctl enable sshd[root@git-server yum.repos.d]# systemctl start sshd安装postfix[root@git-server yum.repos.d]# yum -y install postfix #安装邮箱[root@git-server yum.repos.d]# systemctl enable postfix[root@git-server yum.repos.d]# systemctl start postfix[root@git-server yum.repos.d]# yum install -y gitlab-ce #将会安装gitlab最新版本
我用的是12.6.3的版本的(推荐) git的12.6.3的rpm包 提取码:o3sr 使用 #yum -y install gitlab-ce-12.6.3-ce.0.el7.x86_64.rpm 命令下载
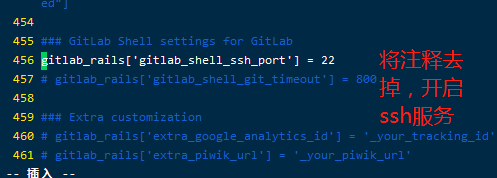
3.配置gitlab登录链接[root@git-server ~]# vim /etc/gitlab/gitlab.rb#找到external_url并将其ip地址修改为服务端的ipexternal_url 'http://192.168.13.139'#在最后一行添加时区gitlab_rails['time_zone'] = 'Asia/Shanghai'
初始化gitlab[root@git-server ~]# gitlab-ctl reconfigure #重新加载,需要等很长时间启动gitlab服务[root@git-server ~]# gitlab-ctl restart #启动
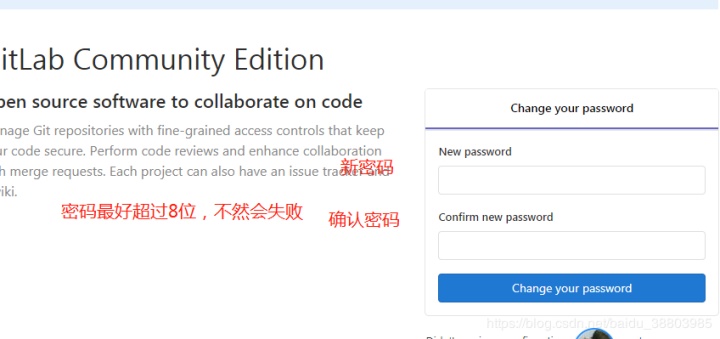
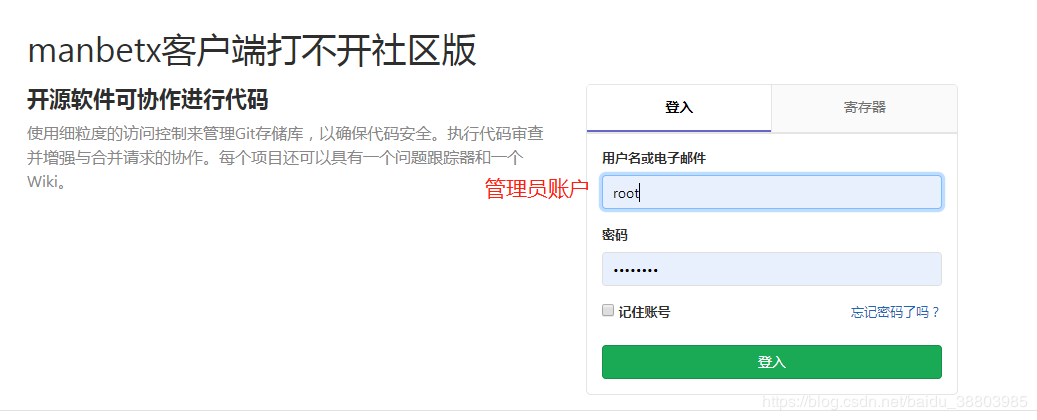
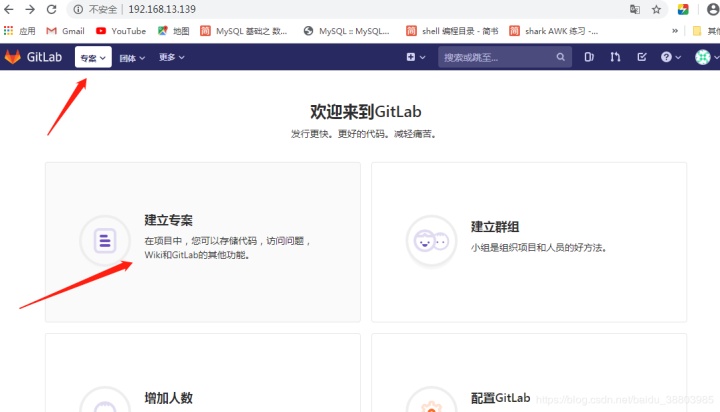
测试访问:http://192.168.13.139/
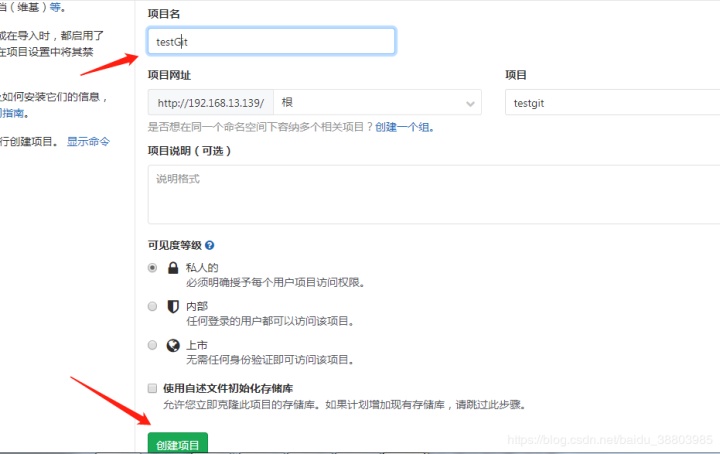
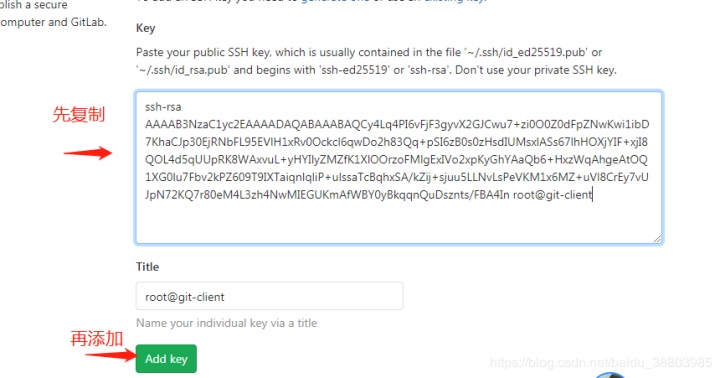
新建文件 点击下面的提交变更。 创建秘钥: 去客户端上查看公钥钥[root@git-client ~]# cat /root/.ssh/id_rsa.pub ssh-rsa AAAAB3NzaC1yc2EAAAADAQABAAABAQCy4Lq4PI6vFjF3gyvX2GJCwu7+zi0O0Z0dFpZNwKwi1ibD7KhaCJp30EjRNbFL95EVlH1xRv0Ockcl6qwDo2h83Qq+pSI6zB0s0zHsdIUMsxlASs67lhHOXjYIF+xjI8QOL4d5qUUpRK8WAxvuL+yHYIlyZMZfK1XlOOrzoFMlgExIVo2xpKyGhYAaQb6+HxzWqAhgeAtOQ1XG0lu7Fbv2kPZ609T9IXTaiqnlqliP+ulssaTcBqhxSA/kZij+sjuu5LLNvLsPeVKM1x6MZ+uVl8CrEy7vUJpN72KQ7r80eM4L3zh4NwMIEGUKmAfWBY0yBkqqnQuDsznts/FBA4In root@git-client然后将公钥复制到网页上
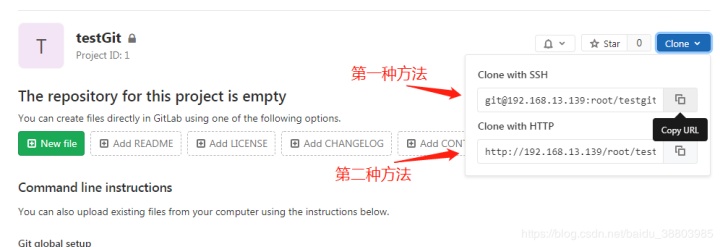
客户端 :192.168.13.140下载:第一种方法[root@git-client ~]# git clone git clone git@192.168.13.139:root/testgit.git Cloning into 'testgit'...remote: Enumerating objects: 6, done.remote: Counting objects: 100% (6/6), done.remote: Compressing objects: 100% (4/4), done.remote: Total 6 (delta 0), reused 0 (delta 0)Receiving objects: 100% (6/6), done.[root@git-client ~]# lstestgit[root@git-client ~]# cd testGit/[root@git-client testgit]# lstest.txt
如果你报错了Please make sure you have the correct access rights and the repository exists. 可能是版本问题,你可以用我的那个版本,也可以用下面第二种方法
第二种方法:[root@git-client ~]# git clone git@192.168.13.139:root/testgit.gitCloning into 'testgit'...Username for 'http://192.168.13.139': rootPassword for 'http://root@192.168.13.139':12345678 #为自己设置的密码remote: Enumerating objects: 6, done.remote: Counting objects: 100% (6/6), done.remote: Compressing objects: 100% (4/4), done.remote: Total 6 (delta 0), reused 0 (delta 0)Unpacking objects: 100% (6/6), done.[root@client ~]# lstestgit
你们的评论和点赞是我写文章的最大动力,蟹蟹。
转载地址:https://blog.csdn.net/weixin_34238178/article/details/112153878 如侵犯您的版权,请留言回复原文章的地址,我们会给您删除此文章,给您带来不便请您谅解!
发表评论
最新留言
能坚持,总会有不一样的收获!
[***.219.124.196]2024年05月03日 09时31分38秒
关于作者

喝酒易醉,品茶养心,人生如梦,品茶悟道,何以解忧?唯有杜康!
-- 愿君每日到此一游!
推荐文章
设置Golang的开发环境
2019-04-30
对HTTP/2的部分理解
2019-04-30
Golang 逃逸分析
2019-04-30
golang实现大数据量文件的排序
2019-04-30
golang中的time包
2019-04-30
golang fmt包中的占位符
2019-04-30
Docker下使用Redis
2019-04-30
Redis的主从和集群设置
2019-04-30
对Redis Cluster的理解
2019-04-30
清华师哥丢了个在Github下载量50万+的项目给我,让(附源码下载地址)
2019-04-30
The MASM32 SDK version 10 发布了!
2019-04-30
发布软件:TreeInfo(分层信息管理器)
2019-04-30
c++二分图的最大匹配
2019-04-30
c++点的距离
2019-04-30
c++实现彩色炫酷(?)画面
2019-04-30
c++马拦过河卒
2019-04-30
2019NOIP D4题 加工领奖
2019-04-30
1997年世界黑客大赛获奖作品
2019-04-30
论DEV-C++怎样才能做窗口
2019-04-30
白红宇的个人博客 - 记录点点滴滴的事 - 您是第 311049981 位访客
访问时间: 2024-05-05 08:19:38
访问IP: 3.129.210.17
Copyright © 2020 - 2023 blog.css8.cn 京ICP备2021015314号-1
手机版