本文共 9869 字,大约阅读时间需要 32 分钟。
转载自
spring基于注解的缓存
对于缓存声明,spring的缓存提供了一组java注解:
- @Cacheable:触发缓存写入。
- @CacheEvict:触发缓存清除。
- @CachePut:更新缓存(不会影响到方法的运行)。
- @Caching:重新组合要应用于方法的多个缓存操作。
- @CacheConfig:设置类级别上共享的一些常见缓存设置。
@Cacheable注解
顾名思义,@Cacheable可以用来进行缓存的写入,将结果存储在缓存中,以便于在后续调用的时候可以直接返回缓存中的值,而不必再执行实际的方法。 最简单的使用方式,注解名称=缓存名称,使用例子如下:
@Cacheable("books") public Book findBook(ISBN isbn) {...} 一个方法可以对应两个缓存名称,如下:
@Cacheable({"books", "isbns"}) public Book findBook(ISBN isbn) {...} @Cacheable的缓存名称是可以配置动态参数的,比如选择传入的参数,如下: (以下示例是使用SpEL声明,如果您不熟悉SpEL,可以阅读)
@Cacheable(cacheNames="books", key="#isbn") public Book findBook(ISBN isbn, boolean checkWarehouse, boolean includeUsed) @Cacheable(cacheNames="books", key="#isbn.rawNumber") public Book findBook(ISBN isbn, boolean checkWarehouse, boolean includeUsed) @Cacheable(cacheNames="books", key="T(someType).hash(#isbn)") public Book findBook(ISBN isbn, boolean checkWarehouse, boolean includeUsed)
@Cacheable还可以设置根据条件判断是否需要缓存
- condition:取决于给定的参数是否满足条件
- unless:取决于返回值是否满足条件
以下是一个简单的例子:
@Cacheable(cacheNames="book", condition="#name.length() < 32") public Book findBook(String name) @Cacheable(cacheNames="book", condition="#name.length() < 32", unless="#result.hardback") public Book findBook(String name)
@Cacheable还可以设置:keyGenerator(指定key自动生成方法),cacheManager(指定使用的缓存管理),cacheResolver(指定使用缓存的解析器)等,这些参数比较适合全局设置,这里就不多做介绍了。
@CachePut注解
@CachePut:当需要更新缓存而不干扰方法的运行时 ,可以使用该注解。也就是说,始终执行该方法,并将结果放入缓存,注解参数与@Cacheable相同。 以下是一个简单的例子:
@CachePut(cacheNames="book", key="#isbn") public Book updateBook(ISBN isbn, BookDescriptor descriptor)
通常强烈建议不要对同一方法同时使用@CachePut和@Cacheable注解,因为它们具有不同的行为。可能会产生不可思议的BUG哦。
@CacheEvict注解
@CacheEvict:删除缓存的注解,这对删除旧的数据和无用的数据是非常有用的。这里还多了一个参数(allEntries),设置allEntries=true时,可以对整个条目进行批量删除。 以下是个简单的例子:
@Caching注解
@CacheEvict(cacheNames="books") public void loadBooks(InputStream batch) //对cacheNames进行批量删除 @CacheEvict(cacheNames="books", allEntries=true) public void loadBooks(InputStream batch)
@Caching:在使用缓存的时候,有可能会同时进行更新和删除,会出现同时使用多个注解的情况.而@Caching可以实现。 以下是个简单的例子:
@Caching(evict = { @CacheEvict("primary"), @CacheEvict(cacheNames="secondary", key="#p0") }) public Book importBooks(String deposit, Date date) @CacheConfig注解
@CacheConfig:缓存提供了许多的注解选项,但是有一些公用的操作,我们可以使用@CacheConfig在类上进行全局设置。 以下是个简单的例子:
@CacheConfig("books") public class BookRepositoryImpl implements BookRepository { @Cacheable public Book findBook(ISBN isbn) {...} } 可以共享缓存名称,统一配置KeyGenerator,CacheManager,CacheResolver。
实例
来看看我们在springboot中怎么使用redis来作为缓存吧.
为spring cache配置redis作为缓存
1.在pom.xml引入redis依赖
org.springframework.boot spring-boot-starter-data-redis
2.springboot集成redis配置文件(在本地启动的redis),在springboot中使用redis,只要配置文件写有redis配置,代码就可以直接使用了。
spring: redis: database: 0 # Database index used by the connection factory. url: redis://user:@127.0.0.1:6379 # Connection URL. Overrides host, port, and password. User is ignored. Example: redis://user:password@example.com:6379 host: 127.0.0.1 # Redis server host. password: # Login password of the redis server. port: 6379 # Redis server port. ssl: false # Whether to enable SSL support. timeout: 5000 # Connection timeout.
3.redis缓存配置类CacheConfig,这里对spring的缓存进行了配置,包括KeyGenerator,CacheResolver,CacheErrorHandler,CacheManager,还有redis序列化方式。
/** * @author wwj */@Configurationpublic class CacheConfig extends CachingConfigurerSupport { @Resource private RedisConnectionFactory factory; /** * 自定义生成redis-key * * @return */ @Override @Bean public KeyGenerator keyGenerator() { return (o, method, objects) -> { StringBuilder sb = new StringBuilder(); sb.append(o.getClass().getName()).append("."); sb.append(method.getName()).append("."); for (Object obj : objects) { sb.append(obj.toString()); } System.out.println("keyGenerator=" + sb.toString()); return sb.toString(); }; } @Bean public RedisTemplate redisTemplate() { RedisTemplate redisTemplate = new RedisTemplate<>(); redisTemplate.setConnectionFactory(factory); GenericJackson2JsonRedisSerializer genericJackson2JsonRedisSerializer = new GenericJackson2JsonRedisSerializer(); redisTemplate.setKeySerializer(genericJackson2JsonRedisSerializer); redisTemplate.setValueSerializer(genericJackson2JsonRedisSerializer); redisTemplate.setHashKeySerializer(new StringRedisSerializer()); redisTemplate.setHashValueSerializer(genericJackson2JsonRedisSerializer); return redisTemplate; } @Bean @Override public CacheResolver cacheResolver() { return new SimpleCacheResolver(cacheManager()); } @Bean @Override public CacheErrorHandler errorHandler() { // 用于捕获从Cache中进行CRUD时的异常的回调处理器。 return new SimpleCacheErrorHandler(); } @Bean @Override public CacheManager cacheManager() { RedisCacheConfiguration cacheConfiguration = defaultCacheConfig() .disableCachingNullValues() .serializeValuesWith(RedisSerializationContext.SerializationPair.fromSerializer(new GenericJackson2JsonRedisSerializer())); return RedisCacheManager.builder(factory).cacheDefaults(cacheConfiguration).build(); }} 代码使用
测试@Cacheable方法
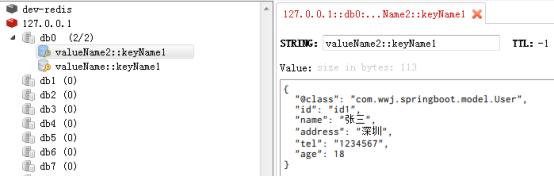
@Test public void findUserTest() { for (int i = 0; i < 3; i++) { System.out.println("第" + i + "次"); User user = userService.findUser(); System.out.println(user); } } @Override @Cacheable(value = {"valueName", "valueName2"}, key = "'keyName1'") public User findUser() { System.out.println("执行方法..."); return new User("id1", "张三", "深圳", "1234567", 18); } 执行结果
只有一次输出了'执行方法...',后面直接从缓存获取,不会再进入方法。
第0次执行方法...User{id='id1', name='张三', address='深圳', tel='1234567', age=18}第1次User{id='id1', name='张三', address='深圳', tel='1234567', age=18}第2次User{id='id1', name='张三', address='深圳', tel='1234567', age=18}
测试@CachePut方法:对缓存进行了修改
@Test public void updateUserTest() { userService.updateUser(); User user = userService.findUser(); System.out.println(user); } @Override @CachePut(value = "valueName", key = "'keyName1'") public User updateUser() { System.out.println("更新用户..."); return new User("id1", "李四", "北京", "1234567", 18); } 执行结果
对缓存进行了更新,获取值的时候取了新的值
更新用户...User{id='id1', name='李四', address='北京', tel='1234567', age=18} 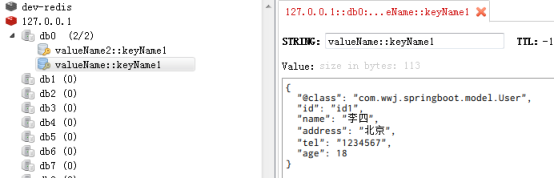
测试@CacheEvict方法:缓存被清空,再次findUser的时候又重新执行了方法。
@Test public void clearUserTest() { userService.clearUser(); User user = userService.findUser(); System.out.println(user); } @Override @CacheEvict(value = "valueName",allEntries = true) public void clearUser() { System.out.println("清除缓存..."); } 执行结果
这里清除了缓存,为什么还是没有执行方法呢?因为这个方法我们定了两个value值,清了一个还有一个
清除缓存...User{id='id1', name='张三', address='深圳', tel='1234567', age=18} 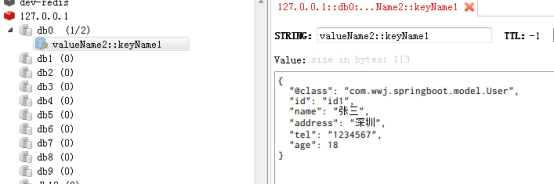
最后贴一下代码吧
User.java
package com.wwj.springboot.model;import java.io.Serializable;/** * @author wwj */public class User implements Serializable { public User() { } private String id; private String name; private String address; private String tel; private Integer age; //省略get,set,tostring} CacheTest.java
package com.wwj.springboot.cache;import com.wwj.springboot.model.User;import com.wwj.springboot.service.UserService;import org.junit.Test;import org.junit.runner.RunWith;import org.springframework.boot.test.context.SpringBootTest;import org.springframework.cache.annotation.EnableCaching;import org.springframework.test.context.junit4.SpringRunner;import javax.annotation.Resource;/** * @author wwj */@RunWith(SpringRunner.class)@SpringBootTest@EnableCachingpublic class CacheTest { @Resource private UserService userService; @Test public void findUserTest() { for (int i = 0; i < 3; i++) { System.out.println("第" + i + "次"); User user = userService.findUser(); System.out.println(user); } } @Test public void updateUserTest() { userService.updateUser(); User user = userService.findUser(); System.out.println(user); } @Test public void clearUserTest() { userService.clearUser(); User user = userService.findUser(); System.out.println(user); }} UserService.java
package com.wwj.springboot.service;import com.wwj.springboot.model.User;import java.util.List;/** * @author wwj */public interface UserService { /** * 获取用户 * @return user */ User findUser(); /** * 更新用户信息 * @return user */ User updateUser(); /** * 清除缓存的用户信息 */ void clearUser();} UserServiceImpl.java
package com.wwj.springboot.service.impl;import com.wwj.springboot.model.User;import com.wwj.springboot.service.UserService;import org.springframework.cache.annotation.CacheConfig;import org.springframework.cache.annotation.CacheEvict;import org.springframework.cache.annotation.CachePut;import org.springframework.cache.annotation.Cacheable;import org.springframework.stereotype.Service;/** * @author wwj */@Service@CacheConfig(cacheNames = "CacheConfigName")public class UserServiceImpl implements UserService { @Override @Cacheable(value = {"valueName", "valueName2"}, key = "'keyName1'") public User findUser() { System.out.println("执行方法..."); return new User("id1", "张三", "深圳", "1234567", 18); } @Override @CachePut(value = "valueName", key = "'keyName1'") public User updateUser() { System.out.println("更新用户..."); return new User("id1", "李四", "北京", "1234567", 18); } @Override @CacheEvict(value = "valueName",allEntries = true) public void clearUser() { System.out.println("清除缓存..."); }}
转载地址:https://maokun.blog.csdn.net/article/details/89739077 如侵犯您的版权,请留言回复原文章的地址,我们会给您删除此文章,给您带来不便请您谅解!
发表评论
最新留言
关于作者
