Android 自定义View-实现快速索引
 3)需要实现的功能: a.A-Z索引的绘制 b.处理Touch事件 c.提供回调函数 d.把汉字转换为拼音 e.进行排序展示 f.进行分组 g.将控件绑定到listview
 获得文本所在格子的宽高的代码:
发布日期:2021-06-30 22:37:15
浏览次数:2
分类:技术文章
本文共 11299 字,大约阅读时间需要 37 分钟。
一概述:
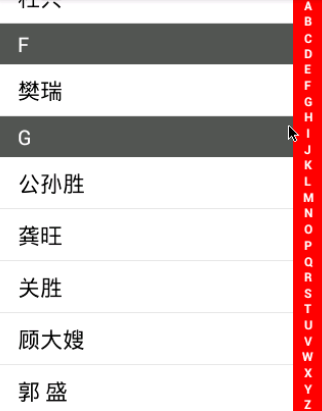
1)应用场景:微信好友列表,通讯录,应用管理,文件管理等
2)效果图: 3)需要实现的功能: a.A-Z索引的绘制 b.处理Touch事件 c.提供回调函数 d.把汉字转换为拼音 e.进行排序展示 f.进行分组 g.将控件绑定到listview ———————————————————————
有需求者请加qq:136137465,非诚勿扰 (java 架构师全套教程,共760G, 让你从零到架构师,每月轻松拿3万) 01.高级架构师四十二个阶段高 02.Java高级系统培训架构课程148课时 03.Java高级互联网架构师课程 04.Java互联网架构Netty、Nio、Mina等-视频教程 05.Java高级架构设计2016整理-视频教程 06.架构师基础、高级片 07.Java架构师必修linux运维系列课程 08.Java高级系统培训架构课程116课时 (送:hadoop系列教程,java设计模式与数据结构, Spring Cloud微服务, SpringBoot入门) ——————————————————————–二、创建自定义快速索引View –QuickIndexBar
1、第一步:创建activity
public class IndexActivity extends Activity { @Override protected void onCreate(Bundle savedInstanceState) { super.onCreate(savedInstanceState); setContentView(R.layout.activity_quickindex); }} 2、创建布局,把创建的QuickIndexBar添加到布局里
3、在QuickIndexBar里重写onDraw方法
1)先绘制’A’,如图: mTextPaint = new Paint();mTextPaint.setAntiAlias(true);mTextPaint.setColor(Color.WHITE);canvas.drawText(LETTERS[i],20,20,mPaint);
2)绘制A-Z:
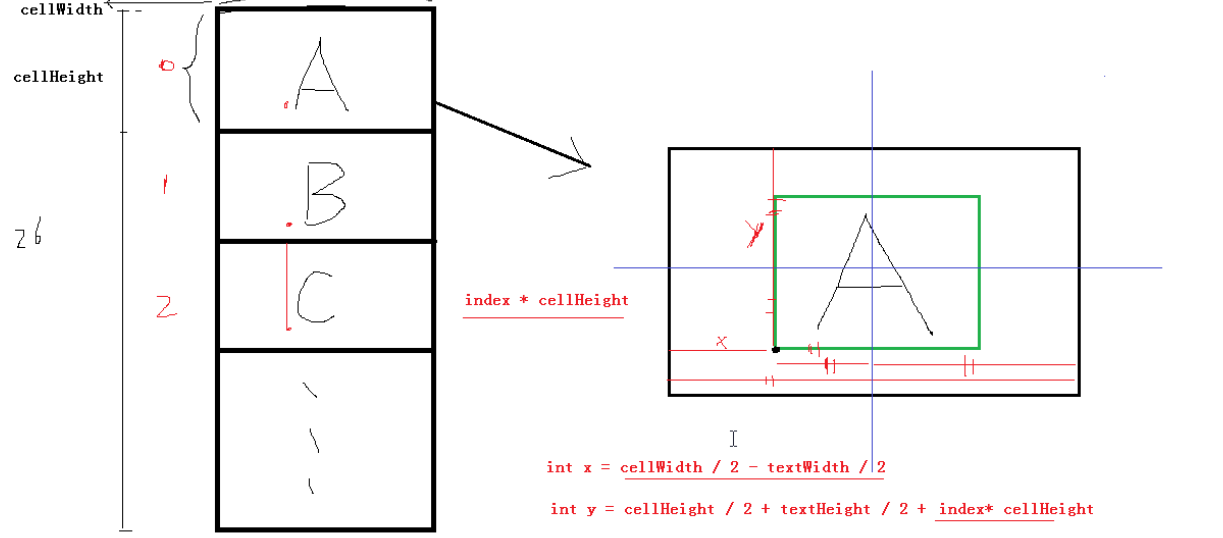
必须先求得其x,y的坐标,如图 获得文本所在格子的宽高的代码: @Override protected void onSizeChanged(int w, int h, int oldw, int oldh) { super.onSizeChanged(w, h, oldw, oldh); mCellWidth = getMeasuredWidth(); int height = getMeasuredHeight(); mCellHeight = height/LETTERS.length; } 3)如何获得文本的宽高:
mTextWidth = (int) (mTextPaint.measureText(text) + 0.5f);Rect bounds = new Rect();mTextPaint.getTextBounds(text, 0, text.length(), bounds);mTextHeigh = bounds.bottom - bounds.top;
4)开始绘制
@Override protected void onDraw(Canvas canvas) { super.onDraw(canvas); for (int i = 0; i < LETTERS.length; i++) { String text = LETTERS[i]; mTextWidth = (int) (mTextPaint.measureText(text) + 0.5f); Rect bounds = new Rect(); mTextPaint.getTextBounds(text, 0, text.length(), bounds); //mTextHeigh = bounds.bottom - bounds.top; mTextHeigh = bounds.height(); int x = mCellWidth/2 - mTextWidth/2; int y = mCellHeight/2 + mTextHeigh/2 + i*mCellHeight; canvas.drawText(LETTERS[i], x, mScreenHeight/LETTERS.length*(i+1), mTextPaint); } } 如图:
5)处理事件,先弹出点击的字母
/** * 必须返回true,才能执行move */ int downIndex = -1; @Override public boolean onTouchEvent(MotionEvent event) { switch (event.getAction()) { case MotionEvent.ACTION_DOWN: int index = (int) (event.getY() / mCellHeight); if (index > 0 && index < LETTERS.length) { Util.showMsg(getContext(), LETTERS[index]); } break; case MotionEvent.ACTION_MOVE: index = (int) (event.getY() / mCellHeight); //判断上面的触摸的是否一样 if (index > 0 && index < LETTERS.length && index != downIndex) { Util.showMsg(getContext(), LETTERS[index]); } break; case MotionEvent.ACTION_CANCEL: case MotionEvent.ACTION_UP: downIndex = -1; break; } return true; } 三、添加监听事件
1)定义
//-监听事件————————————————-private OnLetterLeftListener mLeftListener; public interface OnLetterLeftListener{ void onLetterClick(String letter); } public void setOnLetterLeftListener(OnLetterLeftListener leftListener){ this.mLeftListener = leftListener; } 2)使用:
if (index > 0 && index < LETTERS.length) { //Util.showMsg(getContext(), LETTERS[index]); if (mLeftListener != null) { mLeftListener.onLetterClick(LETTERS[index]); }} 四、IndexView完整 码:
/** * @描述 快速索引 * @项目名称 App_imooc * @包名 com.android.imooc.quickIndex * @类名 QuickIndexBar * @author chenlin * @date 2015年5月23日 下午9:37:23 * @version 1.0 */public class QuickIndexBar extends View { private Paint mTextPaint;// 字母画笔 private static final String[] LETTERS = { // 定义字符数组 "A", "B", "C", "D", "E", "F", "G", "H", "I", "J", "K", "L", "M", "N", "O", "P", "Q", "R", "S", "T", "U", "V", "W", "X", "Y", "Z" }; private int mScreenHeight;// 屏幕的高度 private int mCellWidth;// 文本框的宽度 private int mCellHeight;// 文本框的高度 private int mTextWidth;// 文本的宽度 private int mTextHeigh;// 文本的高度 //-监听事件------------------------------------------------- private OnLetterLeftListener mLeftListener; public interface OnLetterLeftListener{ void onLetterClick(String letter); } public void setOnLetterLeftListener(OnLetterLeftListener leftListener){ this.mLeftListener = leftListener; } public QuickIndexBar(Context context, AttributeSet attrs) { this(context, attrs, 0); } public QuickIndexBar(Context context) { this(context, null); } public QuickIndexBar(Context context, AttributeSet attrs, int defStyleAttr) { super(context, attrs, defStyleAttr); mTextPaint = new Paint(); mTextPaint.setAntiAlias(true); mTextPaint.setColor(Color.WHITE); mTextPaint.setTypeface(Typeface.DEFAULT_BOLD); WindowManager wm = (WindowManager) context.getSystemService(Context.WINDOW_SERVICE); DisplayMetrics outMetrics = new DisplayMetrics(); wm.getDefaultDisplay().getRealMetrics(outMetrics); mScreenHeight = outMetrics.heightPixels; } @Override protected void onDraw(Canvas canvas) { super.onDraw(canvas); for (int i = 0; i < LETTERS.length; i++) { String text = LETTERS[i]; mTextWidth = (int) (mTextPaint.measureText(text) + 0.5f); Rect bounds = new Rect(); mTextPaint.getTextBounds(text, 0, text.length(), bounds); // mTextHeigh = bounds.bottom - bounds.top; mTextHeigh = bounds.height(); int x = mCellWidth / 2 - mTextWidth / 2; int y = mCellHeight / 2 + mTextHeigh / 2 + i * mCellHeight; canvas.drawText(LETTERS[i], x, y, mTextPaint); } } @Override protected void onSizeChanged(int w, int h, int oldw, int oldh) { super.onSizeChanged(w, h, oldw, oldh); mCellWidth = getMeasuredWidth(); int height = getMeasuredHeight(); mCellHeight = height / LETTERS.length; } /** * 必须返回true,才能执行move */ int downIndex = -1; @Override public boolean onTouchEvent(MotionEvent event) { switch (event.getAction()) { case MotionEvent.ACTION_DOWN: int index = (int) (event.getY() / mCellHeight); if (index > 0 && index < LETTERS.length) { //Util.showMsg(getContext(), LETTERS[index]); if (mLeftListener != null) { mLeftListener.onLetterClick(LETTERS[index]); } downIndex = index; } break; case MotionEvent.ACTION_MOVE: index = (int) (event.getY() / mCellHeight); //判断上面的触摸的是否一样 if (index > 0 && index < LETTERS.length && index != downIndex) { //Util.showMsg(getContext(), LETTERS[index]); if (mLeftListener != null) { mLeftListener.onLetterClick(LETTERS[index]); } downIndex = index; } break; case MotionEvent.ACTION_CANCEL: case MotionEvent.ACTION_UP: downIndex = -1; break; } return true; }} 五、把汉字转换成拼音:
1)创建工具类:
/** * 拼音转换工具 * * @描述 TODO * @项目名称 App_imooc * @包名 com.android.imooc.quickIndex * @类名 PinyinUtils * @author chenlin * @date 2016年5月24日 下午9:27:03 * @version 1.0 */public class PinyinUtils { /** * 根据传入的字符串(包含汉字),得到拼音 * * @param str * 字符串 * @return */ public static String getPinyin(String str) { HanyuPinyinOutputFormat format = new HanyuPinyinOutputFormat(); //把字母转换成大写 format.setCaseType(HanyuPinyinCaseType.UPPERCASE); format.setToneType(HanyuPinyinToneType.WITHOUT_TONE); StringBuilder sb = new StringBuilder(); char[] charArray = str.toCharArray(); for (int i = 0; i < charArray.length; i++) { char c = charArray[i]; // 如果是空格, 跳过 if (Character.isWhitespace(c)) { continue; } if (c >= -127 && c < 128) { // 肯定不是汉字 sb.append(c); } else { String s = ""; try { // 通过char得到拼音集合. 单 -> dan, shan s = PinyinHelper.toHanyuPinyinStringArray(c, format)[0]; sb.append(s); } catch (BadHanyuPinyinOutputFormatCombination e) { e.printStackTrace(); sb.append(s); } } } return sb.toString(); }} 2)创建实体类,并实现排序:
/** * @描述 TODO * @项目名称 App_imooc * @包名 com.android.imooc.quickIndex * @类名 Person * @author chenlin * @date 2015年5月24日 下午10:09:25 * @version 1.0 */public class Person implements Comparable{ private String name; private String pinyin; public Person(String name){ this.name = name; this.pinyin = PinyinUtils.getPinyin(name); } public String getName() { return name; } public void setName(String name) { this.name = name; } public String getPinyin() { return pinyin; } public void setPinyin(String pinyin) { this.pinyin = pinyin; } @Override public int compareTo(Person another) { return this.pinyin.compareTo(another.pinyin); }}
六、加载数据到listView上面:
1)在布局里添加listView控件
2)创建listView的item布局
3)初始化数据:
private void initDatas() { mDatas = new ArrayList (); for (int i = 0; i < Cheeses.NAMES.length; i++) { Person person = new Person(Cheeses.NAMES[i]); mDatas.add(person); Collections.sort(mDatas); //Collections.sort(mDatas, comparator); } } 4)初始化adapter,这里使用的adapter是github上的控件base-adapter-helper
下载地址:private QuickAdaptermAdapter = new QuickAdapter (this, R.layout.item_quickindex) { @Override protected void convert(BaseAdapterHelper helper, Person item) { //开始分组 String str = null; String currentLetter = item.getPinyin().charAt(0) + ""; // 根据上一个首字母,决定当前是否显示字母 int position = helper.getPosition(); if(position == 0){ str = currentLetter; }else { // 上一个人的拼音的首字母 String preLetter = mDatas.get(position - 1).getPinyin().charAt(0) + ""; if(!TextUtils.equals(preLetter, currentLetter)){ str = currentLetter; } } // 根据str是否为空,决定是否显示索引栏 helper.setVisible(R.id.tv_index, str == null ? false:true); helper.setText(R.id.tv_index, currentLetter); helper.setText(R.id.tv_name, item.getName()); } };
5)设置数据:
private void initViews() { mListView = (ListView) findViewById(R.id.lv_index); mAdapter.addAll(mDatas); mListView.setAdapter(mAdapter); mIndexBar = (QuickIndexBar) findViewById(R.id.indexBar); mIndexBar.setOnLetterLeftListener(new OnLetterLeftListener() { @Override public void onLetterClick(String letter) { //Util.showMsg(IndexActivity.this, letter); //根据字母定位 for (int i = 0; i 七、源码下载:
链接: 密码:8gx3
转载地址:https://lovoo.blog.csdn.net/article/details/51485112 如侵犯您的版权,请留言回复原文章的地址,我们会给您删除此文章,给您带来不便请您谅解!
发表评论
最新留言
哈哈,博客排版真的漂亮呢~
[***.90.31.176]2024年04月06日 18时38分46秒
关于作者

喝酒易醉,品茶养心,人生如梦,品茶悟道,何以解忧?唯有杜康!
-- 愿君每日到此一游!
推荐文章
Python 之 histogram直方图
2019-04-30
Python实现决策树 Desision Tree & 可视化
2019-04-30
决策树 Decision tree
2019-04-30
nominal和ordinal & 数据处理中四种基本数据类型
2019-04-30
Grid SearchCV(网格搜索)& Python实现
2019-04-30
单目深度估计 monodepth2模型 代码
2019-04-30
位图索引Bitmap indexes
2019-04-30
启发函数heuristic 与 A*
2019-04-30
Oracle 作业记录
2019-04-30
OpenCV实战(二)——答题卡识别判卷
2019-04-30
目标检测神经网络的发展历程(52 个目标检测模型)
2019-04-30
Boundary loss 损失函数
2019-04-30
IEEE与APA引用格式
2019-04-30
pytorch训练cifar10数据集查看各个种类图片的准确率
2019-04-30
白红宇的个人博客 - 记录点点滴滴的事 - 您是第 311219148 位访客
访问时间: 2024-05-05 23:12:22
访问IP: 18.218.168.16
Copyright © 2020 - 2023 blog.css8.cn 京ICP备2021015314号-1
手机版