本文共 6284 字,大约阅读时间需要 20 分钟。
ConfigMap是Kubernetes 在1.2版本中引入的功能,这篇文章围绕者ConfigMap的4种常用的方式创建方法进行介绍,并将关联的查询和修改删除等操作进行说明。
为什么使用ConfigMap
这里使用一张来源与网络的图来说明ConfigMap常见的使用场景之一:
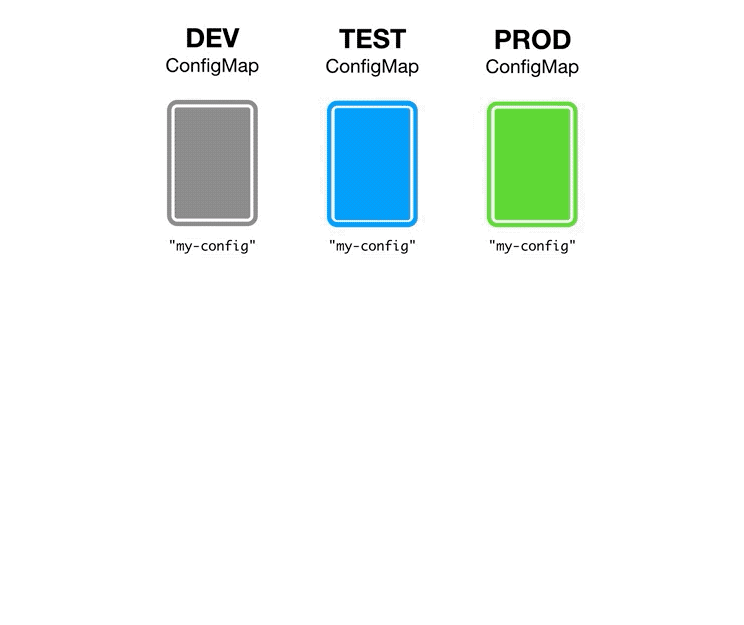 在Kubernetes 引入ConfigMap时的说明种提到是为了进行“动态配置管理”,上述图示很好地进行了说明,比如名为my-config的配置内容,在开发、测试和生产有不同的配置,通过ConfigMap即可对配置进行动态管理,根据需要进行关联,在实际的使用种更加灵活。
 创建ConfigMap的方式
常见的创建方式有如下4种:
- 使用--from-literal选项在命令行中直接创建
- 使用--from-file选项指定配置文件创建
- 使用--from-file选项指定目录进行创建
- 使用-f选项指定标准的ConfigMap的yaml文件进行创建
环境准备
本文使用Kubernetes 1.17,可参看下文进行快速环境搭建:
查询ConfigMap的方法
- 查询缺省的default命名空间的ConfigMap信息
执行命令:kubectl get configmap
或者
执行命令:kubectl get cm
- 查询指定命令空间的ConfigMap信息
执行命令:kubectl get configmap -n 命名空间名称
- 查询所有命令空间的ConfigMap信息
执行命令:kubectl get configmap -A
或者
执行命令:kubectl get cm -A
事前确认
[root@host131 config]# kubectl get configmapNo resources found in default namespace.[root@host131 config]#
创建方式1: 使用from-literal选项
执行命令:kubectl create configmap ConfigMap名称 --from-literal=key1=value1 --from-literal=key2=value2 …
执行示例:
| 设定项目 | 设定值 |
|---|---|
| user.name | liumiao |
| user.id | 1001 |
[root@host131 config]# kubectl create configmap user-configmap-literal --from-literal=user.name=liumiao --from-literal=user.id=1001configmap/user-configmap-literal created[root@host131 config]#
查询创建的ConfigMap信息
[root@host131 config]# kubectl get configmapNAME DATA AGEuser-configmap-literal 2 94s[root@host131 config]# kubectl describe configmap user-configmap-literalName: user-configmap-literalNamespace: defaultLabels:Annotations: Data====user.id:----1001user.name:----liumiaoEvents: [root@host131 config]#
创建方式2: 使用from-file选项(指定文件名)
执行命令:kubectl create configmap ConfigMap名称 --from-file=ConfigMap文件名
执行示例:
| 设定项目 | 设定值 |
|---|---|
| user.name | liumiao |
| user.id | 1001 |
保存上述设定的ConfigMap文件名称为:
[root@host131 config]# lsuser.properties[root@host131 config]# cat user.properties user.name=liumiaouser.id=1001[root@host131 config]#
创建ConfigMap文件
[root@host131 config]# kubectl create configmap user-configmap-file --from-file=user.propertiesconfigmap/user-configmap-file created[root@host131 config]#
确认结果
[root@host131 config]# kubectl get cmNAME DATA AGEuser-configmap-file 1 5suser-configmap-literal 2 8m57s[root@host131 config]# kubectl describe configmap user-configmap-fileName: user-configmap-fileNamespace: defaultLabels:Annotations: Data====user.properties:----user.name=liumiaouser.id=1001Events: [root@host131 config]#
创建方式3: 使用from-file选项(指定目录名)
执行命令:kubectl create configmap ConfigMap名称 --from-file=ConfigMap文件所在目录名
此种方式与方式2的区别在于如果指定目录下可能会有多个文件
执行示例:
| 设定项目 | 设定值 |
|---|---|
| user.name | liumiao |
| user.id | 1001 |
保存上述设定的ConfigMap文件名称为:
[root@host131 config]# lsuser.properties[root@host131 config]# cat user.properties user.name=liumiaouser.id=1001[root@host131 config]#
指定当前目录进行创建
[root@host131 config]# kubectl create configmap user-configmap-dir --from-file=.configmap/user-configmap-dir created[root@host131 config]#
确认结果
[root@host131 config]# kubectl get configmapNAME DATA AGEuser-configmap-dir 1 5suser-configmap-file 1 3m58suser-configmap-literal 2 12m[root@host131 config]# kubectl describe configmap user-configmap-dirName: user-configmap-dirNamespace: defaultLabels:Annotations: Data====user.properties:----user.name=liumiaouser.id=1001Events: [root@host131 config]#
创建方式4: 使用-f选项
执行命令:kubectl create -f ConfigMap的yaml文件
此种方式的区别在于包括类型、名称以及内容都需要在yaml文件中进行说明,事前准备如下配置文件
[root@host131 config]# cat prometheus.configmap.yml apiVersion: v1kind: ConfigMapmetadata: name: prometheus-configmapdata: prometheus.yml: | global: scrape_interval: 10s evaluation_interval: 10s scrape_configs: - job_name: 'prometheus' static_configs: - targets: ['localhost:9090'][root@host131 config]#
创建ConfigMap
[root@host131 config]# kubectl create -f prometheus.configmap.yml configmap/prometheus-configmap created[root@host131 config]#
结果确认
[root@host131 config]# kubectl get cmNAME DATA AGEprometheus-configmap 1 8suser-configmap-dir 1 6m21suser-configmap-file 1 10muser-configmap-literal 2 19m[root@host131 config]# [root@host131 config]# kubectl describe cm prometheus-configmapName: prometheus-configmapNamespace: defaultLabels:Annotations: Data====prometheus.yml:----global: scrape_interval: 10s evaluation_interval: 10sscrape_configs: - job_name: 'prometheus' static_configs: - targets: ['localhost:9090']Events: [root@host131 config]#
删除操作
执行命令:kubectl delete configmap ConfigMap名称
执行示例
[root@host131 config]# kubectl get cmNAME DATA AGEprometheus-configmap 1 5m40suser-configmap-dir 1 11muser-configmap-file 1 15muser-configmap-literal 2 24m[root@host131 config]# kubectl delete configmap user-configmap-literalconfigmap "user-configmap-literal" deleted[root@host131 config]# kubectl get cmNAME DATA AGEprometheus-configmap 1 6m10suser-configmap-dir 1 12muser-configmap-file 1 16m[root@host131 config]#
修改操作
执行命令:kubectl edit configmap ConfigMap名称
事前确认
[root@host131 config]# kubectl describe configmap user-configmap-fileName: user-configmap-fileNamespace: defaultLabels:Annotations: Data====user.properties:----user.name=liumiaouser.id=1001Events: [root@host131 config]#
修改ConfigMap设定内容
[root@host131 config]# kubectl edit configmap user-configmap-fileconfigmap/user-configmap-file edited[root@host131 config]#
修改内容如下所示
apiVersion: v1data: user.properties: | user.name=liumiaocn user.id=1003kind: ConfigMapmetadata: creationTimestamp: "2020-01-03T06:18:06Z" name: user-configmap-file namespace: default resourceVersion: "36993" selfLink: /api/v1/namespaces/default/configmaps/user-configmap-file uid: fc26a0ff-594b-4b4d-bb86-69ee598de97f
修改结果确认
[root@host131 config]# kubectl describe configmap user-configmap-fileName: user-configmap-fileNamespace: defaultLabels:Annotations: Data====user.properties:----user.name=liumiaocnuser.id=1003Events: [root@host131 config]#
转载地址:https://liumiaocn.blog.csdn.net/article/details/103818799 如侵犯您的版权,请留言回复原文章的地址,我们会给您删除此文章,给您带来不便请您谅解!
发表评论
最新留言
关于作者
