本文共 7003 字,大约阅读时间需要 23 分钟。
之前已经学习了socket通信的bio、nio、aio模型,但是如果要实际在工作中应用,还需要不断完善,扩展和优化,有很多细节问题需要处理,比如tcp的拆包粘包问题,数据接收的大小,实际通信中读取和应答的业务逻辑处理等,这些都需要花时间和经验去处理,不是很容易的事情。但是netty!
让我们不用再编写复杂的代码逻辑去实现通信!
也不需要去考虑性能问题!
不需要考虑编解码问题!
拆包粘包问题!
netty都已经帮我们实现了!
Netty是最流行的NIO框架,它的健壮性、功能、性能、可定制性、 可扩展性在同类框架都是首屈一指的,它已经得到成千上白的商业项目验证,如hadoop的rpc框架Avro,以及RocketMq、还有主流的分布式框架Dubbox等等!
netty实现服务器通信的步骤:
1 创建两个NIO的线程组,一个专门用于接收客户端的连接,一个则进行网络通信数据读写。
2 创建一个ServerBootrstrap对象作为服务端辅助工具类,配置一系列参数,例如定义backlog大小等等。
3 创建一个实际处理类ChannelInitializer,进行初始化的准备工作,比如设置接收传输数据的字符集、格式和业务处理器。
4 绑定端口,执行同步阻塞方法等待服务器端启动即可。
简单四个步骤,服务器端就编写完成,且健壮稳定。之前编写nio是不可能的。
服务器端代码:
import io.netty.bootstrap.ServerBootstrap;import io.netty.channel.ChannelFuture;import io.netty.channel.ChannelInitializer;import io.netty.channel.ChannelOption;import io.netty.channel.EventLoopGroup;import io.netty.channel.nio.NioEventLoopGroup;import io.netty.channel.socket.SocketChannel;import io.netty.channel.socket.nio.NioServerSocketChannel;public class Server { public static void main(String[] args) throws Exception { //1 创建线两个程组 //一个是用于处理服务器端接收客户端连接的 EventLoopGroup pGroup = new NioEventLoopGroup(); //一个是进行网络通信的(网络读写的) EventLoopGroup cGroup = new NioEventLoopGroup(); //2 创建辅助工具类,用于服务器通道的一系列配置 ServerBootstrap b = new ServerBootstrap(); b.group(pGroup, cGroup) //绑定俩个线程组 .channel(NioServerSocketChannel.class) //指定NIO的模式 .option(ChannelOption.SO_BACKLOG, 1024) //设置tcp缓冲区 .option(ChannelOption.SO_SNDBUF, 32*1024) //设置发送缓冲大小32k .option(ChannelOption.SO_RCVBUF, 32*1024) //这是接收缓冲大小32k .option(ChannelOption.SO_KEEPALIVE, true) //保持连接 .childHandler(new ChannelInitializer () { @Override protected void initChannel(SocketChannel sc) throws Exception { //3 在这里配置具体数据接收方法的处理 sc.pipeline().addLast(new ServerHandler()); } }); //4 进行绑定端口8765 阻塞直到绑定成功 ChannelFuture cf1 = b.bind(8765).sync(); //5 等待关闭 /** * 如果用户操作调用了sync或者await方法,会在对应的future对象上阻塞用户线程,例如future.channel().closeFuture().sync() * 所有执行channel.closeFuture().sync()就是执行的CloseFuturn的sync方法,这步是会将当前线程阻塞在CloseFuture上 */ cf1.channel().closeFuture().sync(); pGroup.shutdownGracefully(); cGroup.shutdownGracefully(); }} 服务器端处理器类ServerHandler:
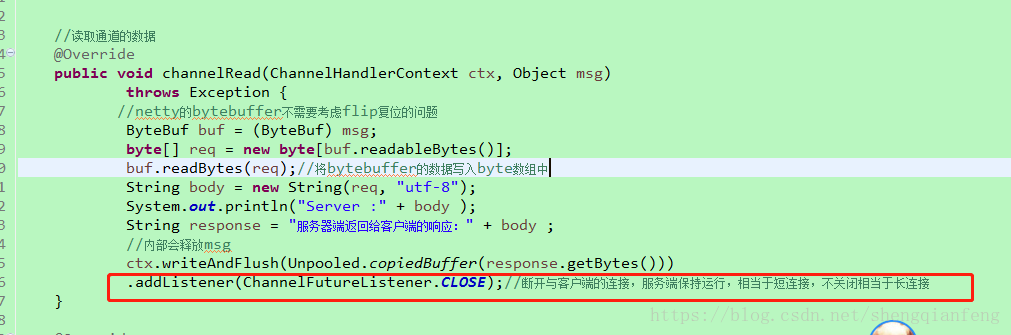
import io.netty.buffer.ByteBuf;import io.netty.buffer.Unpooled;import io.netty.channel.ChannelFutureListener;import io.netty.channel.ChannelHandlerAdapter;import io.netty.channel.ChannelHandlerContext;/** * 服务端业务处理类 * @author jeffSheng * */public class ServerHandler extends ChannelHandlerAdapter { @Override public void channelActive(ChannelHandlerContext ctx) throws Exception { System.out.println("server channel active... "); } //读取通道的数据 @Override public void channelRead(ChannelHandlerContext ctx, Object msg) throws Exception { //netty的bytebuffer不需要考虑flip复位的问题 ByteBuf buf = (ByteBuf) msg; byte[] req = new byte[buf.readableBytes()]; buf.readBytes(req);//将bytebuffer的数据写入byte数组中 String body = new String(req, "utf-8"); System.out.println("Server :" + body ); String response = "服务器端返回给客户端的响应:" + body ; //内部会释放msg ctx.writeAndFlush(Unpooled.copiedBuffer(response.getBytes())) .addListener(ChannelFutureListener.CLOSE);//断开与客户端的连接,服务端保持运行,相当于短连接,不关闭相当于长连接 } @Override public void channelReadComplete(ChannelHandlerContext ctx) throws Exception { System.out.println("读完了"); ctx.flush(); } @Override public void exceptionCaught(ChannelHandlerContext ctx, Throwable t) throws Exception { ctx.close(); }} 客户端Client:
import io.netty.bootstrap.Bootstrap;import io.netty.buffer.Unpooled;import io.netty.channel.ChannelFuture;import io.netty.channel.ChannelInitializer;import io.netty.channel.EventLoopGroup;import io.netty.channel.nio.NioEventLoopGroup;import io.netty.channel.socket.SocketChannel;import io.netty.channel.socket.nio.NioSocketChannel;public class Client { public static void main(String[] args) throws Exception{ //客户端只需要一个EventLoopGroup线程组用于发送请求 EventLoopGroup group = new NioEventLoopGroup(); Bootstrap b = new Bootstrap();//客户端的辅助工具类 b.group(group) .channel(NioSocketChannel.class)//指定客户端的NIO socket通信模式 .handler(new ChannelInitializer () { //添加客户端处理器到管道末端 @Override protected void initChannel(SocketChannel sc) throws Exception { sc.pipeline().addLast(new ClientHandler()); } }); //阻塞直到连接过程结束 ChannelFuture cf1 = b.connect("127.0.0.1", 8765).sync(); //多端口发送消息// Thread.sleep(1000); //基于流传输 所以最终发送给服务器的数据可能会被分割成跟原来完全不同的数据块 cf1.channel().writeAndFlush(Unpooled.copiedBuffer("777".getBytes())); cf1.channel().writeAndFlush(Unpooled.copiedBuffer("666".getBytes())); cf1.channel().closeFuture().sync();//当服务器端断开与客户端连接后,代码解除阻塞继续往下走 group.shutdownGracefully(); }} 客户端处理类ClientHandler:
import io.netty.buffer.ByteBuf;import io.netty.channel.ChannelHandlerAdapter;import io.netty.channel.ChannelHandlerContext;import io.netty.util.ReferenceCountUtil;/** * 客户端业务处理类 * @author jeffSheng * */public class ClientHandler extends ChannelHandlerAdapter{ @Override public void channelActive(ChannelHandlerContext ctx) throws Exception { } //读取通道数据 @Override public void channelRead(ChannelHandlerContext ctx, Object msg) throws Exception { try { ByteBuf buf = (ByteBuf) msg; byte[] req = new byte[buf.readableBytes()]; buf.readBytes(req); String body = new String(req, "utf-8"); System.out.println("Client :" + body ); String response = "客户端收到服务器端的返回信息:" + body; System.out.println(response); } finally { //在netty中必须释放掉msg,否则会内存泄露,除非使用ChannelHandlerContext的write方法内部会给予释放 ReferenceCountUtil.release(msg); } } @Override public void channelReadComplete(ChannelHandlerContext ctx) throws Exception { } @Override public void exceptionCaught(ChannelHandlerContext ctx, Throwable cause) throws Exception { ctx.close(); }} 打印:
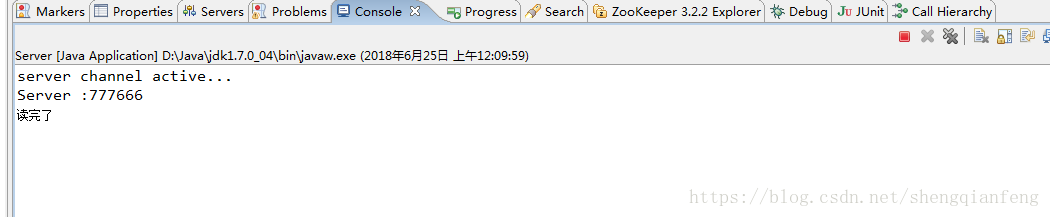
server端
client端:
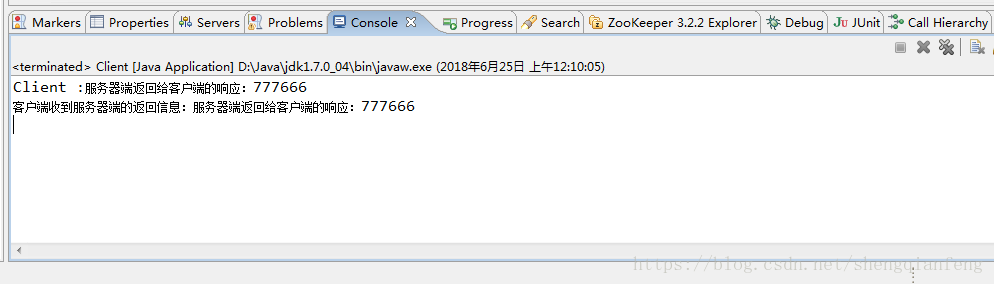
分析:客户端在发送完数据后,就关闭了,这是因为服务端业务处理器在响应数据后就断开了客户端的连接。
拆包粘包问题
还有一个问题是:客户端发送了777和666两次请求,但是服务端却收到了一次连在一起的:777666.这是由于Tcp协议是流式传输,数据很快被发送到流中粘在了一起,这就是TCP的拆包和粘包问题解决方法有两种,netty已经帮我们实现了!
1 固定分割符
2 固定数据大小
下篇文章我们介绍!
多端口绑定
Server端:
//4 进行绑定端口8765 阻塞直到绑定成功 ChannelFuture cf1 = b.bind(8765).sync(); //绑定多个端口---8764,接收数据的能力变强,但是处理能力不变,因为对应的是同一个处理器 ChannelFuture cf2 = b.bind(8764).sync(); //5 等待关闭 /** * 如果用户操作调用了sync或者await方法,会在对应的future对象上阻塞用户线程,例如future.channel().closeFuture().sync() * 所有执行channel.closeFuture().sync()就是执行的CloseFuturn的sync方法,这步是会将当前线程阻塞在CloseFuture上 */ cf1.channel().closeFuture().sync(); cf2.channel().closeFuture().sync();
Client端:
//阻塞直到连接过程结束 ChannelFuture cf1 = b.connect("127.0.0.1", 8765).sync(); //连接8764端口 ChannelFuture cf2 = b.connect("127.0.0.1", 8764).sync(); //多端口发送消息 //基于流传输 所以最终发送给服务器的数据可能会被分割成跟原来完全不同的数据块 cf1.channel().writeAndFlush(Unpooled.copiedBuffer("777".getBytes())); cf1.channel().writeAndFlush(Unpooled.copiedBuffer("666".getBytes())); cf2.channel().writeAndFlush(Unpooled.copiedBuffer("888".getBytes())); cf1.channel().closeFuture().sync();//当服务器端断开与客户端连接后,代码解除阻塞继续往下走 cf2.channel().closeFuture().sync(); 打印:
Server端:

client端:
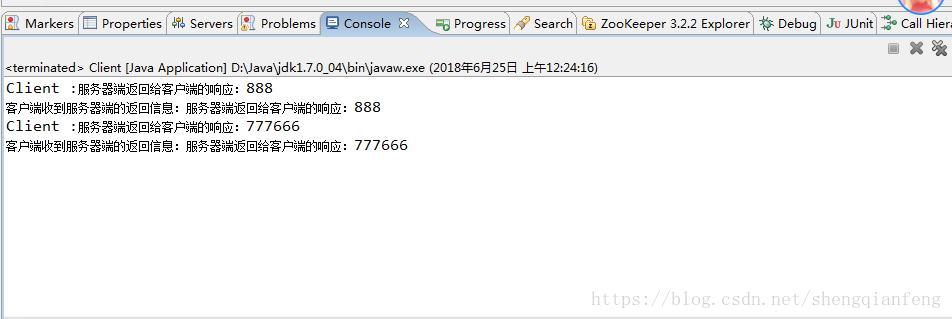
分析:服务端绑定两个端口8765和8764,客户端分别向8765发送777和666,向8764发送888,最终服务器端收到结果一个888,一个777666!
多端口绑定的特点:接收数据的能力变强,但是处理能力不变,因为对应的是同一个处理器
转载地址:https://jeffsheng.blog.csdn.net/article/details/80795993 如侵犯您的版权,请留言回复原文章的地址,我们会给您删除此文章,给您带来不便请您谅解!
发表评论
最新留言
关于作者
