本文共 7316 字,大约阅读时间需要 24 分钟。
1. 云服务器下安装FastDFS
1.2 环境前置要求
- 本地虚拟机/云服务器:CentOS7.x 版本
- 将FastDFS 和 Nginx 相关的软件压缩包下载完成并上传到云服务器中,下载链接如下:
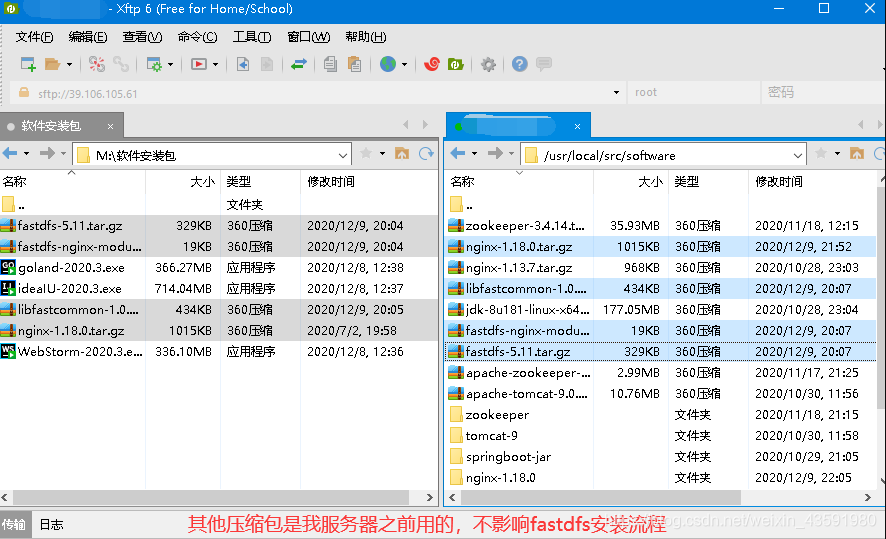
下载完成后如图:

将下载的压缩文件通过Xftp 6 上传到云服务器指定路径下,我指定的路径是:
1.3 安装单节点的FastDFS
因为我这里只是用FastDFS 去做文件服务器,个人开发不需要用到集群的FastDFS,而且个人也没有多台服务器的环境!如果有需要,可以找一篇关于FastDFS集群环境搭建的文章阅读!
1.3.1 安装gcc 和nginx 依赖库
因为FastDFS 本身就是淘宝的大牛用C语言写的,所以其依赖于对C进行编译的环境 gcc,安装命令如下:
yum -y install gcc
除了gcc之外,还需要安装nginx 相关的依赖库,因为后续要安装 nginx :
yum install pcre pcre-devel yum install zlib zlib-devel yum install openssl openssl--devel yum install libevent
注意:如果你本机安装的nginx压缩包不是tar.gz而是zip格式的,这时候需要自己下载一下解压zip格式文件的命令unzip,下载命令如下:
yum install -y unzip zip
1.3.2 安装libfastcommon
我们进入上传软件压缩包的路径:cd /usr/local/src/software
解压:tar -zxvf libfastcommon-1.0.38进入解压完成后的目录:cd libfastcommon-1.0.38/执行编译并且安装:./make.sh ./make.sh install
1.3.3 安装fastdfs
解压:tar -zxvf fastdfs-5.11.tar.gz进入解压完成后的目录:cd fastdfs-5.11/执行编译并且安装:./make.sh ./make.sh install
如果安装成功,会看到下看到提供的脚本文件:

fdfs_trackerd是tracker启动脚本fdfs_storaged是storage启动脚本
能够在 目录下看到默认的配置文件模板:
ll /etc/fdfs/结果如下:-rw-r--r-- 1 root root 1461 Dec 9 20:26 client.conf.sample-rw-r--r-- 1 root root 7927 Dec 9 20:26 storage.conf.sample-rw-r--r-- 1 root root 7389 Dec 9 20:26 tracker.conf.sample
tarcker.conf.sample是tracker的配置文件模板storage.conf.sample是storage的配置文件模板client.conf.sample是客户端的配置文件模板
1.3.4 配置并启动tracker服务
FastDFS 的 tracker 和 storage 在刚刚的安装过程中,都已经被安装了,因此我们安装这两种角色的方式是一样的。不同的是,两种需要不同的配置文件。
我们要启动tracker,就修改刚刚看到的tarcker.conf,并且启动fdfs_trackerd脚本即可:
1)首先将模板文件复制:
cp /etc/fdfs/tracker.conf.sample /etc/fdfs/tracker.conf
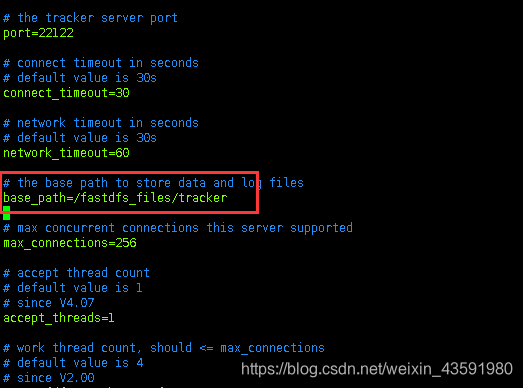
2)修改复制后的配置文件:
vim /etc/fdfs/tracker.conf# 修改的内容如下:base_path=/fastdfs_files/tracker # 自己指定的存储日志和数据的根目录
因为自己指定的目录默认是不存在的,所以修改过配置文件后,我们新建一下该目录:
mkdir -p /fastdfs_files/tracker
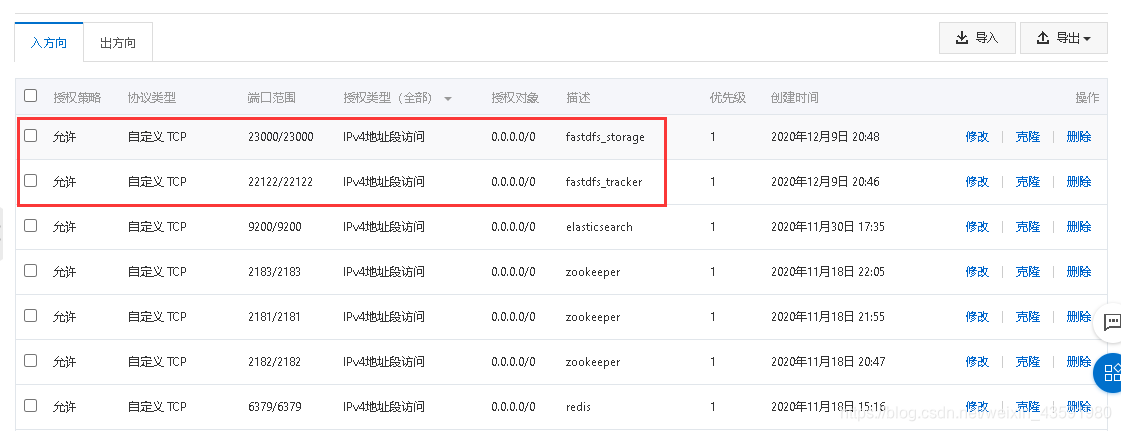
注意:如果使用的是本地虚拟机请关闭防火墙,云服务器记得开放安全组对应的端口!下面是我的云服务器开放的端口,FastDFS 默认需要23000 和 22122 两个端口:
4)启动和停止:
-
启动tracker服务器:
/etc/init.d/fdfs_trackerd start -
停止tracker服务器:
/etc/init.d/fdfs_trackerd stop
不过安装过程中,fdfs 已经被设置为系统服务,我们可以采用熟悉的服务启动方式:
service fdfs_trackerd start # 启动fdfs_trackerd服务,停止用stop
检查FastDFS Tracker Server是否启动成功:
ps -ef | grep fdfs_trackerd

如果是本地虚拟机,不想每次开机都重新启动该服务,可以将其设置为开启自启动:
chkconfig fdfs_trackerd on
1.3.5 配置并启动storage服务
步骤类似于1.3.4:
1)首先将模板文件复制:
cp /etc/fdfs/storage.conf.sample /etc/fdfs/storage.conf
2)修改复制后的配置文件:
vim /etc/fdfs/storage.conf# 修改的内容如下: base_path=/fastdfs_files/storage # 数据和日志文件存储根目录 store_path0=/fastdfs_files/storage # 第一个存储目录 tracker_server=本机ip:22122 # tracker服务器IP和端口
因为自己指定的目录默认是不存在的,所以修改过配置文件后,我们新建一下该目录:
mkdir -p /fastdfs_files/storage
3)启动和停止:
- 启动storage服务器:
/etc/init.d/fdfs_storaged start - 停止storage服务器:
/etc/init.d/fdfs_storaged stop
推荐使用如下方式启动:
service fdfs_storaged start # 启动fdfs_storaged服务,停止用stop
可以使用 ps -ef | grep fdfs 查看进程:

如果是本地虚拟机,不想每次开机都重新启动该服务,可以将其设置为开启自启动:
chkconfig fdfs_trackerd on
再次提醒:本地虚拟机关闭防火墙,云服务器开启安全组端口!
2. 使用nginx访问FastDFS
2.1 安装fastdfs-nginx-module
2.1.1 解压
tar -zxvf fastdfs-nginx-module-1.20.tar.gz
2.1.2 修改config文件
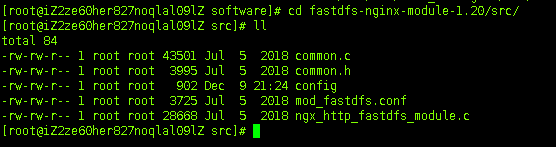
1)进入解压后的文件夹下的src目录
cd fastdfs-nginx-module-1.20/src/
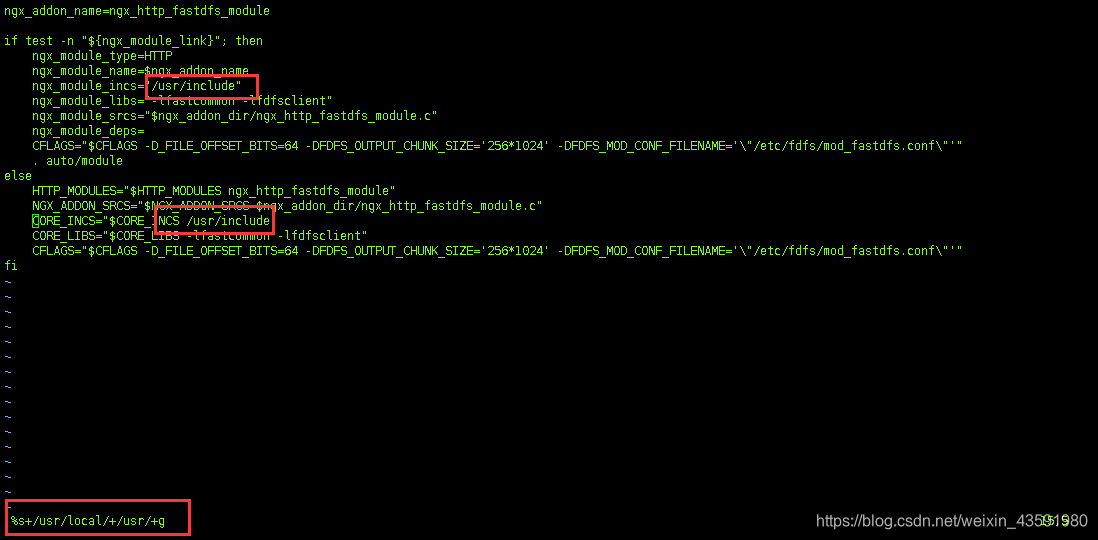
2)编辑config
vim config
使用以下底行命令:
:%s+/usr/local/+/usr/+g
将所有的替换为 ,这个才是正确的目录:
2.1.3 配置nginx与FastDFS关联配置文件
复制 fastdfs-nginx-module-1.20 源码中的配置文件到 目录, 并修改:
cp /usr/local/src/software/fastdfs-nginx-module-1.20/src/mod_fastdfs.conf /etc/fdfs/vim /etc/fdfs/mod_fastdfs.conf
修改以下配置:
connect_timeout=10 # 客户端访问文件连接超时时长(单位:秒)tracker_server=本机ip:22122 # tracker服务IP和端口url_have_group_name=true # 访问链接前缀加上组名store_path0=/fastdfs_files/storage # 文件存储路径
复制 FastDFS 的部分配置文件到 目录:
cd /usr/local/src/software/fastdfs-5.11/conf/cp http.conf mime.types /etc/fdfs/
2.2 安装Nginx的插件
因为文章 1.3.1 小节已经安装了 nginx 依赖库,所以这里不需要再安装:
# 如果前面没安装,这里就需要安装虚啊 nginx依赖库:yum -y install gcc pcre pcre-devel zlib zlib-devel openssl openssl-devel
2.2.1 解压安装包
tar -zxvf nginx-1.18.0.tar.gz
2.2.2 配置nginx安装包并指定fastdfs-nginx-model
# 进入解压后的nginx-1.18.0 目录:cd nginx-1.18.0/# 执行以下命令:./configure --prefix=/opt/nginx --sbin-path=/usr/bin/nginx --add-module=/usr/local/src/software/fastdfs-nginx-module-1.20/src/
注意:在执行./configure 配置nginx 参数的时候,需要将 fastdfs-nginx-moudle 源码作为模块编译进去。
2.2.3 编译并安装
make && make install
2.2.4 启动nginx
配置nginx整合fastdfs-module模块,我们需要修改nginx配置文件,在 文件中:
vim /opt/nginx/conf/nginx.conf
将文件中,原来的server 80{ ...} 部分代码替换为如下代码:
server { listen 80; server_name 你的域名; # 监听域名中带有group的,交给FastDFS模块处理 location ~/group([0-9])/ { ngx_fastdfs_module; } location / { root html; index index.html index.htm; } error_page 500 502 503 504 /50x.html; location = /50x.html { root html; }} 启动命令:
nginx # 启动nginxnginx -s stop # 停止nginxnginx -s reload # 重新载入配置文件
可通过ps -ef | grep nginx查看nginx是否已启动成功:

3. 使用SpringBoot 整合FastDFS
3.1 相关依赖
com.github.tobato fastdfs-client
3.2 相关配置参数
# fastDFS 相关配置fdfs: so-timeout: 1501 # 读取超时时间 connect-timeout: 601 # 连接超时时间 thumb-image: # 缩略图配置 width: 60 height: 60 tracker-list: # tracker地址:你的虚拟机服务器地址+端口(默认是22122) - 你的服务器ip:22122
3.3 相关配置类
/** * @Auther: csp1999 * @Date: 2020/12/10/11:29 * @Description: fastDFS 客户端配置类 */@Configuration@Import(FdfsClientConfig.class)// 解决jmx重复注册bean的问题@EnableMBeanExport(registration = RegistrationPolicy.IGNORE_EXISTING)public class FastDfsClientConfig { } 3.4 测试类中进行测试
/** * @Auther: csp1999 * @Date: 2020/12/10/11:33 * @Description: 测试FastDFS 文件上传 */@SpringBootTest@RunWith(SpringRunner.class)public class FastDFSTest { // fastDFS 存储客户端 @Autowired private FastFileStorageClient storageClient; // 用于获取 fastDFS 图片缩略图 @Autowired private ThumbImageConfig thumbImageConfig; @Test public void testUpload() throws FileNotFoundException { // 获取本机要上传的文件 File file = new File("M:\\code\\IDEA\\leyou\\image\\lf.jpg"); /** * 上传并保存图片 * * 参数: * 1-上传的文件流 * 2-文件的大小 * 3-文件的后缀 * 4-可以不管他 */ StorePath storePath = this.storageClient.uploadFile( new FileInputStream(file), file.length(), "jpg", null); // 带分组的路径 System.out.println(storePath.getFullPath()); // 不带分组的路径 System.out.println(storePath.getPath()); } @Test public void testUploadAndCreateThumb() throws FileNotFoundException { // 获取本机要上传的文件 File file = new File("M:\\code\\IDEA\\leyou\\image\\bz4.jpg"); /** * 上传并保存图片并且生成缩略图 * * 参数: * 1-上传的文件流 * 2-文件的大小 * 3-文件的后缀 * 4-可以不管他 */ StorePath storePath = this.storageClient.uploadImageAndCrtThumbImage( new FileInputStream(file), file.length(), "png", null); // 带分组的路径 System.out.println(storePath.getFullPath()); // 不带分组的路径 System.out.println(storePath.getPath()); // 获取缩略图路径 String path = thumbImageConfig.getThumbImagePath(storePath.getPath()); System.out.println(path); }} 先测试testUpload() 方法,输出结果:

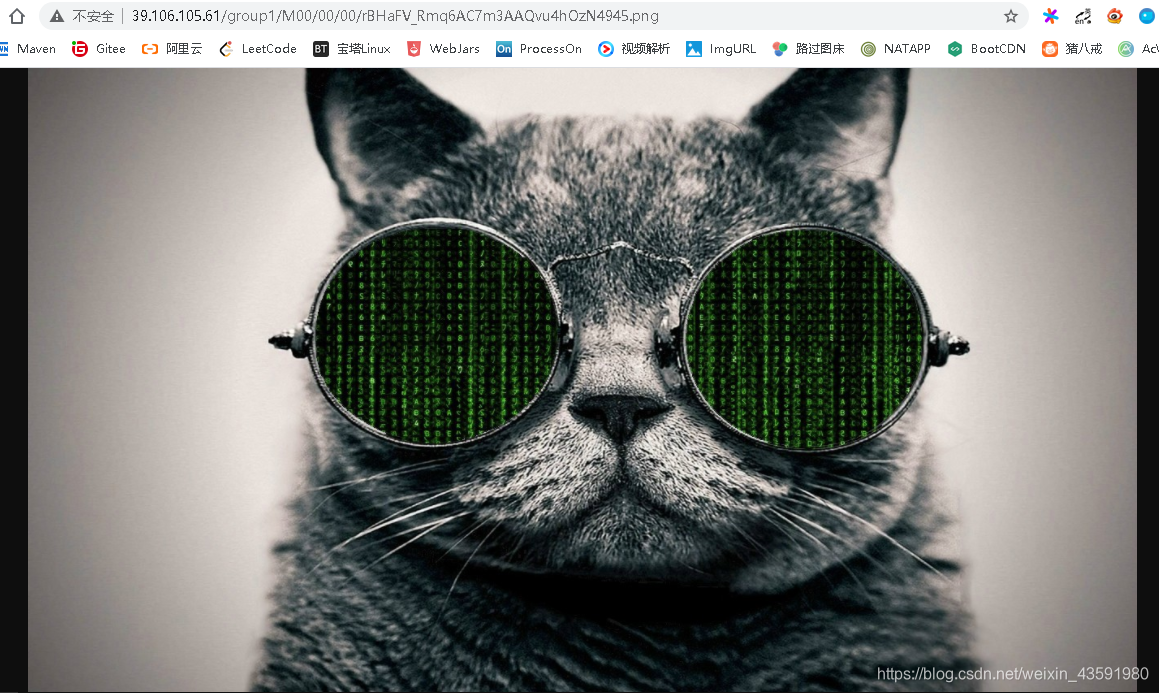
然后我们就可以通过,去访问图片:

同理我们测试testUploadAndCreateThumb() 带缩略图的方法,输出结果如下:
group1/M00/00/00/rBHaFV_Rmq6AC7m3AAQvu4hOzN4945.png # 带分组的路径M00/00/00/rBHaFV_Rmq6AC7m3AAQvu4hOzN4945.png # 不带分组的路径 M00/00/00/rBHaFV_Rmq6AC7m3AAQvu4hOzN4945_60x60.png # 缩略图路径
我们先看下不是缩略图的效果:
再看下缩略图的效果:

图片大小是我们在配置文件中配置的宽高60px! 我们可以到服务器路径下查看上传的图片:

SpringBoot整合FastDFS完成!
扩展:除了FastDFS分布式文件上传,现在开发中基于OSS的文件上传也很常用,可以参考下面这篇文章学习:
转载地址:https://csp1999.blog.csdn.net/article/details/110947827 如侵犯您的版权,请留言回复原文章的地址,我们会给您删除此文章,给您带来不便请您谅解!
发表评论
最新留言
关于作者
