01 计算机视觉-opencv图像基本操作
发布日期:2021-06-29 15:45:38
浏览次数:2
分类:技术文章
本文共 6193 字,大约阅读时间需要 20 分钟。
计算机视觉-opencv图像基本操作
1 数据读取-图像
- cv2.IMREAD_COLOR:彩色图像
- cv2.IMREAD_GRAYSCALE:灰度图像
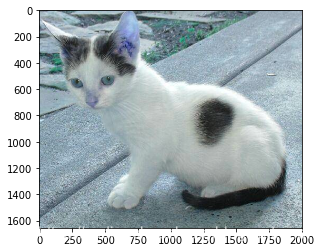
import cv2import matplotlib.pyplot as pltimport numpy as np%matplotlib inline#读取彩色图像img = cv2.imread("cat.jpg") img
array([[[142, 151, 160], [146, 155, 164], [151, 160, 170], ..., [156, 172, 185], [155, 171, 184], [154, 170, 183]], [[108, 117, 126], [112, 123, 131], [118, 127, 137], ..., [155, 171, 184], [154, 170, 183], [153, 169, 182]], [[108, 119, 127], [110, 123, 131], [118, 128, 138], ..., [156, 169, 183], [155, 168, 182], [154, 167, 181]], ..., [[162, 186, 198], [157, 181, 193], [142, 166, 178], ..., [181, 204, 206], [170, 193, 195], [149, 172, 174]], [[140, 164, 176], [147, 171, 183], [139, 163, 175], ..., [169, 187, 188], [125, 143, 144], [106, 124, 125]], [[154, 178, 190], [154, 178, 190], [121, 145, 157], ..., [183, 198, 200], [128, 143, 145], [127, 142, 144]]], dtype=uint8)
# 图像的显示cv2.imshow("image",img)# 等待时间 毫秒级 0表示任意键终止cv2.waitKey(0)cv2.destroyAllWindows()plt.imshow(img) 
# 直接定义一个opencv显示的函数def cv_show(name,img): cv2.imshow(name,img) cv2.waitKey(0) cv2.destroyAllWindows()
# 看一下图片的维度 h w cimg.shape
(414, 500, 3)
# 读取灰度图像img = cv2.imread("cat.jpg",cv2.IMREAD_GRAYSCALE)img array([[153, 157, 162, ..., 174, 173, 172], [119, 124, 129, ..., 173, 172, 171], [120, 124, 130, ..., 172, 171, 170], ..., [187, 182, 167, ..., 202, 191, 170], [165, 172, 164, ..., 185, 141, 122], [179, 179, 146, ..., 197, 142, 141]], dtype=uint8)
img.shape
(414, 500)
cv_show("image",img) # 保存图像cv2.imwrite("mycat.png",img) True
# 看一下读取图像的类型type(img)
numpy.ndarray
# 图像的大小img.size
207000
# 图像的类型img.dtype
dtype('uint8') 2 数据读取-视频
- cv2.VideoCapture可以捕获摄像头,用数字来控制不同的设备,例如0,1
- 如果是视频文件,直接指定好路径即可
vc = cv2.VideoCapture("test.mp4") # 检查是否打开正确:if vc.isOpened(): open,frame = vc.read()else: open = False
while open: ret,frame = vc.read() if frame is None: break if ret == True: gray = cv2.cvtColor(frame,cv2.COLOR_BGR2GRAY) cv2.imshow("result",gray) if cv2.waitKey(10) & 0xFF == 27: breakvc.release()cv2.destroyAllWindows() 
3 截取部分图像数据
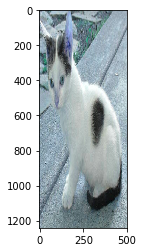
img = cv2.imread("cat.jpg")cat = img[0:50,0:200]cv_show("cat",cat)plt.imshow(cat) 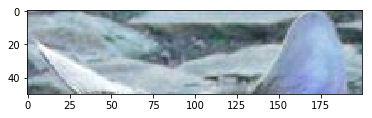
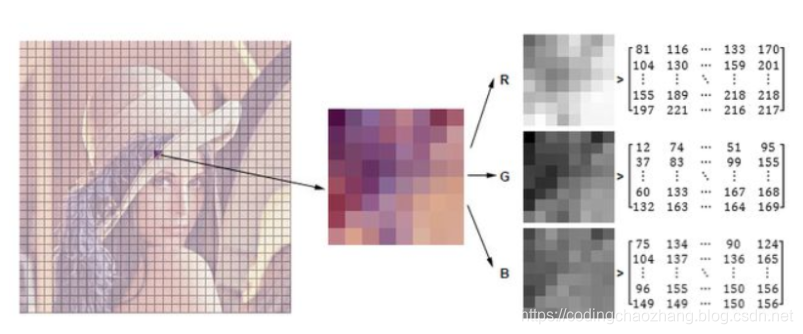
4 颜色通道提取
b,g,r = cv2.split(img)
b
array([[142, 146, 151, ..., 156, 155, 154], [108, 112, 118, ..., 155, 154, 153], [108, 110, 118, ..., 156, 155, 154], ..., [162, 157, 142, ..., 181, 170, 149], [140, 147, 139, ..., 169, 125, 106], [154, 154, 121, ..., 183, 128, 127]], dtype=uint8)
b.shape
(414, 500)
img = cv2.merge((b,g,r))img.shape
(414, 500, 3)
# 只保留Rcur_img = img.copy()cur_img[:,:,0] = 0cur_img[:,:,1] = 0cv_show("R",cur_img)plt.imshow(cur_img) 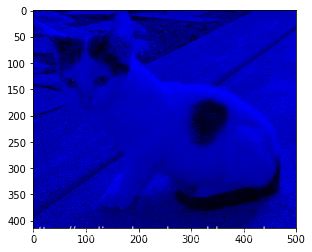
# 只保留Gcur_img = img.copy()cur_img[:,:,0] = 0cur_img[:,:,2] = 0cv_show("G",cur_img)plt.imshow(cur_img) 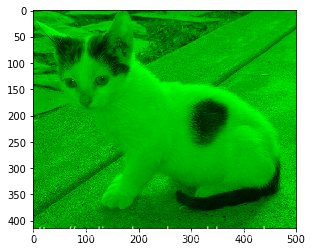
# 只保留Bcur_img = img.copy()cur_img[:,:,1] = 0cur_img[:,:,2] = 0cv_show("B",cur_img)plt.imshow(cur_img) 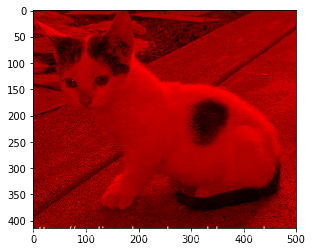
5 边界填充
- BORDER_REPLICATE:复制法,也就是复制最边缘像素。
- BORDER_REFLECT:反射法,对感兴趣的图像中的像素在两边进行复制例如:fedcba|abcdefgh|hgfedcb
- BORDER_REFLECT_101:反射法,也就是以最边缘像素为轴,对称,gfedcb|abcdefgh|gfedcba
- BORDER_WRAP:外包装法cdefgh|abcdefgh|abcdefg
- BORDER_CONSTANT:常量法,常数值填充。
top_size,bottom_size,left_size,right_size = (50,50,50,50)replicate = cv2.copyMakeBorder(img, top_size, bottom_size, left_size, right_size, borderType=cv2.BORDER_REPLICATE)reflect = cv2.copyMakeBorder(img, top_size, bottom_size, left_size, right_size,cv2.BORDER_REFLECT)reflect101 = cv2.copyMakeBorder(img, top_size, bottom_size, left_size, right_size, cv2.BORDER_REFLECT_101)wrap = cv2.copyMakeBorder(img, top_size, bottom_size, left_size, right_size, cv2.BORDER_WRAP)constant = cv2.copyMakeBorder(img, top_size, bottom_size, left_size, right_size,cv2.BORDER_CONSTANT, value=0)
plt.subplot(231), plt.imshow(img, 'gray'), plt.title('ORIGINAL')plt.subplot(232), plt.imshow(replicate, 'gray'), plt.title('REPLICATE')plt.subplot(233), plt.imshow(reflect, 'gray'), plt.title('REFLECT')plt.subplot(234), plt.imshow(reflect101, 'gray'), plt.title('REFLECT_101')plt.subplot(235), plt.imshow(wrap, 'gray'), plt.title('WRAP')plt.subplot(236), plt.imshow(constant, 'gray'), plt.title('CONSTANT')plt.show() 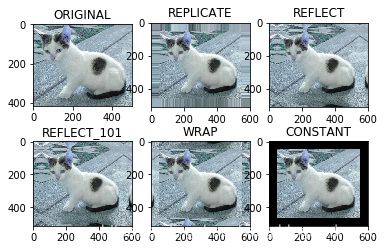
6 数值计算
img_cat = cv2.imread("cat.jpg")img_dog = cv2.imread("dog.jpg") img_cat2 = img_cat + 10img_cat[:5,:,0]
array([[142, 146, 151, ..., 156, 155, 154], [108, 112, 118, ..., 155, 154, 153], [108, 110, 118, ..., 156, 155, 154], [139, 141, 148, ..., 156, 155, 154], [153, 156, 163, ..., 160, 159, 158]], dtype=uint8)
img_cat2[:5,:,0]
array([[152, 156, 161, ..., 166, 165, 164], [118, 122, 128, ..., 165, 164, 163], [118, 120, 128, ..., 166, 165, 164], [149, 151, 158, ..., 166, 165, 164], [163, 166, 173, ..., 170, 169, 168]], dtype=uint8)
# 相当于%256(img_cat+img_cat2)[:5,:,0]
array([[ 38, 46, 56, ..., 66, 64, 62], [226, 234, 246, ..., 64, 62, 60], [226, 230, 246, ..., 66, 64, 62], [ 32, 36, 50, ..., 66, 64, 62], [ 60, 66, 80, ..., 74, 72, 70]], dtype=uint8)
cv2.add(img_cat,img_cat2)[:5,:,0]
array([[255, 255, 255, ..., 255, 255, 255], [226, 234, 246, ..., 255, 255, 255], [226, 230, 246, ..., 255, 255, 255], [255, 255, 255, ..., 255, 255, 255], [255, 255, 255, ..., 255, 255, 255]], dtype=uint8)
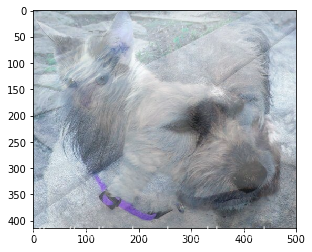
图像融合
# 若直接相加,会报错img_cat + img_dog
---------------------------------------------------------------------------ValueError Traceback (most recent call last)in 1 # 若直接相加,会报错----> 2 img_cat + img_dogValueError: operands could not be broadcast together with shapes (414,500,3) (429,499,3)
img_cat.shape
(414, 500, 3)
img_dog.shape
(429, 499, 3)
img_dog = cv2.resize(img_dog,(500,414))
img_dog.shape
(414, 500, 3)
res = cv2.addWeighted(img_cat,0.4,img_dog,0.6,0)
plt.imshow(res)
# 尺寸变换resizeres = cv2.resize(img, (0, 0), fx=4, fy=4)plt.imshow(res)
# 尺寸变换res = cv2.resize(img, (0, 0), fx=1, fy=3)plt.imshow(res)
转载地址:https://codingchaozhang.blog.csdn.net/article/details/99473640 如侵犯您的版权,请留言回复原文章的地址,我们会给您删除此文章,给您带来不便请您谅解!
发表评论
最新留言
逛到本站,mark一下
[***.202.152.39]2024年04月29日 14时16分20秒
关于作者

喝酒易醉,品茶养心,人生如梦,品茶悟道,何以解忧?唯有杜康!
-- 愿君每日到此一游!
推荐文章
JAVA 线程同步机制 synchronized
2019-04-29
MySQL 安装教程(无脑版)
2019-04-29
IDEA 怎么删除一个Module
2019-04-29
走进数据科学:最好是通过比网课更好的方法
2019-04-29
AI革命第一步:最容易被忽略但必不可少的物联网
2019-04-29
2020年开发运维工具清单:选择开发运维工具堆栈吧
2019-04-29
效率提升法则:高效人士不会去做的4件事
2019-04-29
8.PostgreSQL约束
2019-04-29
【技术分享】使用AES加密技术保障数据安全
2019-04-29
【应用实例】布线多?成本高?不可靠?泽耀方案没烦恼!
2019-04-29
数据可视化工具:Matplotlib绘图
2019-04-29
用Python写个超级小恐龙跑酷游戏,上班摸鱼我能玩一天
2019-04-29
闺蜜看我用Python画了一幅樱花图,吵着要我给他介绍程序员小哥哥
2019-04-29
【Python爬虫实战】知乎热榜数据采集,上班工作摸鱼两不误,知乎热门信息一网打尽
2019-04-29
Python抓取哔哩哔哩up主信息:只要爬虫学的好,牢饭吃的早
2019-04-29
有个码龄5年的程序员跟我说:“他连wifi从来不用密码”
2019-04-29
领导让我整理上个季度的销售额,幸好我会Python数据分析,你猜我几点下班
2019-04-29
【Python爬虫实战】为何如此痴迷Python?还不是因为爱看小姐姐图
2019-04-29
白红宇的个人博客 - 记录点点滴滴的事 - 您是第 310142742 位访客
访问时间: 2024-05-02 21:28:20
访问IP: 3.142.174.55
Copyright © 2020 - 2023 blog.css8.cn 京ICP备2021015314号-1
手机版