TensorFlow(keras)入门课程--05 复杂图像处理
发布日期:2021-06-29 15:45:31
浏览次数:3
分类:技术文章
本文共 10833 字,大约阅读时间需要 36 分钟。
目录
- 1 使用复杂图像
- 2 获取数据
- 3 使用ImageGenerator标记和准备数据
- 4 探索数据
- 5 定义模型
- 6 编译模型
- 7 ImageGenerator生成数据
- 8 训练
- 9 测试模型
- 10 可视化中间过程
1 使用复杂图像:马或人
在之前的Fashion MNIST训练图像分类器中。图像时28×28,并且图像居中。本节我们将提升一个新的水平,训练识别图像中的特征,其中主体可以在图像中的任何位置。
2 获取数据
我们将构建马匹和人类的分类来实现上述目的,该分类器将告诉图像是否包含马或人。
import osimport zipfilelocal_zip = "./horse-or-human.zip"zip_ref = zipfile.ZipFile(local_zip,"r")zip_ref.extractall("./horse-or-human")zip_ref.close() .zip的内容被提取到基本目录horse-or-human中
3 使用ImageGenerator标记和准备数据
在这个样本中我们要注意到一件事是:我们没有明确地将图像标记为马或人。
下面我们将用ImageGenerator来从子目录中读取图像,并从该子目录的名称自动标记它们。
# directory with out trainging horse picturestrain_horse_dir = os.path.join("./horse-or-human/horses")# dirctory with out training human picturestrain_human_dir = os.path.join("./horse-or-human/humans") 现在,让我们看一下马和人训练目录中的文件名是怎么样的
train_horse_names = os.listdir(train_horse_dir)print(train_horse_names[:10])train_human_names = os.listdir(train_human_dir)print(train_human_names[:10])
['horse01-0.png', 'horse01-1.png', 'horse01-2.png', 'horse01-3.png', 'horse01-4.png', 'horse01-5.png', 'horse01-6.png', 'horse01-7.png', 'horse01-8.png', 'horse01-9.png']['human01-00.png', 'human01-01.png', 'human01-02.png', 'human01-03.png', 'human01-04.png', 'human01-05.png', 'human01-06.png', 'human01-07.png', 'human01-08.png', 'human01-09.png']
让我们找出目录中马和人类图像的总数:
print("the total training horse images:",len(os.listdir(train_horse_dir)))print("the total training human images:",len(os.listdir(train_human_dir))) the total training horse images: 500the total training human images: 527
4 探索数据
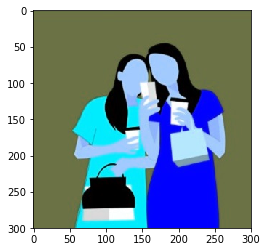
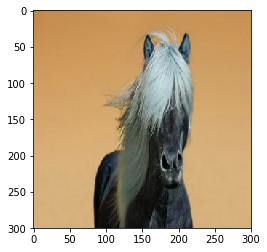
现在我们看看几张照片,以便更好地了解它们的外观。
import matplotlib.pyplot as plt%matplotlib inlineimport matplotlib.image as mpimgnrows = 4ncols = 4pic_index = 0
现在展示一批8张马和8张人的图片
# Set up matplotlib fig, and size it to fit 4x4 picsfig = plt.gcf()fig.set_size_inches(ncols * 4, nrows * 4) pic_index += 8next_horse_pix = [os.path.join(train_horse_dir, fname) for fname in train_horse_names[pic_index-8:pic_index]]next_human_pix = [os.path.join(train_human_dir, fname) for fname in train_human_names[pic_index-8:pic_index]] for i, img_path in enumerate(next_horse_pix+next_human_pix): # Set up subplot; subplot indices start at 1 sp = plt.subplot(nrows, ncols, i + 1 ) sp.axis('Off') # Don't show axes (or gridlines) img = mpimg.imread(img_path) plt.imshow(img) 
5 定义模型
第1步导入TensorFlow
import tensorflow as tf
这是一个二分类问题
model = tf.keras.models.Sequential([ tf.keras.layers.Conv2D(16,(3,3),activation="relu",input_shape=(300,300,3)), tf.keras.layers.MaxPooling2D(2,2), tf.keras.layers.Conv2D(32,(3,3),activation="relu"), tf.keras.layers.MaxPooling2D(2,2), tf.keras.layers.Conv2D(64,(3,3),activation="relu"), tf.keras.layers.MaxPooling2D(2,2), tf.keras.layers.Conv2D(64,(3,3),activation="relu"), tf.keras.layers.MaxPooling2D(2,2), tf.keras.layers.Conv2D(64,(3,3),activation="relu"), tf.keras.layers.MaxPooling2D(2,2), tf.keras.layers.Flatten(), tf.keras.layers.Dense(512,activation="relu"), tf.keras.layers.Dense(1,activation="sigmoid")])
WARNING:tensorflow:From D:\software\Anaconda\anaconda\lib\site-packages\tensorflow\python\ops\resource_variable_ops.py:435: colocate_with (from tensorflow.python.framework.ops) is deprecated and will be removed in a future version.Instructions for updating:Colocations handled automatically by placer.
model.summary打印模型信息
model.summary()
_________________________________________________________________Layer (type) Output Shape Param # =================================================================conv2d (Conv2D) (None, 298, 298, 16) 448 _________________________________________________________________max_pooling2d (MaxPooling2D) (None, 149, 149, 16) 0 _________________________________________________________________conv2d_1 (Conv2D) (None, 147, 147, 32) 4640 _________________________________________________________________max_pooling2d_1 (MaxPooling2 (None, 73, 73, 32) 0 _________________________________________________________________conv2d_2 (Conv2D) (None, 71, 71, 64) 18496 _________________________________________________________________max_pooling2d_2 (MaxPooling2 (None, 35, 35, 64) 0 _________________________________________________________________conv2d_3 (Conv2D) (None, 33, 33, 64) 36928 _________________________________________________________________max_pooling2d_3 (MaxPooling2 (None, 16, 16, 64) 0 _________________________________________________________________conv2d_4 (Conv2D) (None, 14, 14, 64) 36928 _________________________________________________________________max_pooling2d_4 (MaxPooling2 (None, 7, 7, 64) 0 _________________________________________________________________flatten (Flatten) (None, 3136) 0 _________________________________________________________________dense (Dense) (None, 512) 1606144 _________________________________________________________________dense_1 (Dense) (None, 1) 513 =================================================================Total params: 1,704,097Trainable params: 1,704,097Non-trainable params: 0_________________________________________________________________
6 编译模型
from tensorflow.keras.optimizers import RMSpropmodel.compile(loss="binary_crossentropy", optimizer=RMSprop(lr=0.001), metrics=["acc"])
7 ImageGenerator生成数据
from tensorflow.keras.preprocessing.image import ImageDataGeneratortrain_datagen = ImageDataGenerator(rescale=1./255)train_generator = train_datagen.flow_from_directory( "./horse-or-human/", target_size=(300,300), batch_size=128, class_mode="binary")
Found 1027 images belonging to 2 classes.
8 训练
history = model.fit_generator( train_generator, steps_per_epoch=8, epochs=15, verbose=1)
WARNING:tensorflow:From D:\software\Anaconda\anaconda\lib\site-packages\tensorflow\python\ops\math_ops.py:3066: to_int32 (from tensorflow.python.ops.math_ops) is deprecated and will be removed in a future version.Instructions for updating:Use tf.cast instead.Epoch 1/159/9 [==============================] - 85s 9s/step - loss: 0.9717 - acc: 0.5511Epoch 2/159/9 [==============================] - 78s 9s/step - loss: 0.5993 - acc: 0.7527Epoch 3/159/9 [==============================] - 81s 9s/step - loss: 0.7818 - acc: 0.7858Epoch 4/159/9 [==============================] - 82s 9s/step - loss: 0.4991 - acc: 0.8043Epoch 5/159/9 [==============================] - 88s 10s/step - loss: 0.2824 - acc: 0.8939Epoch 6/159/9 [==============================] - 74s 8s/step - loss: 0.1238 - acc: 0.9659Epoch 7/159/9 [==============================] - 83s 9s/step - loss: 0.0556 - acc: 0.9747Epoch 8/159/9 [==============================] - 74s 8s/step - loss: 0.7515 - acc: 0.8822Epoch 9/159/9 [==============================] - 73s 8s/step - loss: 0.0387 - acc: 0.9903Epoch 10/159/9 [==============================] - 74s 8s/step - loss: 0.0553 - acc: 0.9718Epoch 11/159/9 [==============================] - 74s 8s/step - loss: 0.0151 - acc: 0.9961Epoch 12/159/9 [==============================] - 72s 8s/step - loss: 0.0043 - acc: 1.0000Epoch 13/159/9 [==============================] - 75s 8s/step - loss: 0.4870 - acc: 0.8812Epoch 14/159/9 [==============================] - 72s 8s/step - loss: 0.0156 - acc: 0.9961Epoch 15/159/9 [==============================] - 75s 8s/step - loss: 0.0468 - acc: 0.9805
9 测试模型
现在让我们使用该模型实际运行预测。此代码允许你从文件系统中选择一个或多个文件,然后上传它们,并通过模型运行它们,指示对象是马或人
import cv2import numpy as nphuman_img = cv2.imread("human.jpg")plt.imshow(human_img)classes = model.predict(human_img.reshape(1,300,300,3))print(classes[0])if classes[0] > 0.5: print("this is a human")else: print("this is a horse") [1.]this is a human
import cv2import numpy as nphorse_img = cv2.imread("horse.jpg")plt.imshow(horse_img)classes = model.predict(horse_img.reshape(1,300,300,3))print(classes[0])if classes[0] > 0.5: print("this is a human")else: print("this is a horse") [1.]this is a human
可以看到分辨的话还是不准确的
10 可视化中间过程
从训练集中随机选择一个图像,然后生成一个图像,其中每一行是图层的输出,并且该行输出特征图中的特定 滤镜。
import numpy as npimport randomfrom tensorflow.keras.preprocessing.image import img_to_array, load_img # Let's define a new Model that will take an image as input, and will output# intermediate representations for all layers in the previous model after# the first.successive_outputs = [layer.output for layer in model.layers[1:]]#visualization_model = Model(img_input, successive_outputs)visualization_model = tf.keras.models.Model(inputs = model.input, outputs = successive_outputs)# Let's prepare a random input image from the training set.horse_img_files = [os.path.join(train_horse_dir, f) for f in train_horse_names]human_img_files = [os.path.join(train_human_dir, f) for f in train_human_names]img_path = random.choice(horse_img_files + human_img_files) img = load_img(img_path, target_size=(300, 300)) # this is a PIL imagex = img_to_array(img) # Numpy array with shape (150, 150, 3)x = x.reshape((1,) + x.shape) # Numpy array with shape (1, 150, 150, 3) # Rescale by 1/255x /= 255 # Let's run our image through our network, thus obtaining all# intermediate representations for this image.successive_feature_maps = visualization_model.predict(x) # These are the names of the layers, so can have them as part of our plotlayer_names = [layer.name for layer in model.layers] # Now let's display our representationsfor layer_name, feature_map in zip(layer_names, successive_feature_maps): if len(feature_map.shape) == 4: # Just do this for the conv / maxpool layers, not the fully-connected layers n_features = feature_map.shape[-1] # number of features in feature map # The feature map has shape (1, size, size, n_features) size = feature_map.shape[1] # We will tile our images in this matrix display_grid = np.zeros((size, size * n_features)) for i in range(n_features): # Postprocess the feature to make it visually palatable x = feature_map[0, :, :, i] x -= x.mean() x /= x.std() x *= 64 x += 128 x = np.clip(x, 0, 255).astype('uint8') # We'll tile each filter into this big horizontal grid display_grid[:, i * size : (i + 1) * size] = x # Display the grid scale = 20. / n_features plt.figure(figsize=(scale * n_features, scale)) plt.title(layer_name) plt.grid(False) plt.imshow(display_grid, aspect='auto', cmap='viridis') D:\software\Anaconda\anaconda\lib\site-packages\ipykernel_launcher.py:43: RuntimeWarning: invalid value encountered in true_divide


转载地址:https://codingchaozhang.blog.csdn.net/article/details/90718176 如侵犯您的版权,请留言回复原文章的地址,我们会给您删除此文章,给您带来不便请您谅解!
发表评论
最新留言
做的很好,不错不错
[***.243.131.199]2024年04月10日 02时56分34秒
关于作者

喝酒易醉,品茶养心,人生如梦,品茶悟道,何以解忧?唯有杜康!
-- 愿君每日到此一游!
推荐文章
实习小白的日常(4)
2019-04-29
微信扫码登录验证PHP代码(不用开放平台)
2019-04-29
CH554E USB单片机 10引脚小封装低成本USB方案
2019-04-29
windows MQTT客户端
2019-04-29
LINUX下挂载(mount)查看树莓派镜像文件
2019-04-29
基于CH568芯片加密SD卡方案
2019-04-29
1元钱的超低成本单芯片USB单片机方案
2019-04-29
单片机/树莓派扩展双串口(TTL和RS485)
2019-04-29
JAVA(android)提取WIFI客流探针MAC地址源码
2019-04-29
基于CH568芯片的SATA电子盘方案
2019-04-29
linux下C语言判断网络是否连接
2019-04-29
STM32Cube_FW_F4_V1.17 F4固件包百度网盘下载
2019-04-29
猿来绘Java-35-线程的同步(生产者和消费者问题)
2019-04-29
猿来绘Java-36-解决线程安全问题
2019-04-29
猿来绘Java-37-ReentrantLock解决线程安全问题
2019-04-29
猿来绘Java-38-生产者消费者模型
2019-04-29
猿来绘Java-39-JDK8的新日期时间类
2019-04-29
猿来绘Java-40-比较器(Comparable 接口与 CompareTo方法)
2019-04-29
猿来绘Java-41-源码分析String对象的数组的排序(JDK1.8)
2019-04-29
白红宇的个人博客 - 记录点点滴滴的事 - 您是第 310035489 位访客
访问时间: 2024-05-02 14:13:22
访问IP: 3.19.211.134
Copyright © 2020 - 2023 blog.css8.cn 京ICP备2021015314号-1
手机版