本文共 2796 字,大约阅读时间需要 9 分钟。
目录
- 1 简介
- 2 使用卷积
- 3 开始编码
- 4 创建卷积
- 5 查看结果
- 6 了解池化
- 7 编写池化代码
1 简介
在本节中,你将了解卷积以及它们在计算机视觉场景中如此强大的原因。
在上一节中,我们了解了如何使用Fashion MNIST数据集为时尚项目训练图像分类器。但这里有一个明显的约束:图像时28×28的,且图像在图片居中。
例如,这里有Fshion MNIST中的几张图。

上节我们创建的全连接网络DNN知识从构成毛衣的原始像素中学到的,那么考虑一下如何对下面这张图片进行分类呢?

虽然很明显这张图片有靴子,但分类器会因多种原因而失败。首先,它不是28×28的灰度图,更重要的是,分类器是从左开始的原始像素上进行训练的。要解决此问题,可以使用Convolutions
2 使用卷积
卷积是一种过滤器,它通过图像处理它,并提取在图像中显示共性的特征。在本节中,我们将看到它们的工作原理,并处理图像以查看是否可以从中提取特征。
这个过程非常简单,我们只需扫描图像中的每个像素,然后查看其相邻像素。我们可以将这些像素的值乘以滤波器中的等效权重。

下面将通过在2D图像中来探索卷积的工作原理。
主要是通过scipy的ascent图像来证明这一点。这是一个很好的内置图片 ,有很多角度和线条。
3 开始编码
首先引入一些Python库并获取上升图片
import cv2import numpy as npfrom scipy import misc
i = misc.ascent()
接下来,使用pyplot库来绘制图形,以便我们知道图像样子
import matplotlib.pyplot as plt%matplotlib inlineplt.grid(False)plt.gray()plt.axis("off")plt.imshow(i) 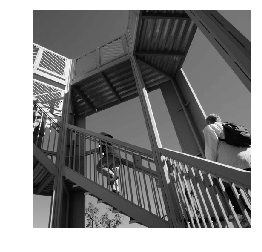
我们可以看到这是一个楼梯间的图像。我们可以试试是否可以隔离它们,例如:强烈的垂直线。
图像存储为numpy数组,我们可以通过复制该数组来创建转换后的图像。
i_transformed = np.copy(i)size_x = i_transformed.shape[0]size_y = i_transformed.shape[1]
4 创建卷积
首先,我们将卷积矩阵设为3×3的数组。
filter = [[-1,-2,-1],[0,0,0],[1,2,1]]weight = 1
现在我们将计算像素,迭代图像。
for x in range(1,size_x-1): for y in range(1,size_y-1): output_pixel = 0.0 output_pixel = output_pixel + (i[x - 1, y-1] * filter[0][0]) output_pixel = output_pixel + (i[x, y-1] * filter[0][1]) output_pixel = output_pixel + (i[x + 1, y-1] * filter[0][2]) output_pixel = output_pixel + (i[x-1, y] * filter[1][0]) output_pixel = output_pixel + (i[x, y] * filter[1][1]) output_pixel = output_pixel + (i[x+1, y] * filter[1][2]) output_pixel = output_pixel + (i[x-1, y+1] * filter[2][0]) output_pixel = output_pixel + (i[x, y+1] * filter[2][1]) output_pixel = output_pixel + (i[x+1, y+1] * filter[2][2]) output_pixel = output_pixel * weight if output_pixel<0: output_pixel = 0 if output_pixel>255: output_pixel = 255 i_transformed[x,y] = output_pixel
5 查看结果
现在我们可以绘制图像来查看卷积后的图像的结果
plt.gray()plt.grid(False)plt.imshow(i_transformed)
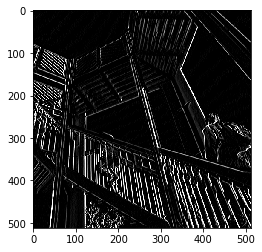
下面,将考虑卷积核对图像的影响。
使用[-1,0,1,-2,0,2,-1,0,1]为我们提供了一组非常强大的垂直线:

使用[-1,-2,-1,0,0,0,1,2,1]提供了一组水平线

6 了解池化
除了使用卷积,池化还可以帮助我实现检测功能。池化的目标是减少图像中的总信息两,并同时保持检测到特征存在。
其实有许多不同类型的池,但对于本实验,我们将使用一个称为MAX的池。
这里的想法是迭代图像,并考虑右侧、下方和右下方的像素及其近邻。取其中最大的加载到新图像中。因此,新图像时旧图像的1/4.

7 编写池化代码
此代码将执行(2,2)池。运行它并查看输出结果,我们将看到图像时原始尺寸的1/4,同时保留所有特征。
new_x = int(size_x/2)new_y = int(size_y/2)newImage = np.zeros((new_x,new_y))for x in range(0,size_x,2): for y in range(0,size_y,2): pixels = [] pixels.append(i_transformed[x, y]) pixels.append(i_transformed[x+1, y]) pixels.append(i_transformed[x, y+1]) pixels.append(i_transformed[x+1, y+1]) pixels.sort(reverse=True) newImage[int(x/2),int(y/2)] = pixels[0]plt.gray()plt.grid(False)plt.imshow(newImage)

注意,此时图像现在是256×256,原始尺寸的1/4,并且检测到的功能已得到增强。
转载地址:https://codingchaozhang.blog.csdn.net/article/details/90718068 如侵犯您的版权,请留言回复原文章的地址,我们会给您删除此文章,给您带来不便请您谅解!
发表评论
最新留言
关于作者
