本文共 12810 字,大约阅读时间需要 42 分钟。
流程图
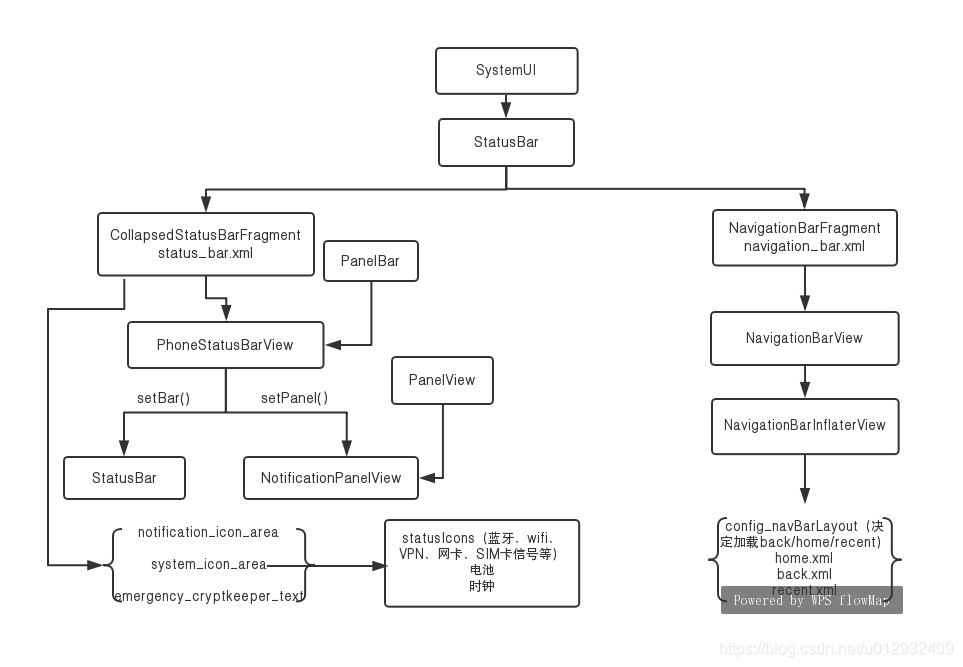
代码流程
1、先看UI显示,StatuBar加载 CollapsedStatusBarFragment 替换 status_bar_container(状态栏通知显示区域)
SystemUI\src\com\android\systemui\statusbar\phone\StatusBar.java
FragmentHostManager.get(mStatusBarWindow) .addTagListener(CollapsedStatusBarFragment.TAG, (tag, fragment) -> { CollapsedStatusBarFragment statusBarFragment = (CollapsedStatusBarFragment) fragment; statusBarFragment.initNotificationIconArea(mNotificationIconAreaController); mStatusBarView = (PhoneStatusBarView) fragment.getView(); mStatusBarView.setBar(this); mStatusBarView.setPanel(mNotificationPanel); mStatusBarView.setScrimController(mScrimController); mStatusBarView.setBouncerShowing(mBouncerShowing); setAreThereNotifications(); checkBarModes(); /// M: add for plmn display feature @{ attachPlmnPlugin(); ///@} }).getFragmentManager() .beginTransaction() .replace(R.id.status_bar_container, new CollapsedStatusBarFragment(), CollapsedStatusBarFragment.TAG) .commit(); statusBarFragment.initNotificationIconArea(mNotificationIconAreaController) 初始化通知栏区域,这是我们关心的
mStatusBarView.setBar(this) 传递statusBar处理下拉事件
mStatusBarView.setPanel(mNotificationPanel) 传递 NotificationPanelView 显示下拉UI控制
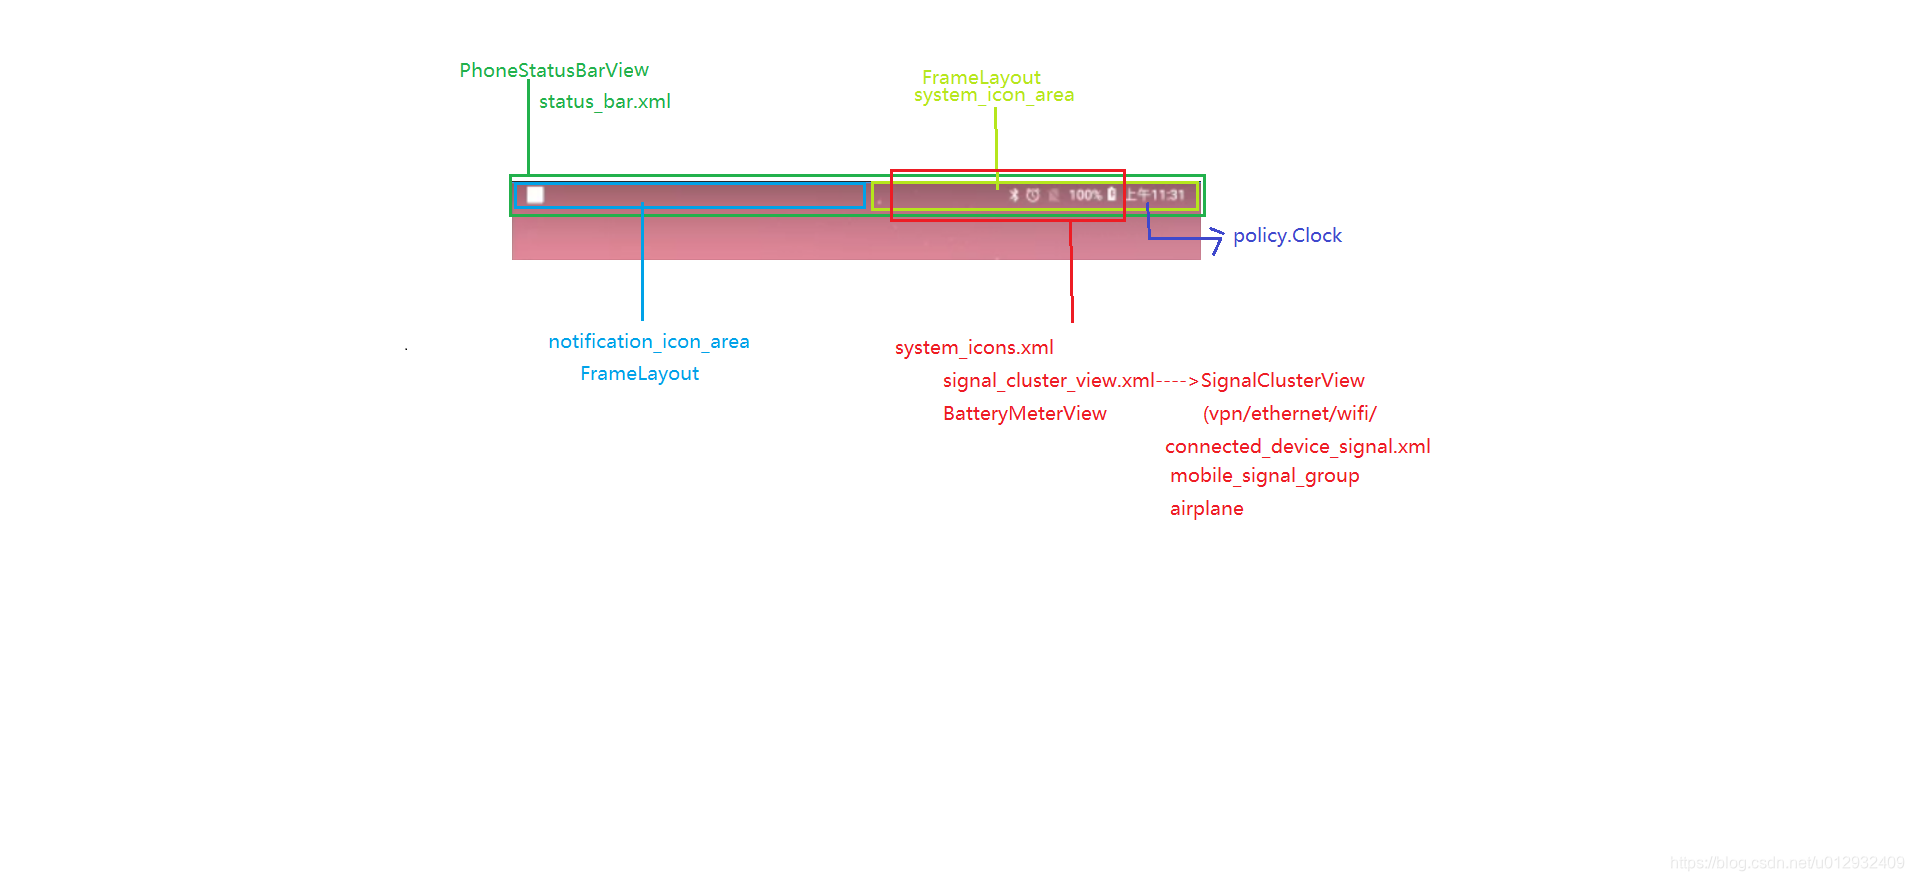
2、跟进 CollapsedStatusBarFragment 中,先看布局文件 status_bar.xml
1、notification_lights_out---ImageView默认gone2、status_bar_contents--LinearLayout notification_icon_area--FrameLayout system_icon_area--LinearLayout system_icons.xml(蓝牙、wifi、VPN、网卡、SIM卡信号、飞行模式等) 电池 clock--Clock.java 3、emergency_cryptkeeper_text--ViewStub(延迟加载 紧急电话文字)
这就是我们看到的statusBar的布局,本篇只关心 notification_icon_area,其它的以后再进行分析。继续看到之前的 initNotificationIconArea()
SystemUI\src\com\android\systemui\statusbar\phone\CollapsedStatusBarFragment.java
public void initNotificationIconArea(NotificationIconAreaController notificationIconAreaController) { ViewGroup notificationIconArea = mStatusBar.findViewById(R.id.notification_icon_area); mNotificationIconAreaInner = notificationIconAreaController.getNotificationInnerAreaView(); if (mNotificationIconAreaInner.getParent() != null) { ((ViewGroup) mNotificationIconAreaInner.getParent()) .removeView(mNotificationIconAreaInner); } notificationIconArea.addView(mNotificationIconAreaInner); // Default to showing until we know otherwise. showNotificationIconArea(false);} 获取到 notification_icon_area,FrameLayout转为ViewGroup,调用 notificationIconAreaController 获取通知要显示的view(LinearLayout),
如果已经有显示的view,通过 view 父布局将其自身remove,然后再重新addView。最后将 mNotificationIconAreaInner 显示出来(设置透明度为1,visibility为VISIBLE)
可以看到 CollapsedStatusBarFragment 中定义了几个如下的方法。
public void hideSystemIconArea(boolean animate) { animateHide(mSystemIconArea, animate);}public void showSystemIconArea(boolean animate) { animateShow(mSystemIconArea, animate);}public void hideNotificationIconArea(boolean animate) { animateHide(mNotificationIconAreaInner, animate);}public void showNotificationIconArea(boolean animate) { animateShow(mNotificationIconAreaInner, animate);} 当状态栏下拉时,状态栏中的图标icon会慢慢的变成透明和不可见,就是通过hideSystemIconArea(true), hideNotificationIconArea(true)
3、接下来,我们需要跟进 getNotificationInnerAreaView()方法中看看通知栏icon对应的容器
SystemUI\src\com\android\systemui\statusbar\phone\NotificationIconAreaController.java
public View getNotificationInnerAreaView() { return mNotificationIconArea;}protected void initializeNotificationAreaViews(Context context) { reloadDimens(context); LayoutInflater layoutInflater = LayoutInflater.from(context); mNotificationIconArea = inflateIconArea(layoutInflater); mNotificationIcons = (NotificationIconContainer) mNotificationIconArea.findViewById( R.id.notificationIcons); mNotificationScrollLayout = mStatusBar.getNotificationScrollLayout();}protected View inflateIconArea(LayoutInflater inflater) { return inflater.inflate(R.layout.notification_icon_area, null);}//notification_icon_area.xml 好了,观察上面的代码,现在基本上已经理清 notification_icon_area 的布局结构了
notification_icon_area(FrameLayout) 中添加 notification_icon_area_inner(LinearLayout),
每一个通知对应的bean为 NotificationData,创建 Notification 添加到 NotificationIconContainer(FrameLayout)中
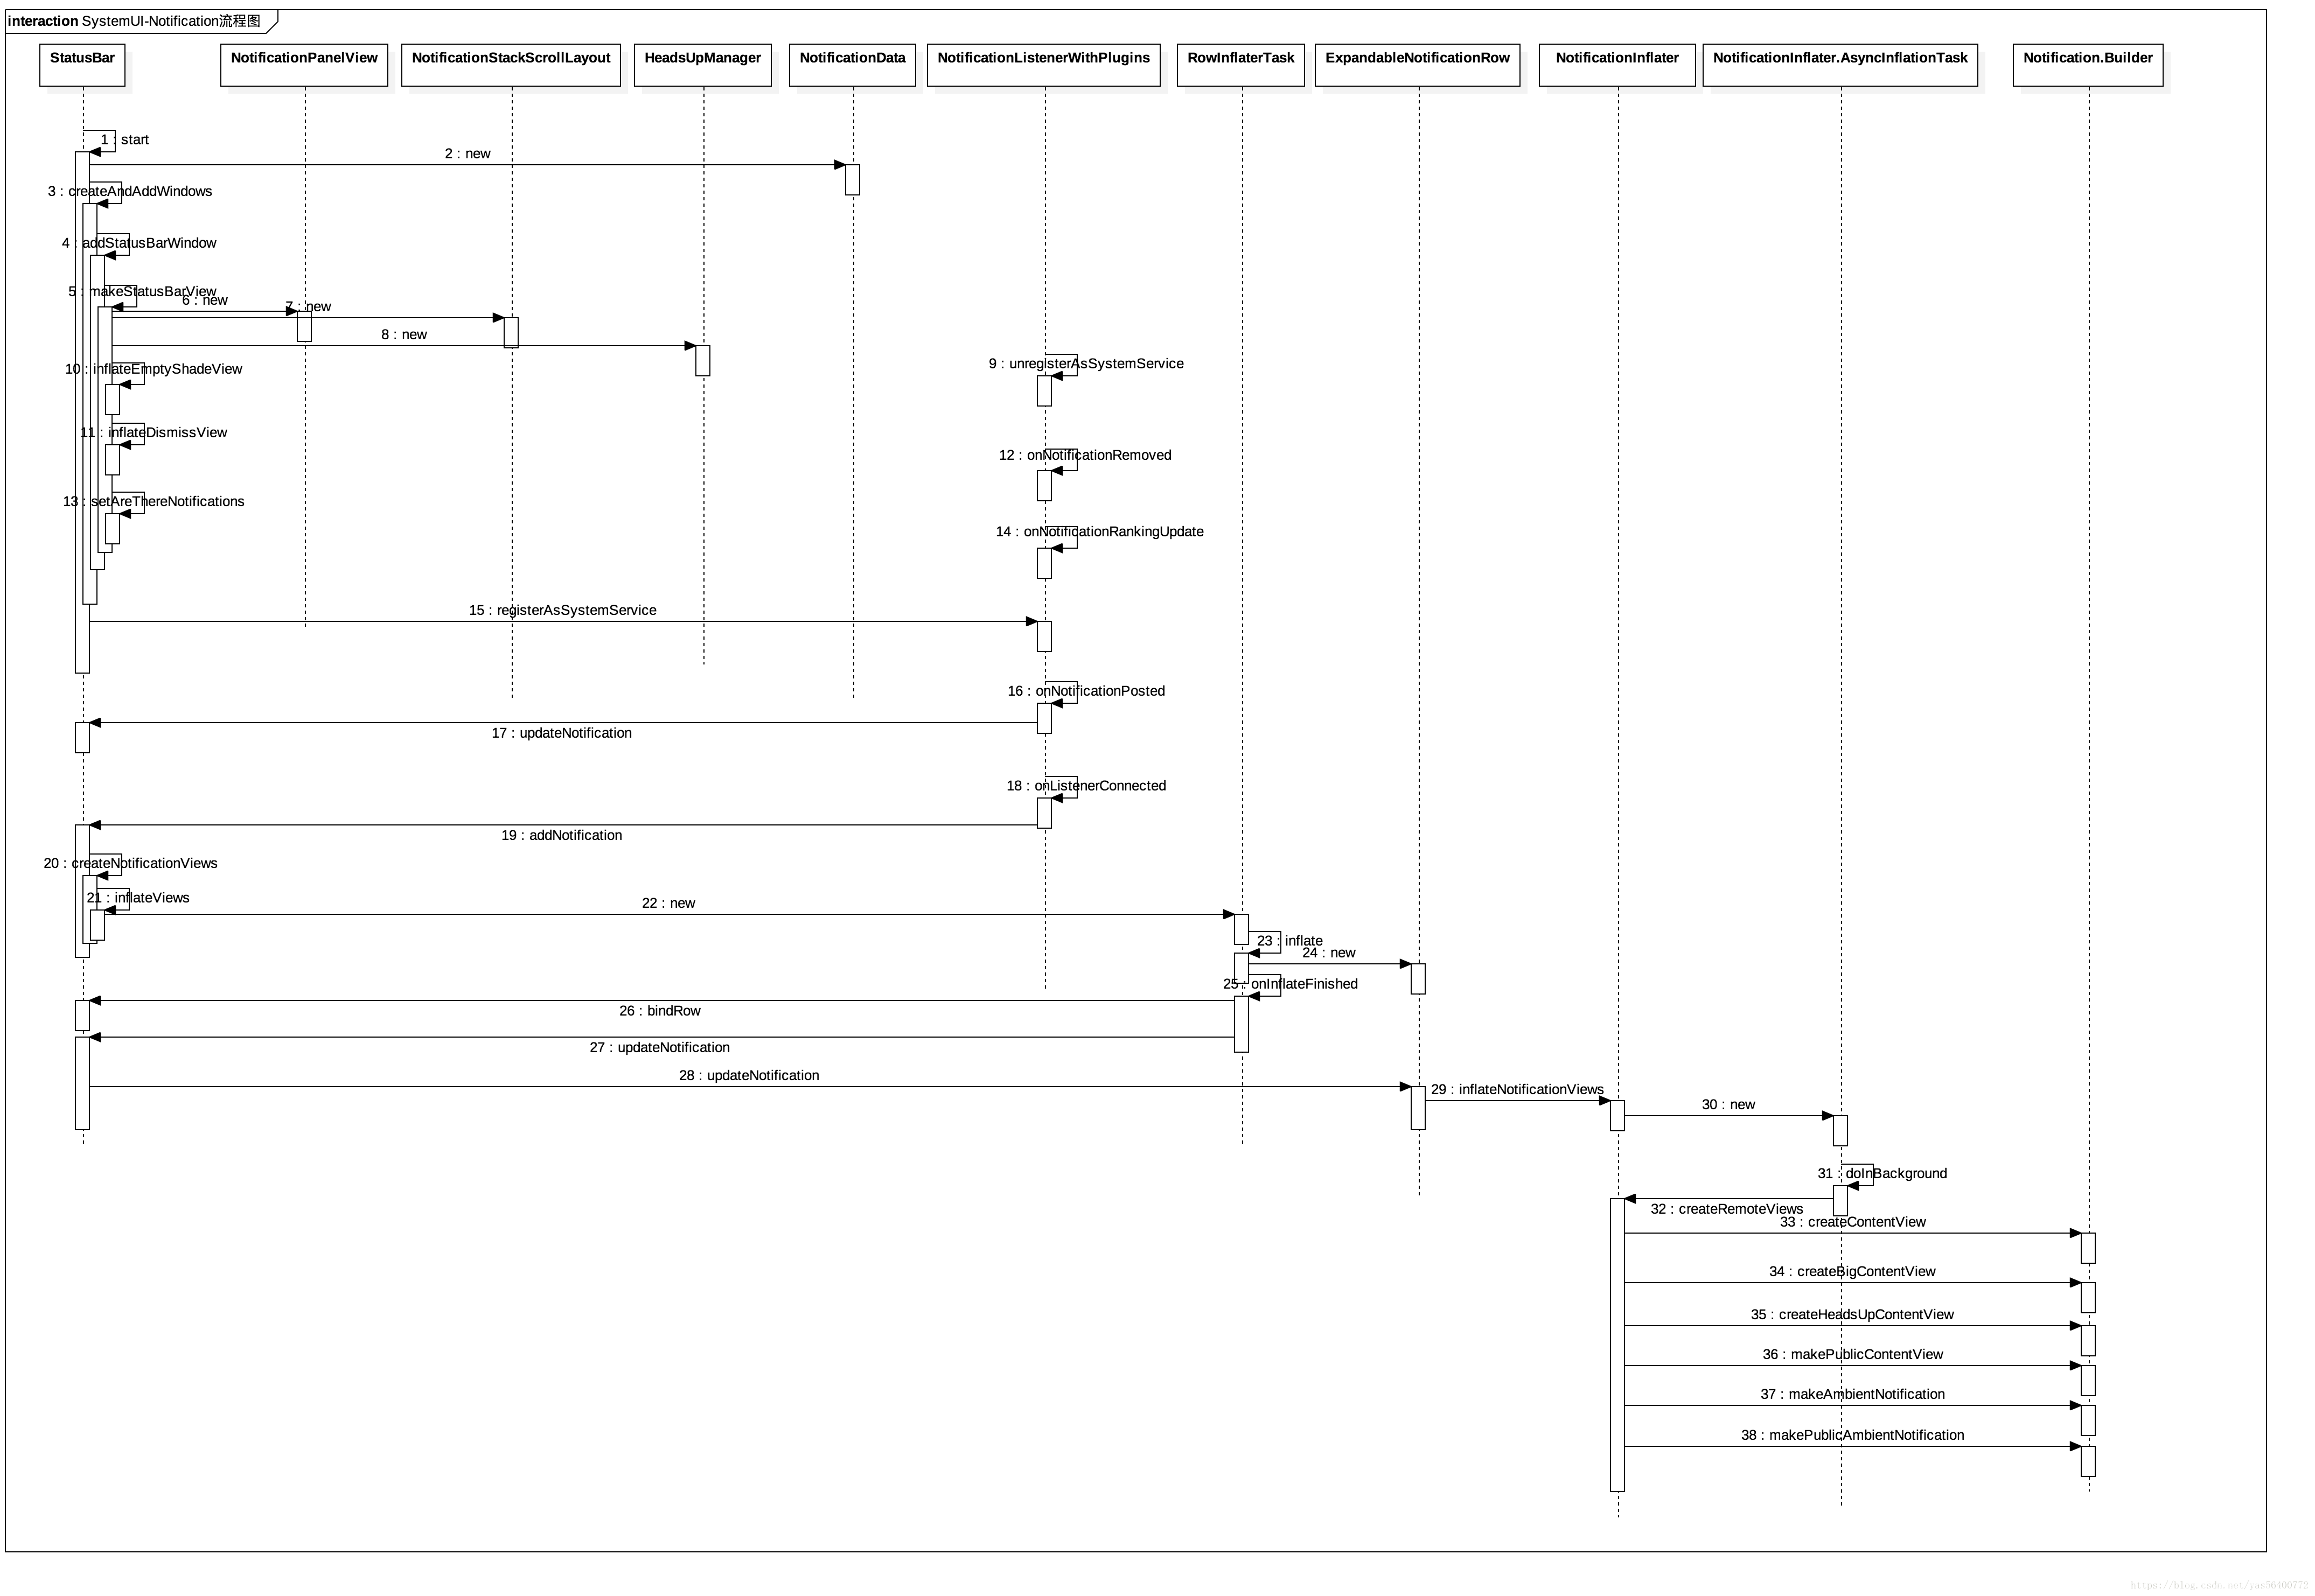
4、紧接着我们就来看下 Notification 的监听加载流程,回到 statusBar 的start()中注册 NotificationListenerWithPlugins 作为系统service监听通知消息
try { mNotificationListener.registerAsSystemService(mContext, new ComponentName(mContext.getPackageName(), getClass().getCanonicalName()), UserHandle.USER_ALL); } catch (RemoteException e) { Log.e(TAG, "Unable to register notification listener", e); } private final NotificationListenerWithPlugins mNotificationListener = new NotificationListenerWithPlugins() { @Override public void onListenerConnected() { ...... services成功启动,获取当前处于活动状态的通知(没被移除的通知),添加到通知栏,此处应该是重启后重新加载 } @Override public void onNotificationPosted(final StatusBarNotification sbn, final RankingMap rankingMap) { ...... 收到通知消息,添加或者修改 if (isUpdate) { updateNotification(sbn, rankingMap); } else { addNotification(sbn, rankingMap); } } @Override public void onNotificationRemoved(StatusBarNotification sbn, final RankingMap rankingMap) { ...... 移除通知消息 if (sbn != null && !onPluginNotificationRemoved(sbn, rankingMap)) { final String key = sbn.getKey(); mHandler.post(() -> removeNotification(key, rankingMap)); } } @Override public void onNotificationRankingUpdate(final RankingMap rankingMap) { ..... 通知的排序优先级改变,修改通知位置 if (rankingMap != null) { RankingMap r = onPluginRankingUpdate(rankingMap); mHandler.post(() -> updateNotificationRanking(r)); } }}; 继续来看下 addNotification()方法
public void addNotification(StatusBarNotification notification, RankingMap ranking) throws InflationException { String key = notification.getKey(); if (true/**DEBUG*/) Log.d(TAG, "addNotification key=" + key); mNotificationData.updateRanking(ranking); Entry shadeEntry = createNotificationViews(notification); ......} 可以看到是通过 createNotificationViews()来创建通知 View对象,内部继续调用 inflateViews()
protected NotificationData.Entry createNotificationViews(StatusBarNotification sbn) throws InflationException { if (DEBUG) { Log.d(TAG, "createNotificationViews(notification=" + sbn); } NotificationData.Entry entry = new NotificationData.Entry(sbn); Dependency.get(LeakDetector.class).trackInstance(entry); entry.createIcons(mContext, sbn); // Construct the expanded view. inflateViews(entry, mStackScroller); return entry;}protected void inflateViews(Entry entry, ViewGroup parent) { PackageManager pmUser = getPackageManagerForUser(mContext, entry.notification.getUser().getIdentifier()); final StatusBarNotification sbn = entry.notification; if (entry.row != null) { entry.reset(); updateNotification(entry, pmUser, sbn, entry.row); } else { new RowInflaterTask().inflate(mContext, parent, entry, row -> { bindRow(entry, pmUser, sbn, row); updateNotification(entry, pmUser, sbn, row); }); }} 看到上面的方法中,entry在 createNotificationViews 中创建,只赋值了icons, entry.row 为null,进入 RowInflaterTask 中
SystemUI\src\com\android\systemui\statusbar\notification\RowInflaterTask.java
public void inflate(Context context, ViewGroup parent, NotificationData.Entry entry, RowInflationFinishedListener listener) { mListener = listener; AsyncLayoutInflater inflater = new AsyncLayoutInflater(context); mEntry = entry; entry.setInflationTask(this); inflater.inflate(R.layout.status_bar_notification_row, parent, this);} 这里我们得到了 Notification 对应的layout为 status_bar_notification_row.xml,
回调方法中将 row 和 entry 绑定,继续再调用 updateNotification(),注意这个方法是四个参数的,该类中还有重载方法是两个参数的。
private void updateNotification(Entry entry, PackageManager pmUser, StatusBarNotification sbn, ExpandableNotificationRow row) { ..... entry.row = row; entry.row.setOnActivatedListener(this); boolean useIncreasedCollapsedHeight = mMessagingUtil.isImportantMessaging(sbn, mNotificationData.getImportance(sbn.getKey())); boolean useIncreasedHeadsUp = useIncreasedCollapsedHeight && mPanelExpanded; row.setUseIncreasedCollapsedHeight(useIncreasedCollapsedHeight); row.setUseIncreasedHeadsUpHeight(useIncreasedHeadsUp); row.updateNotification(entry);} 紧接着调用了 ExpandableNotificationRow的 updateNotification(),内部继续调用 NotificationInflater.inflateNotificationViews()
SystemUI\src\com\android\systemui\statusbar\notification\NotificationInflater.java
@VisibleForTestingvoid inflateNotificationViews(int reInflateFlags) { if (mRow.isRemoved()) { // We don't want to reinflate anything for removed notifications. Otherwise views might // be readded to the stack, leading to leaks. This may happen with low-priority groups // where the removal of already removed children can lead to a reinflation. return; } StatusBarNotification sbn = mRow.getEntry().notification; new AsyncInflationTask(sbn, reInflateFlags, mRow, mIsLowPriority, mIsChildInGroup, mUsesIncreasedHeight, mUsesIncreasedHeadsUpHeight, mRedactAmbient, mCallback, mRemoteViewClickHandler).execute();} new AsyncInflationTask().execute();
@Overrideprotected InflationProgress doInBackground(Void... params) { try { final Notification.Builder recoveredBuilder = Notification.Builder.recoverBuilder(mContext, mSbn.getNotification()); Context packageContext = mSbn.getPackageContext(mContext); Notification notification = mSbn.getNotification(); if (mIsLowPriority) { int backgroundColor = mContext.getColor( R.color.notification_material_background_low_priority_color); recoveredBuilder.setBackgroundColorHint(backgroundColor); } if (notification.isMediaNotification()) { MediaNotificationProcessor processor = new MediaNotificationProcessor(mContext, packageContext); processor.setIsLowPriority(mIsLowPriority); processor.processNotification(notification, recoveredBuilder); } return createRemoteViews(mReInflateFlags, recoveredBuilder, mIsLowPriority, mIsChildInGroup, mUsesIncreasedHeight, mUsesIncreasedHeadsUpHeight, mRedactAmbient, packageContext); } catch (Exception e) { mError = e; return null; }}@Overrideprotected void onPostExecute(InflationProgress result) { if (mError == null) { mCancellationSignal = apply(result, mReInflateFlags, mRow, mRedactAmbient, mRemoteViewClickHandler, this); } else { handleError(mError); }} 从msbn中获取 notifaction,判断是否是媒体类型的通知,进行对应的主题背景色修改,通过传递的优先级设置通知背景色,继续看核心方法 createRemoteViews()
private static InflationProgress createRemoteViews(int reInflateFlags, Notification.Builder builder, boolean isLowPriority, boolean isChildInGroup, boolean usesIncreasedHeight, boolean usesIncreasedHeadsUpHeight, boolean redactAmbient, Context packageContext) { InflationProgress result = new InflationProgress(); isLowPriority = isLowPriority && !isChildInGroup; if ((reInflateFlags & FLAG_REINFLATE_CONTENT_VIEW) != 0) { result.newContentView = createContentView(builder, isLowPriority, usesIncreasedHeight); } if ((reInflateFlags & FLAG_REINFLATE_EXPANDED_VIEW) != 0) { result.newExpandedView = createExpandedView(builder, isLowPriority); } if ((reInflateFlags & FLAG_REINFLATE_HEADS_UP_VIEW) != 0) { result.newHeadsUpView = builder.createHeadsUpContentView(usesIncreasedHeadsUpHeight); } if ((reInflateFlags & FLAG_REINFLATE_PUBLIC_VIEW) != 0) { result.newPublicView = builder.makePublicContentView(); } if ((reInflateFlags & FLAG_REINFLATE_AMBIENT_VIEW) != 0) { result.newAmbientView = redactAmbient ? builder.makePublicAmbientNotification() : builder.makeAmbientNotification(); } result.packageContext = packageContext; return result;} 这里就是创建各种布局 CONTENT_VIEW、EXPANDED_VIEW、HEADS_UP_VIEW、PUBLIC_VIEW、AMBIENT_VIEW,
然后回到 AsyncInflationTask 的 onPostExecute()中执行 apply(),代码太多就不贴了, SystemUI部分的通知流程分析技术,欢迎留言讨论。
statusBar左边区域(notification_icon_area)看完了,接下来看下右边的系统图标区域(system_icon_area)
从根源上屏蔽Notification
frameworks/base/services/core/java/com/android/server/notification/NotificationManagerService.java
注释如下代码
mHandler.post(new EnqueueNotificationRunnable(userId, r))
转载地址:https://cczheng.blog.csdn.net/article/details/89919667 如侵犯您的版权,请留言回复原文章的地址,我们会给您删除此文章,给您带来不便请您谅解!
发表评论
最新留言
关于作者
