实现两个UITableView垂直同步滑动,右边列表水平滑动,左边固定
发布日期:2021-06-28 22:55:07
浏览次数:2
分类:技术文章
本文共 11965 字,大约阅读时间需要 39 分钟。
两个UITableView垂直同步滑动,并且右边的列表能水平滑动,左边固定只能上下滑动,这个需求不常见。多见于了财经App中,左边是固定的行情名称和code,右边则有很多相关的信息展示,比如:当前值,开盘价、最高价、最低价、昨收价、收盘价、涨跌、涨跌幅等。经过构思,大致分析如下:
1、左边是UITableView,与当前设备的同宽高。实际只展示一列数据,比如:美元USD
2、通过addSubView 为左边列表添加一个ScrollView,其宽度为整个设备宽度减去左边列表实际占用的宽度(假如列宽为:100pt),高度为总数据条数与列高度的乘积(即为左边列表的contentSize 的高度)。
3、在右边的ScrollView 中addSubView 一个UITableView,用于显示右边列表信息。其宽度是右边信息列的宽度(一般会比 ScrollView 的width 要宽,否则水平滚动就滚不起来了),其高度与ScrollView 同高。由于TableView 要水平滚动必须要要加到ScrollView 中,但这也会导致该列表的列重用机制被破坏。
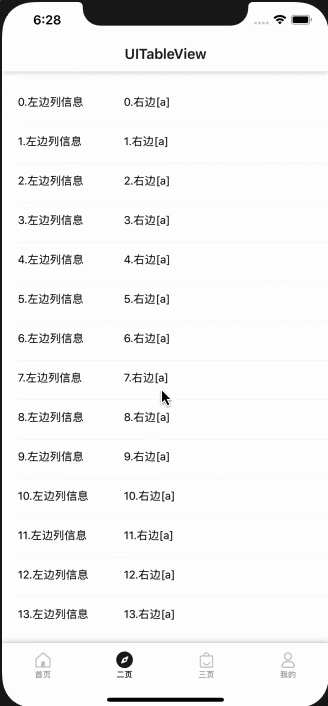
初步效果图如下:
参考代码如下:
//// TableViewController.swift// SwiftAppDeme//// Created by apple on 2019/7/7.// Copyright © 2019 yimiSun. All rights reserved.//import UIKitimport SnapKit/** * UITableView 例子 */class TableViewController: BaseViewController,UITableViewDelegate,UITableViewDataSource { let cell_count:Int = 30 let cell_height:CGFloat = 50 override func viewDidLoad() { super.viewDidLoad() // Do any additional setup after loading the view. self.initView() } //MARK: - initView private func initView() -> Void { //MARK:导航 self.initNavgationBar(isBottomLine: false, isShadow: true) //MARK:标题 self.initViewControllerTitle(strTitle: "UITableView") //MARK:列表 self.view.addSubview(self.leftListTableView) self.leftListTableView.addSubview(self.scrollViewRight) //缺点:加到 ScrollView 的列表重用机制被破坏 self.scrollViewRight.addSubview(self.listTableView) self.view.sendSubviewToBack(self.leftListTableView) } //MARK: - UITableViewDelegate、UITabelViewDataSource func numberOfSections(in tableView: UITableView) -> Int { return 1 } //MARK:组头、组尾 func tableView(_ tableView: UITableView, heightForHeaderInSection section: Int) -> CGFloat { return CGFloat.leastNormalMagnitude } func tableView(_ tableView: UITableView, heightForFooterInSection section: Int) -> CGFloat { return CGFloat.leastNormalMagnitude } func tableView(_ tableView: UITableView, viewForHeaderInSection section: Int) -> UIView? { return nil } func tableView(_ tableView: UITableView, viewForFooterInSection section: Int) -> UIView? { return nil } //MARK:列 func tableView(_ tableView: UITableView, numberOfRowsInSection section: Int) -> Int { return cell_count } func tableView(_ tableView: UITableView, heightForRowAt indexPath: IndexPath) -> CGFloat { return cell_height } func tableView(_ tableView: UITableView, cellForRowAt indexPath: IndexPath) -> UITableViewCell { if tableView == self.leftListTableView { var cell:LeftTableCell? = tableView.dequeueReusableCell(withIdentifier: LeftTableCell.cell_identify) as? LeftTableCell if cell == nil { cell = LeftTableCell.init(style: .default, reuseIdentifier: LeftTableCell.cell_identify) } cell?.initBindCellData(strInfo: "\(indexPath.row).左边列信息") return cell! } else{ var cell:RightTableCell? = tableView.dequeueReusableCell(withIdentifier: RightTableCell.cell_identify) as? RightTableCell if cell == nil { cell = RightTableCell.init(style: .default, reuseIdentifier: RightTableCell.cell_identify) } cell?.initBindCellDataFor(Index: indexPath.row) return cell! } } func tableView(_ tableView: UITableView, didSelectRowAt indexPath: IndexPath) { tableView.deselectRow(at: indexPath, animated: true) defer { tableView.deselectRow(at: indexPath, animated: true) } print("leftListTableView.visibleCells.count:\(self.leftListTableView.visibleCells.count)") print("listTableView.visibleCells.count:\(self.listTableView.visibleCells.count)") } //MARK: - 侧滑 func tableView(_ tableView: UITableView, editActionsForRowAt indexPath: IndexPath) -> [UITableViewRowAction]? { //备注 let remark:UITableViewRowAction = UITableViewRowAction.init(style: .destructive, title: "备注") { (_action:UITableViewRowAction, _indexPath:IndexPath) in print("我是备注") } remark.backgroundColor = UIColor.init().colorFromHexInt(hex: 0x01A1EF) //删除 let delete:UITableViewRowAction = UITableViewRowAction.init(style: .default, title: "删除") { (_action:UITableViewRowAction, _indexPath:IndexPath) in print("我是删除") } delete.backgroundColor = UIColor.init().colorFromHexInt(hex: 0xff544b) return [delete,remark] } func tableView(_ tableView: UITableView, canEditRowAt indexPath: IndexPath) -> Bool {// if tableView == self.listTableView {// return true// } return false } //MARK: - lazy load private lazy var leftListTableView:UITableView = { let y = K_APP_NAVIGATION_BAR_HEIGHT let h = K_APP_HEIGHT - y - K_APP_TABBAR_HEIGHT let _tb = UITableView.init(frame: .init(x: 0, y: y, width:K_APP_WIDTH, height: h), style: UITableView.Style.plain) _tb.backgroundColor = UIColor.clear _tb.isScrollEnabled = true _tb.showsVerticalScrollIndicator = false _tb.showsHorizontalScrollIndicator = false //分割线 _tb.separatorStyle = .singleLine _tb.separatorColor = K_APP_SPLIT_LINE_COLOR //行选中 _tb.allowsSelection = true _tb.allowsMultipleSelection = false //表头、表尾 _tb.tableHeaderView = UIView.init(frame: .zero) _tb.tableFooterView = UIView.init(frame: .zero) _tb.delegate = self _tb.dataSource = self //防止顶部空白 if #available(iOS 11.0, *) { _tb.contentInsetAdjustmentBehavior = UIScrollView.ContentInsetAdjustmentBehavior.never } else { self.automaticallyAdjustsScrollViewInsets = false } //注册 _tb.register(LeftTableCell.classForCoder(), forCellReuseIdentifier: LeftTableCell.cell_identify) return _tb }() private lazy var scrollViewRight:UIScrollView = { let th = CGFloat.init(cell_count) * cell_height let _s = UIScrollView.init(frame: CGRect.init(x: 0.3 * K_APP_WIDTH, y: 0, width: 0.7 * K_APP_WIDTH, height: th)) _s.contentSize = CGSize.init(width: RightTableCell.cell_width, height: th) _s.backgroundColor = UIColor.clear _s.isUserInteractionEnabled = true _s.showsVerticalScrollIndicator = false _s.showsHorizontalScrollIndicator = false return _s }() private lazy var listTableView:UITableView = { let th = CGFloat.init(cell_count) * cell_height let _tb = UITableView.init(frame: CGRect.init(x: 0, y: 0, width: RightTableCell.cell_width, height: th), style: UITableView.Style.plain) _tb.backgroundColor = UIColor.clear _tb.isScrollEnabled = false _tb.isUserInteractionEnabled = false _tb.showsVerticalScrollIndicator = false _tb.showsHorizontalScrollIndicator = false //分割线 _tb.separatorStyle = .none _tb.separatorColor = UIColor.clear //行选中 _tb.allowsSelection = false _tb.allowsMultipleSelection = false //表头、表尾 _tb.tableHeaderView = UIView.init(frame: .zero) _tb.tableFooterView = UIView.init(frame: .zero) _tb.delegate = self _tb.dataSource = self //防止顶部空白 if #available(iOS 11.0, *) { _tb.contentInsetAdjustmentBehavior = UIScrollView.ContentInsetAdjustmentBehavior.never } else { self.automaticallyAdjustsScrollViewInsets = false } //注册 _tb.register(RightTableCell.classForCoder(), forCellReuseIdentifier: RightTableCell.cell_identify) return _tb }()}//MARK: - 左边列class LeftTableCell: UITableViewCell { static let cell_identify:String = "left_cell_identify" static let cell_width:CGFloat = 0.3 * K_APP_WIDTH //MARK: - override override init(style: UITableViewCell.CellStyle, reuseIdentifier: String?) { super.init(style: style, reuseIdentifier: reuseIdentifier) self.initView() } required init?(coder: NSCoder) { fatalError("init(coder:) has not been implemented") } //MARK: - initView private func initView(){ self.backgroundColor = UIColor.clear self.addSubview(self.labInfo) self.labInfo.snp.makeConstraints { make in make.left.equalTo(20) make.right.equalTo(-20) make.height.equalTo(21) make.centerY.equalTo(self.centerY) } } /** 列数据绑定 */ public func initBindCellData(strInfo:String) { self.labInfo.text = strInfo } //MARK: - lazy load private lazy var labInfo:YYLabel = { let _l = YYLabel.init() _l.textAlignment = .left _l.textColor = UIColor.black _l.font = UIFont.systemFont(ofSize: 14) return _l }()}//MARK: - 右边列class RightTableCell:UITableViewCell { static let cell_identify:String = "right_cell_identify" static let cell_width:CGFloat = 600 override init(style: UITableViewCell.CellStyle, reuseIdentifier: String?) { super.init(style: style, reuseIdentifier: reuseIdentifier) self.initView() } required init?(coder: NSCoder) { fatalError("init(coder:) has not been implemented") } //MARK: - initView private func initView(){ self.backgroundColor = UIColor.clear self.addSubview(self.labInfo) self.labInfo.snp.makeConstraints { make in make.left.equalTo(30) make.width.equalTo(180) make.height.equalTo(21) make.centerY.equalTo(self.centerY) } self.addSubview(self.labInfo2) self.labInfo2.snp.makeConstraints { make in make.left.equalTo(self.labInfo.snp.right).offset(20) make.width.equalTo(180) make.height.equalTo(21) make.centerY.equalTo(self.centerY) } self.addSubview(self.labInfo3) self.labInfo3.snp.makeConstraints { make in make.left.equalTo(self.labInfo2.snp.right).offset(20) make.width.equalTo(180) make.height.equalTo(21) make.centerY.equalTo(self.centerY) } } /** 列数据绑定 */ public func initBindCellDataFor(Index ix:Int) { self.labInfo.text = "\(ix).右边[a]" self.labInfo2.text = "右边[b]" self.labInfo3.text = "右边[c]" } //MARK: - lazy load private lazy var labInfo:YYLabel = { let _l = YYLabel.init() _l.textAlignment = .left _l.textColor = UIColor.black _l.font = UIFont.systemFont(ofSize: 14) return _l }() private lazy var labInfo2:YYLabel = { let _l = YYLabel.init() _l.textAlignment = .center _l.textColor = UIColor.black _l.font = UIFont.systemFont(ofSize: 14) return _l }() private lazy var labInfo3:YYLabel = { let _l = YYLabel.init() _l.textAlignment = .center _l.textColor = UIColor.black _l.font = UIFont.systemFont(ofSize: 14) return _l }()} 目前暂未找到更好的方法,能保留两个TableView 的列重用。如有其他更好的方案欢迎留言交流
转载地址:https://blog.csdn.net/yimiyuangguang/article/details/103226921 如侵犯您的版权,请留言回复原文章的地址,我们会给您删除此文章,给您带来不便请您谅解!
发表评论
最新留言
很好
[***.229.124.182]2024年04月01日 21时11分34秒
关于作者

喝酒易醉,品茶养心,人生如梦,品茶悟道,何以解忧?唯有杜康!
-- 愿君每日到此一游!
推荐文章
大厂架构师经验分享!我离职后面试收割小米等大厂offer,知乎上已获万赞
2019-04-29
安卓开发视频教学!10天用Flutter撸了个高仿携程App,内含福利
2019-04-29
安卓主板开发!Android之内存泄漏调试学习与总结,社招面试心得
2019-04-29
安卓前端开发框架!完美讲解内存缓存LruCache实现原理,吐血整理
2019-04-29
安卓前端开发框架!轻松获得一线大厂面试offer,附答案
2019-04-29
安卓前端开发!Android性能优化之APK优化,赶快收藏备战金九银十!
2019-04-29
安卓定制系统开发!这是一份面向Android开发者的复习指南,系列篇
2019-04-29
安卓客户端开发!如何试出一个Android开发者真正的水平?分享PDF高清版
2019-04-29
安卓平板app开发!实战讲述Flutter跨平台框架应用,附大厂真题面经
2019-04-29
安卓开发包!大佬手把手教你如何仿写出大厂的APP,含BATJM大厂
2019-04-29
Android事件分发机制及设计思路,先收藏了
2019-04-29
Android事件分发机制收藏这一篇就够了,不吃透都对不起自己
2019-04-29
Android内存泄漏总结,offer拿到手软
2019-04-29
Android内存泄漏总结,成功拿下大厂offer
2019-04-29
来看看移动端小程序技术的前世今生!讲的明明白白!
2019-04-29
来看看这份超全面的《Android面试题及解析》,大厂面经合集
2019-04-29
4面字节跳动拿到Offer,已拿到offer
2019-04-29
4面字节跳动拿到Offer,真香!
2019-04-29
4面阿里拿到P7Offer,赶紧收藏!
2019-04-29
6年老Android面经总结,大牛最佳总结
2019-04-29
白红宇的个人博客 - 记录点点滴滴的事 - 您是第 309229587 位访客
访问时间: 2024-04-30 04:09:10
访问IP: 18.119.125.135
Copyright © 2020 - 2023 blog.css8.cn 京ICP备2021015314号-1
手机版