【茶余饭后】安装Apache配置正向代理和反向代理
发布日期:2021-06-24 15:29:02
浏览次数:2
分类:技术文章
本文共 4229 字,大约阅读时间需要 14 分钟。
文章目录
Apache安装(离线)
1、准备必要软件包
- apr-1.4.5.tar.gz 注:APR(Apache portable Run-time libraries,Apache可移植运行库)的目的如其名称一样,主要为上层的应用程序提供一个可以跨越多操作系统平台使用的底层支持接口库。相当于apache的虚拟环境
- apr-util-1.3.12.tar.gz apr-util安装依赖于apr,因此需要首先安装apr。常用的一些存储段和存储段组,加密组件等等
- httpd-2.2.31.tar.gz apache的核心软件,也是http的主程序
- pcre-8.10.zip
2、解压编译
默认解压路径为“/opt/”
1. 依赖包安装apr-1.4.5.tar.gz1. tar -xzvf apr-1.4.5.tar.gz 2. cd apr-1.4.5 3. yum -y install gcc-c++ 4. ./configure --prefix=/usr/local/apr 5. make && make install
2. 依赖包安装apr-util-1.3.12.tar.gz
1. tar -xzvf apr-util-1.3.12.tar.gz 2. cd apr-util-1.3.12 3. ./configure --prefix=/usr/local/apr-util --with-apr=/usr/local/apr/bin/apr-1-config 4. make && make install
3. 依赖包安装pcre.8.10.zip
1. tar -xzvf pcre-8.10.zip 或者 unzip pcre-8.10.zip 2. cd pcre-8.10 2. ./configure --prefix=/usr/local/pcre 3. make && make install
4. Apache安装
1. tar zxvf httpd-2.2.31.tar.gz 2. yum install zlib-devel -y 3. cd httpd-2.2.31 4. ./configure --prefix=/usr/local/apache2 --with-apr=/usr/local/apr --with-apr-util=/usr/local/apr-util --with-pcre=/usr/local/pcre --enable-modules=so --enable-mods-shared=all --enable-proxy --enable-proxy-connect --enable-proxy-ftp --enable-proxy-http --enable-proxy-ajp --enable-proxy-balancer --enable-rewrite --enable-ssl --with-ssl=/usr/local/httpd/ssl --with-expat=builtin ap_cv_void_ptr_lt_long=no --with-z=/usr/lib/ 5. make && make install
以上执行会报错,configure: error: …No recognized SSL/TLS toolkit detected,这是需要先执行第五步中的“yum install openssl*”,若不需要代理https的,可以把以上第四步中的*–enable-ssl --with-ssl=/usr/local/httpd/ssl*给去掉
5. 使用https代理需要安装ssl1. yum install openssl*2. openssl genrsa -des3 1024 > /usr/local/apache2/conf/server.key3. openssl genrsa -des3 1024 > /usr/local/apache2/conf/server.key > /usr/local/apache2/conf/server2.key 4. mv /usr/local/apache2/conf/server2.key /usr/local/apache2/conf/server.key5. openssl req -new -key /usr/local/apache2/conf/server.key -out /usr/local/apache2/conf/server.csr6. openssl x509 -in /usr/local/apache2/conf/server.csr -out /usr/local/apache2/conf/server.crt -req -signkey /usr/local/apache2/conf/server.key -days 3650
该生成的证书路径需要和apache创建后的host_ssl.conf中的SSL证书路径一致,查看证书信息“openssl x509 -noout -text -in server.crt”
3、验证Apache
1. 启动Apache
###由于在安装apache的时候指定的安装前缀是/usr/local/apache21. cd /usr/local/apache2/bin2. ./apachectl start###报错:httpd: Could not reliably determine the server's fully qualified domain name, using localhost.localdomain for ServerName
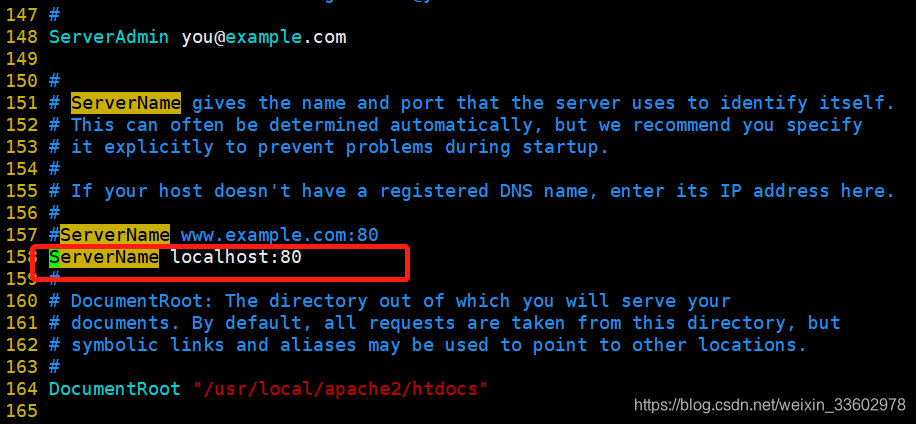
报错httpd: Could not reliably determine the server’s fully qualified domain name, using localhost.localdomain for ServerName,需要在原始的httpd.conf文件中配置ServerName,如下:
3. cd /usr/local/apache2/conf4. vim httpd.conf###使用:set number 打开行号找到157行,或者使用?ServerName找到位置,在原来的下面新增一行6. ServerName localhost:80
netstat -na | grep 80
发现并没有启动成功
下面需要进一步配置apache 2. 配置Apache 首先修改主配置httpd.conf1. cd /usr/local/apache2/conf/2. vim httpd.conf####保证一下模块处于开启的状态,前面有#号的去掉#LoadModule proxy_module modules/mod_proxy.so #LoadModule proxy_connect_module modules/mod_proxy_connect.so#LoadModule proxy_http_module modules/mod_proxy_http.so#LoadModule proxy_ajp_module modules/mod_proxy_ajp.so#LoadModule proxy_balancer_module modules/mod_proxy_balancer.so#Include conf/extra/httpd-vhosts.conf#####如果使用到了https的反向代理,需要打开下面这个配置#Include conf/extra/httpd-vhosts.conf
其次修改虚拟主机的httpd配置,即httpd-vhosts.conf
以下同时使用80端口做了正向代理和反向代理,仅供参考DocumentRoot "/usr/local/apache2/shared" ServerName xxx.xxx.xxx.xxx:80 ErrorLog "/usr/local/apache2/logs/error.log" CustomLog "/usr/local/apache2/logs/access.log" common SetEnvIfNoCase Referer ^http://xxx.xxx.xxx.xxx:80 local_ref SetEnvIf Referer ^$ local_ref ###作为https的反向代理必须加上以下的配置 SSLProxyEngine on ###以下作为https的反向代理配置 ProxyPass /wechat https://weixin.qq.com ProxyPassReverse /wechat https://weixin.qq.com Require all denied Options FollowSymLinks AllowOverride None Order deny,allow Allow from all ###以下是作为正向代理的配置 ProxyRequests On ProxyVia OnOrder deny,allow Deny from all Allow from all SetOutputFilter DEFLATE SetEnvIfNoCase Request_URI "\.(?:rar|json|g?zip)$" no-gzip
重启apache,然后再查看端口启用情况即可
转载地址:https://blog.csdn.net/weixin_33602978/article/details/106038444 如侵犯您的版权,请留言回复原文章的地址,我们会给您删除此文章,给您带来不便请您谅解!
发表评论
最新留言
表示我来过!
[***.240.166.169]2024年04月16日 09时44分30秒
关于作者

喝酒易醉,品茶养心,人生如梦,品茶悟道,何以解忧?唯有杜康!
-- 愿君每日到此一游!
推荐文章
ARMv8-M相比ARMv7-M架构优势在哪里?
2019-04-28
PCB差分信号设计中的3个常见误区
2019-04-28
没赶上互联网,也没赶上移动互联网,微软到底赶上了什么?
2019-04-28
C语言中,全局变量滥用的后果竟如此严重?
2019-04-28
一种经典的按键扫描方案
2019-04-28
NFC技术解读及ST NFC产品与方案
2019-04-28
开源协议是什么?开源等于免费吗?
2019-04-28
USB 2.0电路设计注意要点
2019-04-28
核电池:一切电池的终极形态
2019-04-28
计算机操作系统“进程”与“线程”的通俗解析
2019-04-28
FPGA难懂?与GPU类比一下就明白了
2019-04-28
网传互联网公司加班表
2019-04-28
实操 Svn 迁移到 Git
2019-04-28
Windows 内核会换为 Linux 吗?
2019-04-28
如果没有PCB设计
2019-04-28
几款优秀的 Windows 虚拟串口模拟器
2019-04-28
天线的原理
2019-04-28
物联网标准和协议,选择哪种更适合?
2019-04-28
保险丝分类知多少?
2019-04-28
共模电感为什么会接在开关电源交流一侧?
2019-04-28
白红宇的个人博客 - 记录点点滴滴的事 - 您是第 308854278 位访客
访问时间: 2024-04-29 05:10:54
访问IP: 3.136.97.64
Copyright © 2020 - 2023 blog.css8.cn 京ICP备2021015314号-1
手机版