Web 项目 tiger 之2 国际化
发布日期:2021-06-23 19:02:40
浏览次数:11
分类:技术文章
本文共 8357 字,大约阅读时间需要 27 分钟。
本文导读
- 本文承接
- 国际化主要用于应用跨国时使用,比如在中国时应用为中文,在韩国时,应用显示为韩文,在日本时,应用又显示为日文等。又或者是用户点击什么语言就可以自动切换什么语言
自动语言切换
需求分析
- 国际化主要用于应用跨国时使用,比如在中国时应用为中文,在韩国时,应用显示为韩文,在日本时,应用又显示为日文等,这叫应用跟着系统语言环境自动切换;
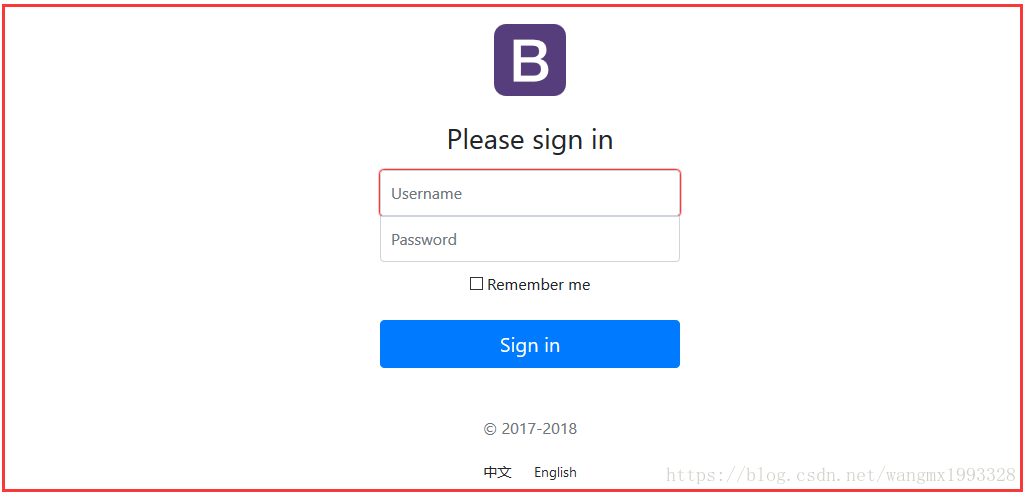
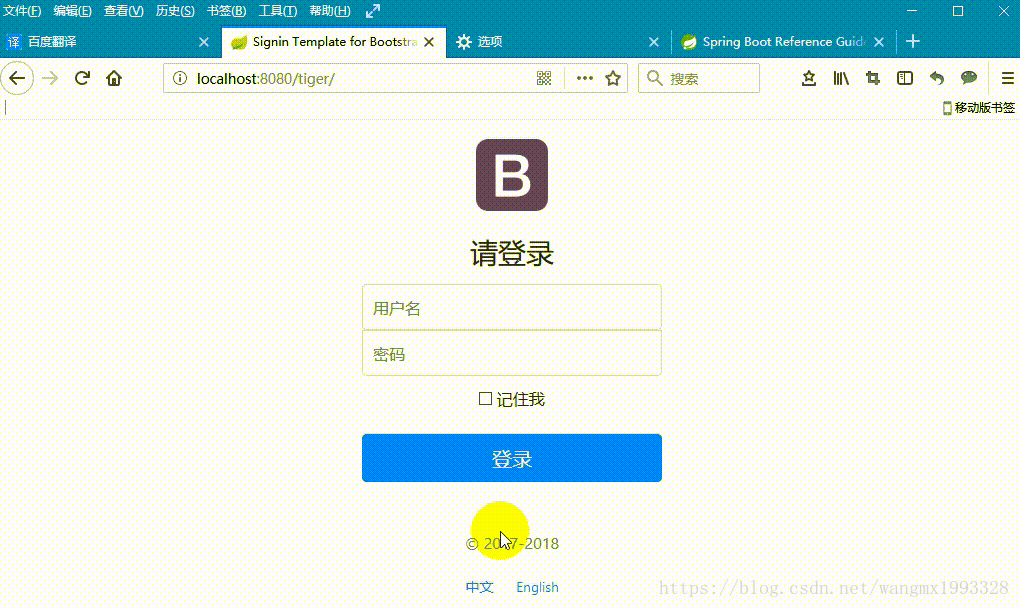
- 下面以“tiger”项目的首页为例进行说明
准备国际化文件
- 编写国际化配置文件,抽取页面需要显示的国际化消息
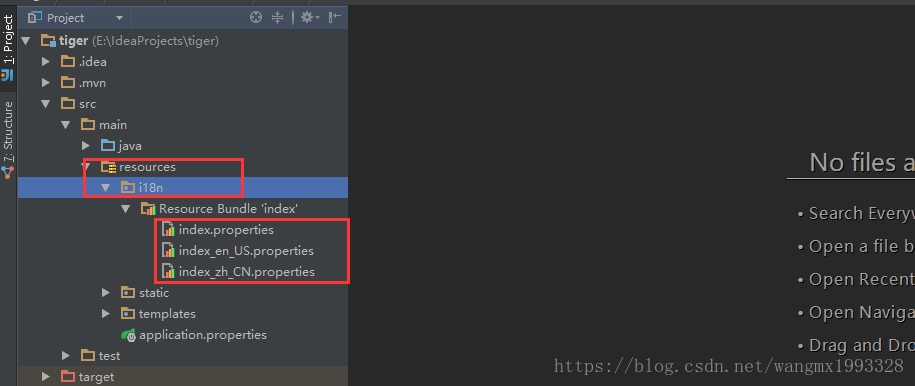
- 在类路径下新建一个目录“i18n”(目录名字随意)
- 然后在“i18n”目录下新建 “index.properties”、“index_en_US.properties”、“index_zh_CN.properties” 三个属性文件
- “index.properties”:存放默认的语言,名称通常与页面名称一致
- “index_en_US.properties”:存放英文,en表示语言(英文)缩写,US表示国家(美国)缩写,请按规范格式写即可
- “index_zh_CN.properties”:存放中文,zh表示语言(中文)缩写,CN表示国家(中国)缩写,请按规范格式写即可
- 当然还可以写更多的语言文件,当它们的命名符合规范时,IDEA会自动将它们绑定到一起,这样在后面输入值的时候会很方便
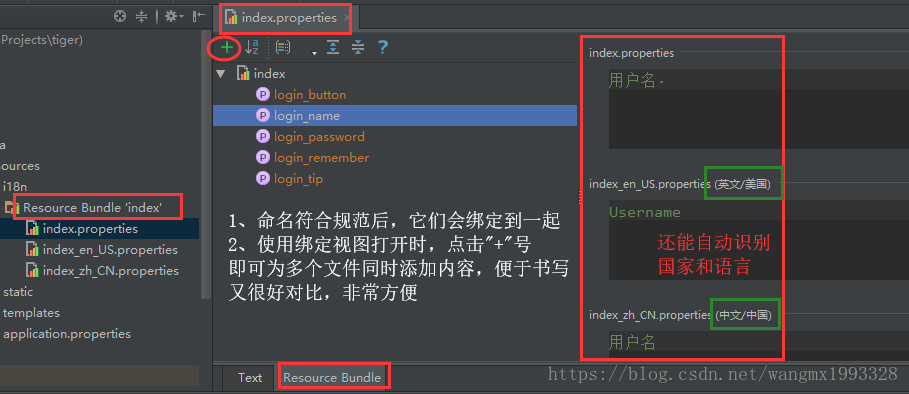
#index.propertieslogin_button=登录·login_name=用户名·login_password=密码·login_remember=记住我·login_tip=请登录·
#index_zh_CN.propertieslogin_button=登录login_name=用户名login_password=密码login_remember=记住我login_tip=请登录
#index_en_US.propertieslogin_button=Sign inlogin_name=Usernamelogin_password=Passwordlogin_remember=Remember melogin_tip=Please sign in
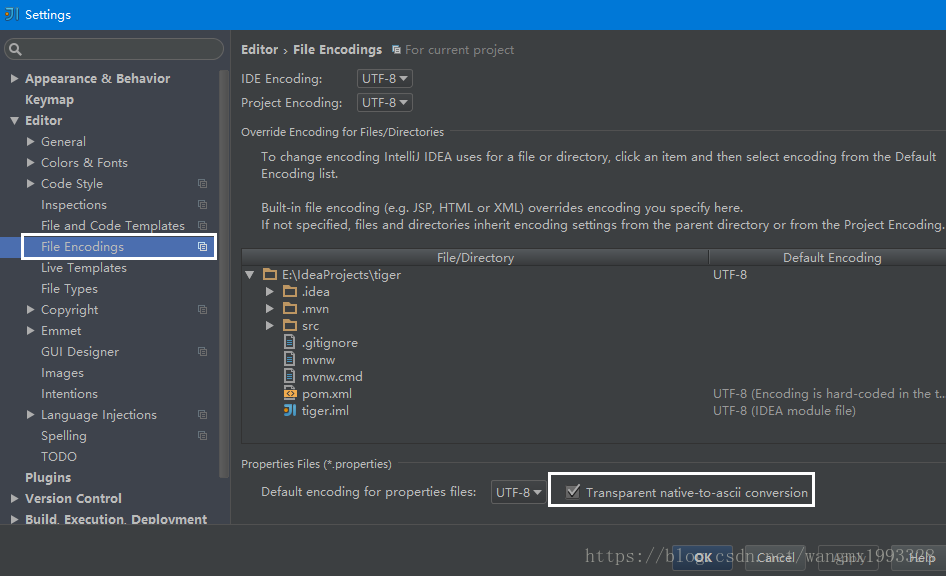
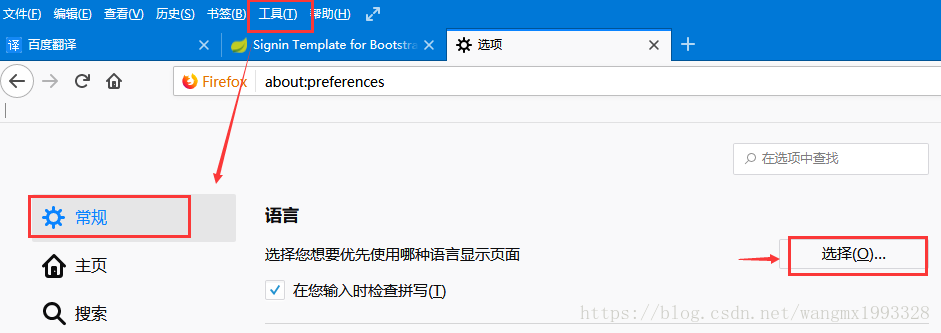
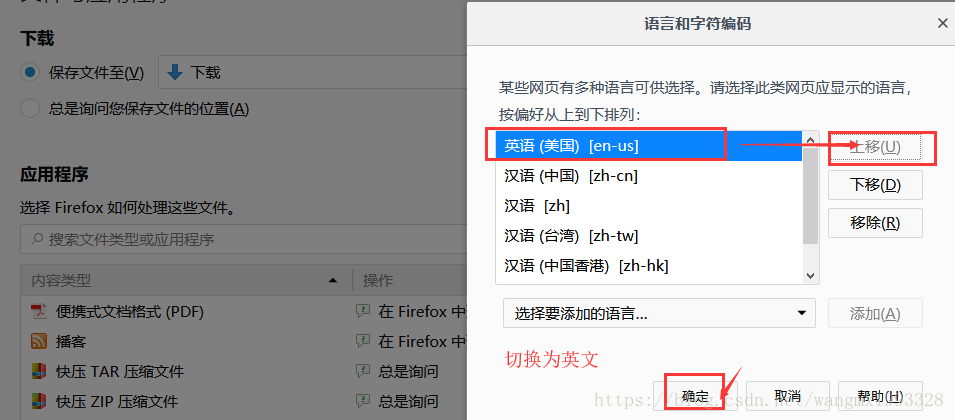
- 为了防止资源文件中文乱码,请勾选如下IDEA设置
Spring Boot 自动配置国际化原理
- 以前使用 Spring MVC 来做国际化的步骤如下:
- 编写国际化配置文件,这一步 Spring Boot 同样要做,上面已经做了
- 使用 ResourceBundleMessageSource API管理国际化资源文件,Spring Boot帮我们做了
- 在页面使用 fmt:message 取出国际化内容,Spring Boot 因为这里使用 Thymeleaf 模板引擎,所以会用 Thymeleaf 进行取值
- Spring Boot 现在自动配置好了管理国际化资源文件的组件 MessageSourceAutoConfiguration,可以看出底层仍然使用的是 ResourceBundleMessageSource;
package org.springframework.boot.autoconfigure.context;@Configuration@ConditionalOnMissingBean(value = MessageSource.class, search = SearchStrategy.CURRENT)@AutoConfigureOrder(Ordered.HIGHEST_PRECEDENCE)@Conditional(ResourceBundleCondition.class)@EnableConfigurationPropertiespublic class MessageSourceAutoConfiguration { private static final Resource[] NO_RESOURCES = {}; @Bean @ConfigurationProperties(prefix = "spring.messages") public MessageSourceProperties messageSourceProperties() { return new MessageSourceProperties(); } @Bean public MessageSource messageSource() { MessageSourceProperties properties = messageSourceProperties(); ResourceBundleMessageSource messageSource = new ResourceBundleMessageSource(); if (StringUtils.hasText(properties.getBasename())) { messageSource.setBasenames(StringUtils.commaDelimitedListToStringArray( StringUtils.trimAllWhitespace(properties.getBasename()))); } if (properties.getEncoding() != null) { messageSource.setDefaultEncoding(properties.getEncoding().name()); } messageSource.setFallbackToSystemLocale(properties.isFallbackToSystemLocale()); Duration cacheDuration = properties.getCacheDuration(); if (cacheDuration != null) { messageSource.setCacheMillis(cacheDuration.toMillis()); } messageSource.setAlwaysUseMessageFormat(properties.isAlwaysUseMessageFormat()); messageSource.setUseCodeAsDefaultMessage(properties.isUseCodeAsDefaultMessage()); return messageSource; }...... - 如上所示在它的 MessageSourceProperties 可以看到可以配置的属性,同理可以直接在官网进行查看,可以在全局配置文件中覆盖其默认配置,官方文档查看:”
# INTERNATIONALIZATION (MessageSourceProperties)spring.messages.always-use-message-format=false # Whether to always apply the MessageFormat rules, parsing even messages without arguments.spring.messages.basename=messages # Comma-separated list of basenames (essentially a fully-qualified classpath location), each following the ResourceBundle convention with relaxed support for slash based locations.spring.messages.cache-duration= # Loaded resource bundle files cache duration. When not set, bundles are cached forever. If a duration suffix is not specified, seconds will be used.spring.messages.encoding=UTF-8 # Message bundles encoding.spring.messages.fallback-to-system-locale=true # Whether to fall back to the system Locale if no files for a specific Locale have been found.spring.messages.use-code-as-default-message=false # Whether to use the message code as the default message instead of throwing a "NoSuchMessageException". Recommended during development only.
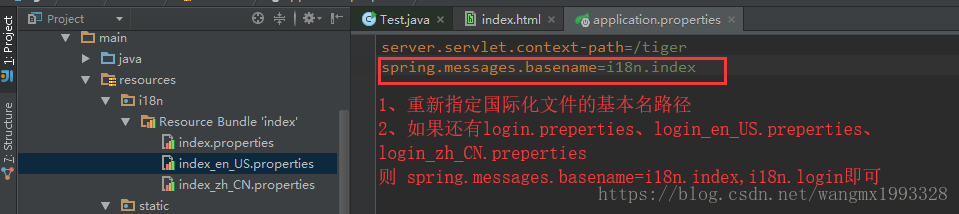
- 如上所示,spring.messages.basename=messages,就是配置国际化资源文件的基本名路径,默认是“message”,意思是如果我们没有在全局配置文件中覆盖此配置项的话,它默认会扫描类路径下的“messages.properties”、"messages_en_US.properties"、"messages_zh_CN.properties"等格式的文件作为国际化文件
- 因为应用会有多个页面,就会有多套资源文件,这时 spring.messages.basename 的值用逗号分隔即可
页面获取国际化值
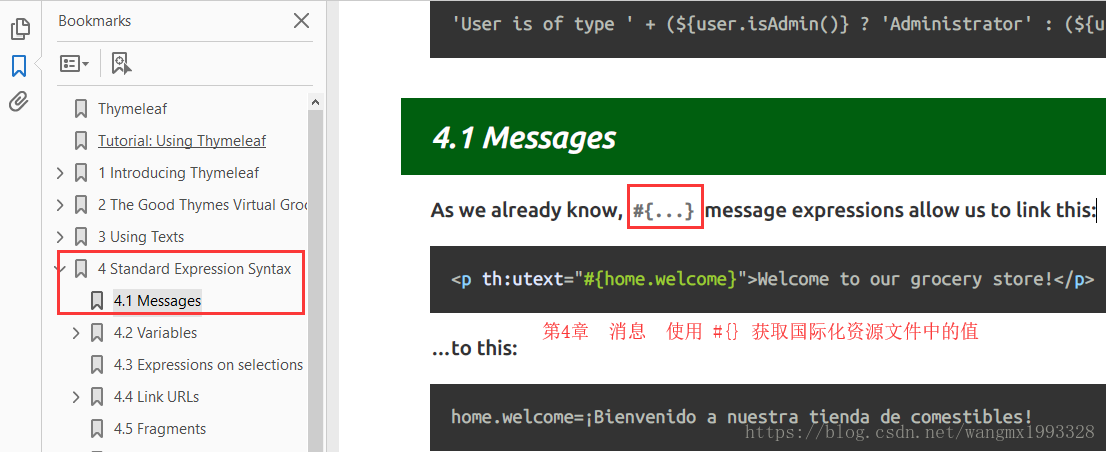
- 因为页面直接使用的 Html 加 Thymeleaf 模板引擎,所以页面上直接使用 Thymeleaf 获取国际化文件的值即可,对于 Thymeleaf 不熟悉的,可以参考
- 通过 Thymeleaf 文档可以查看知道

下面重新修改之前的index.html页面,为它获取国际化值
Signin Template for Bootstrap
- th:text="#{xxx}":获取国际化文件中的xxx属性值,然后替换标签原来的文本默认值
- th:placeholder="#{xxx}":获取国际化文件中的xxx属性值,然后替换标签placeholder属性原来的默认值,同理可以替换任意属性的默认值
- [[#{login_remember}]]:对于 <input xxx />这种自封闭标签得用 Thymeleaf的行内表达式取值
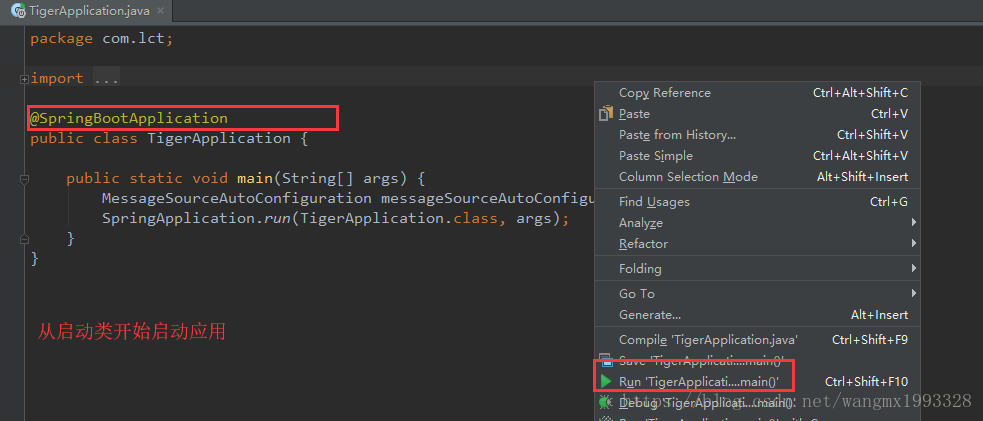
运行测试
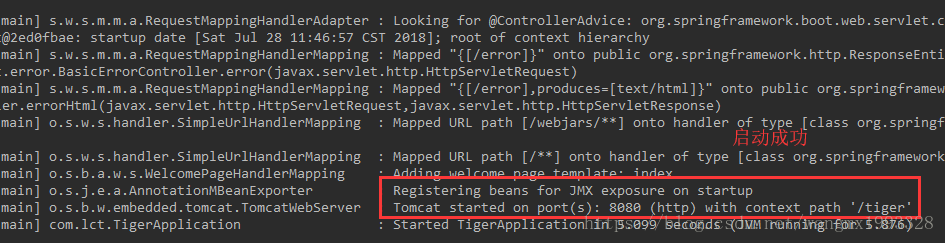
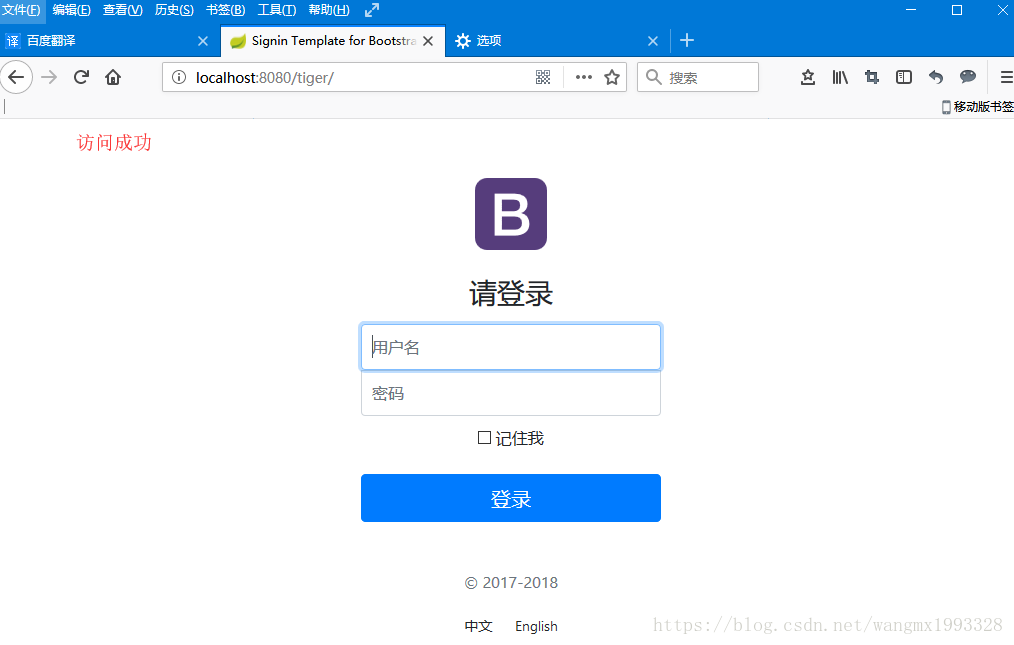
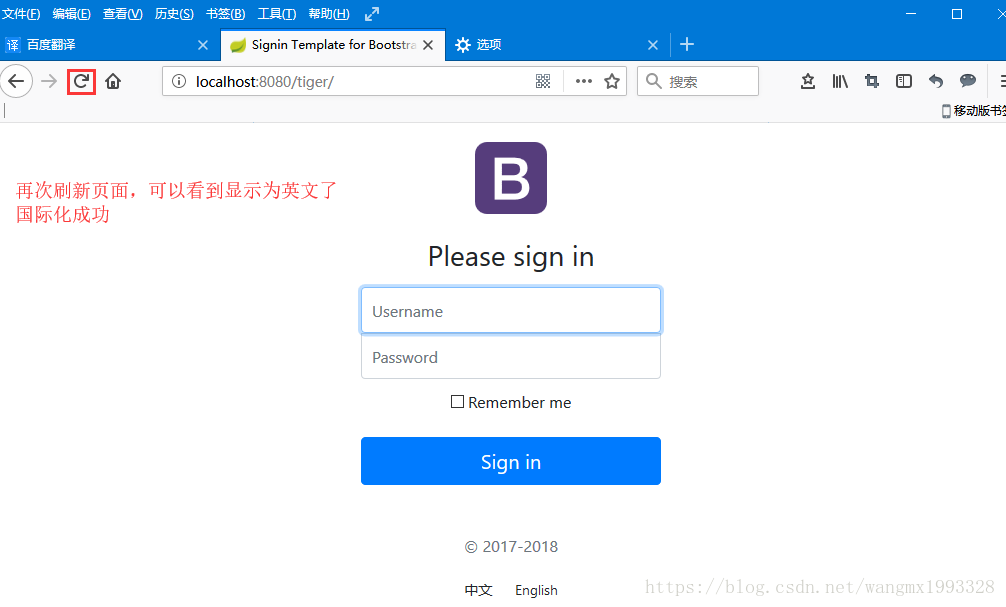
- 效果:根据浏览器语言设置的信息切换了国际化;
指定语言切换
- 上面是应用根据跟随浏览器语音自动进行语音切换,现在需要改成用户“点击中文”则切换中文,“点击英文”则切换英文。
- 原理是需要使用到 “国际化Locale(区域信息对象)”与 “ LocaleResolver(获取区域信息对象)”两个API
切换原理
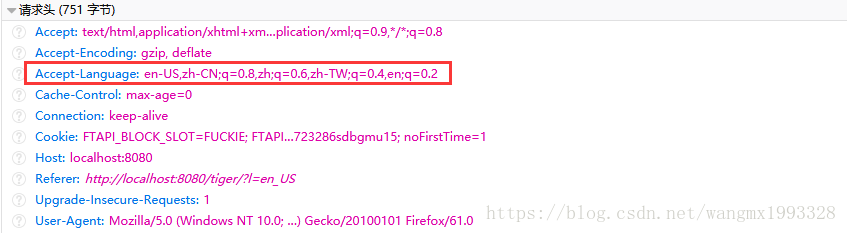
- 应用国际化默认之所以能随着浏览器的语言变化而变化,是因为浏览器Http请求时,会在请求头中携带语言信息,这是后台国际化变换的依据。
- 第一部分中的 “自动语言切换” 之所以能用,是因为在 WebMvcAutoConfiguration 配置类中自动配置好了一个 区域信息解析器组件,如下所示逻辑是如果用户没有自己提供 区域信息解析器 “LocaleResolver”,那么它默认会使用一个叫 “AcceptHeaderLocaleResolver” 进行解析
- 所以我们只需要自己提供一个 “LocaleResolver” 组件覆盖默认的即可
package org.springframework.boot.autoconfigure.web.servlet;.....@Configuration@ConditionalOnWebApplication(type = Type.SERVLET)@ConditionalOnClass({ Servlet.class, DispatcherServlet.class, WebMvcConfigurer.class })@ConditionalOnMissingBean(WebMvcConfigurationSupport.class)@AutoConfigureOrder(Ordered.HIGHEST_PRECEDENCE + 10)@AutoConfigureAfter({ DispatcherServletAutoConfiguration.class, ValidationAutoConfiguration.class })public class WebMvcAutoConfiguration {...... @Bean @ConditionalOnMissingBean @ConditionalOnProperty(prefix = "spring.mvc", name = "locale") public LocaleResolver localeResolver() { if (this.mvcProperties .getLocaleResolver() == WebMvcProperties.LocaleResolver.FIXED) { return new FixedLocaleResolver(this.mvcProperties.getLocale()); } AcceptHeaderLocaleResolver localeResolver = new AcceptHeaderLocaleResolver(); localeResolver.setDefaultLocale(this.mvcProperties.getLocale()); return localeResolver; }.......} index.html 页面修改
- 修改一下首页的“中文”、“英文”按钮,使用 Thymeleaf 的 @{xxx} 取值是会默认带上应用上下文的
- @{/} 的效果就是 http://localhost:8080/tiger/
- @{/(l=zh_CN)} 相当于 @{/?zh_CN},只是 Thymeleaf 不再使用 "?" 的方式为get请求路径带参数,而是使用"()"的方式
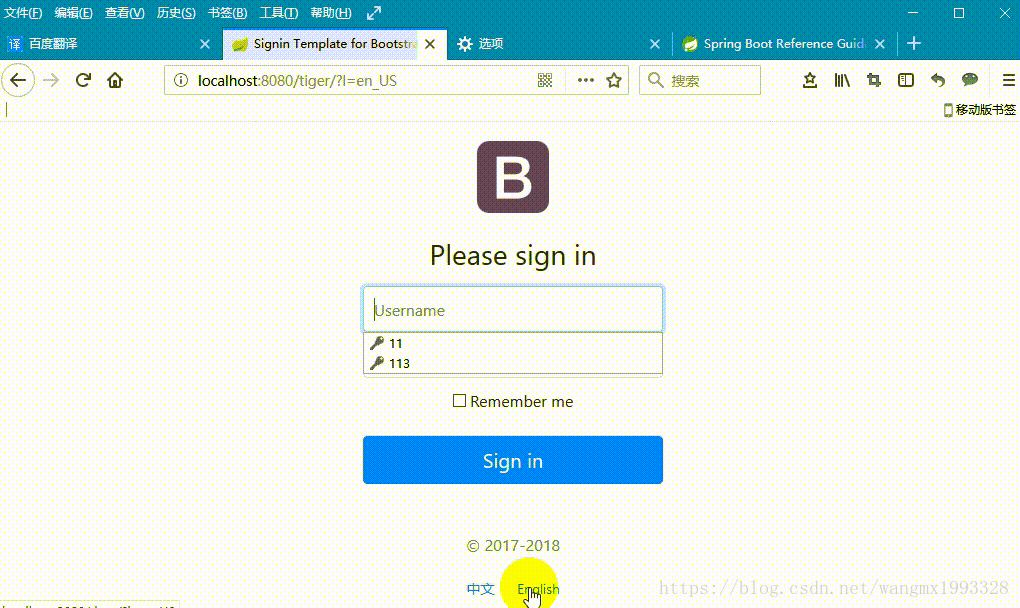
- 页面上点击“中文”后,会跳转:http://localhost:8080/tiger/?l=zh_CN
- 页面上点击“英文”后,会跳转:http://localhost:8080/tiger/?l=en_US
© 2017-2018
中文 English
自定义区域信息解析器
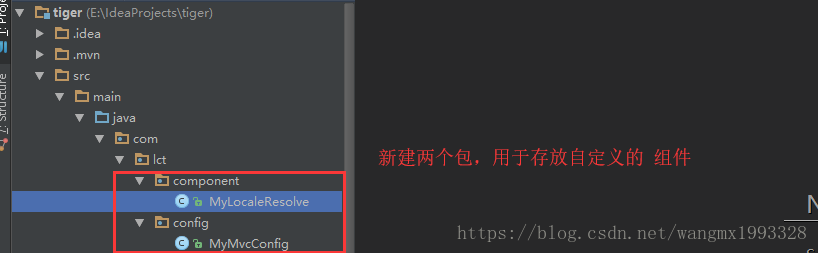
package com.lct.component;import org.springframework.util.StringUtils;import org.springframework.web.servlet.LocaleResolver;import javax.servlet.http.HttpServletRequest;import javax.servlet.http.HttpServletResponse;import java.util.Locale;/** * Created by Administrator on 2018/7/28 0028. * 自定义区域信息解析器 */public class MyLocaleResolve implements LocaleResolver { /** * 解析http请求中地址中的标识,然后设置对应的区域信息值 * * @param httpServletRequest * @return */ @Override public Locale resolveLocale(HttpServletRequest request) { /** * 如果请求地址中含有l参数,如 http://localhost:8080/tiger/?l=en_US,则设置新的区域对象 * 否则使用默认的区域对象,默认的区域对象不会使国际化再随着浏览器语言的变化而变化的 */ Locale locale = Locale.getDefault(); String l = request.getParameter("l"); if (!StringUtils.isEmpty(l)) { String[] ls = l.split("_"); locale = new Locale(ls[0], ls[1]); } return locale; } /** * 设置区域信息,一般不做处理 * * @param httpServletRequest * @param httpServletResponse * @param locale */ @Override public void setLocale(HttpServletRequest httpServletRequest, HttpServletResponse httpServletResponse, Locale locale) { }} 添加组件
package com.lct.config;import com.lct.component.MyLocaleResolve;import org.springframework.context.annotation.Bean;import org.springframework.context.annotation.Configuration;import org.springframework.web.servlet.LocaleResolver;/** * Created by Administrator on 2018/7/28 0028. * 自定义配置类 */@Configurationpublic class MyMvcConfig { /** * 将我们自己的 LocaleResolver 组件交于 Spring 容器管理 * 从而覆盖 Spring Boot默认的区域信息解析器 * * @return */ @Bean public LocaleResolver localeResolver() { return new MyLocaleResolve(); }} 运行测试
- 和预期的完全一致,因为请求路径中携带了"l"参数,所以不管浏览器 语言 选择的是什么,都不会影响
- 当请求地址中不带 “l” 参数时,此时后台使用的是默认的 Locale,此时即使浏览器切换了语言,同样国际化也不会生效的
转载地址:https://wangmaoxiong.blog.csdn.net/article/details/81190830 如侵犯您的版权,请留言回复原文章的地址,我们会给您删除此文章,给您带来不便请您谅解!
发表评论
最新留言
哈哈,博客排版真的漂亮呢~
[***.90.31.176]2024年04月01日 07时27分07秒
关于作者

喝酒易醉,品茶养心,人生如梦,品茶悟道,何以解忧?唯有杜康!
-- 愿君每日到此一游!
推荐文章
服务器端开发经验总结 Linux C语言
2019-04-27
将网站程序放在tmpfs下
2019-04-27
使用Nginx的proxy_cache缓存功能取代Squid
2019-04-27
nginx 反向代理,动静态请求分离,proxy_cache缓存及缓存清除
2019-04-27
nginx 的proxy_cache才是王道
2019-04-27
Nginx proxy_cache 使用示例
2019-04-27
Nginx源代码分析 - 日志处理
2019-04-27
使Apache实现gzip压缩
2019-04-27
Memcached在大型网站中应用
2019-04-27
Hadoop简要介绍
2019-04-27
squid中的X-Cache和X-Cache-Lookup的意义
2019-04-27
squid 优化指南
2019-04-27
centos vnc配置笔记
2019-04-27
让Squid 显示本地时间
2019-04-27
linux mysql 命令 大全
2019-04-27
清除Squid缓存的小工具
2019-04-27
Varnish Cache 3.0.0安装
2019-04-27
2011年6月编程语言关注度排行
2019-04-27
Varnish使用小结
2019-04-27
千万级并发HAproxy均衡负载系统介绍
2019-04-27
白红宇的个人博客 - 记录点点滴滴的事 - 您是第 308144409 位访客
访问时间: 2024-04-26 20:53:31
访问IP: 18.218.138.170
Copyright © 2020 - 2023 blog.css8.cn 京ICP备2021015314号-1
手机版