iOS自定义控件三
发布日期:2022-03-18 08:27:46
浏览次数:25
分类:技术文章
本文共 7834 字,大约阅读时间需要 26 分钟。
本文内容来自
iOS自定义控件三
Control Animation
Implicit Animation VS Explicit Animation
Implicit Animation在CALayer的属性发生变化时,会自动的发生。包括的属性有:
backgroundColorborderColorborderWidthboundscornerRadiusmaskopacitypositiontransform
禁用Implicit Animation
CATransaction.begin()CATransaction.setDisableActions(true)...CATransaction.commit()
Explicit Animation相关
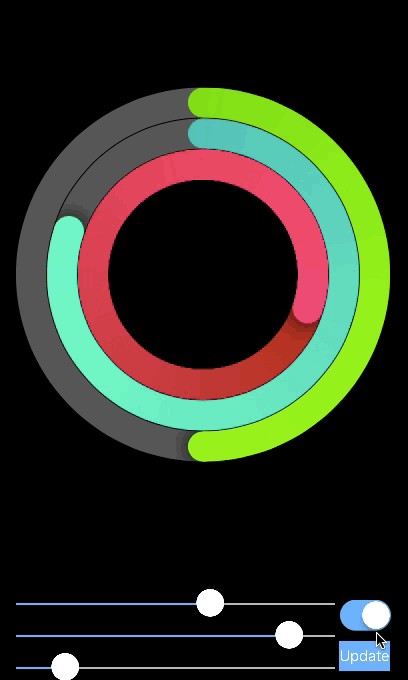
public class CABasicAnimation : CAPropertyAnimation { public var fromValue: AnyObject? public var toValue: AnyObject? public var byValue: AnyObject?}public class CALayer { ... public func addAnimation(anim: CAAnimation, forKey key: String?) public func removeAllAnimations() public func removeAnimationForKey(key: String) public func animationKeys() -> [String]? public func animationForKey(key: String) -> CAAnimation?} 本例的主要内容是在改变RingLayer时的value值时,有动画,添加动画的地方是:
1.对ringTipLayer和gradientLayer,添加旋转
foregroundMask的path 要注意的地方有:
- 旋转layer时,动画
transform.rotation.z总是会选择最短路径,所以动画可能是顺时针,也可能是逆时针,所以这里使用的是CAKeyframeAnimation关键帧动画 - 对
foregroundMask应用strokeEnd基本动画时,当角度变大时,是在最新的path上,fromValue为原始值,toValue为1。当角度变小时,是在原来的path上,fromValue为1,toValue变为现在的值,在动画之后,还要在模型层上做出相应的改变
主要代码:
private func animateFromValue(fromValue: CGFloat, toValue: CGFloat) { let angleDelta = (toValue - fromValue) * 2.0 * CGFloat(M_PI) if abs(angleDelta) < 0.001 { return } CATransaction.begin() CATransaction.setDisableActions(true) CATransaction.setAnimationTimingFunction(CAMediaTimingFunction(name: kCAMediaTimingFunctionEaseInEaseOut)) // Rotate the tip and the gradient ringTipLayer.addAnimation(rotationForLayer(ringTipLayer, byAngle: angleDelta), forKey: "transform.rotation.z") gradientLayer.addAnimation(rotationForLayer(gradientLayer, byAngle: angleDelta), forKey: "transform.rotation.z") // Update model ringTipLayer.setValue(angleForValue(toValue), forKeyPath: "transform.rotation.z") gradientLayer.setValue(angleForValue(toValue), forKeyPath: "transform.rotation.z") // Update the foreground mask path let finalMaskPath = maskPathForValue(toValue) let strokeAnimation = CABasicAnimation(keyPath: "strokeEnd") if angleDelta > 0 { // Need to grow the mask. Immediately create the larger path and animate strokeEnd to fill it foregroundMask.path = finalMaskPath strokeAnimation.fromValue = fromValue / toValue strokeAnimation.toValue = 1.0 } else { // Mask needs to shrink. Animate down and replace mask at end of transaction strokeAnimation.fromValue = 1.0 strokeAnimation.toValue = toValue / fromValue CATransaction.setCompletionBlock { // Update the mask to the new shape after the animation CATransaction.begin() CATransaction.setDisableActions(true) self.foregroundMask.path = finalMaskPath self.foregroundMask.strokeEnd = 1.0 CATransaction.commit() } } foregroundMask.addAnimation(strokeAnimation, forKey: "strokeEnd") CATransaction.commit() }func rotationForLayer(layer: CALayer, byAngle angle: CGFloat) -> CAKeyframeAnimation { let animation = CAKeyframeAnimation(keyPath: "transform.rotation.z") let c = layer.valueForKeyPath("transform.rotation.z") let currentAngle = c as? CGFloat ?? 0 let numberOfKeyFrames = Int(floor(abs(angle) / CGFloat(M_PI_4)) + 2) var times = [CGFloat]() var values = [CGFloat]() for i in 0 ... abs(numberOfKeyFrames) { times.append(CGFloat(i) / CGFloat(numberOfKeyFrames)) values.append(angle / CGFloat(numberOfKeyFrames) * CGFloat(i) + currentAngle) } animation.keyTimes = times animation.values = values return animation} 最终的效果是:
Control Reuse
这里是生成一个dynamic framework来复用,要注意的地方是:
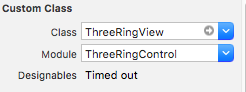
1.导入的ThreeRingControl.xcodeproj可能会没有展开,可能的原因是同时在两个窗口中打开了。
module 参考:
Drawing with Core Graphics
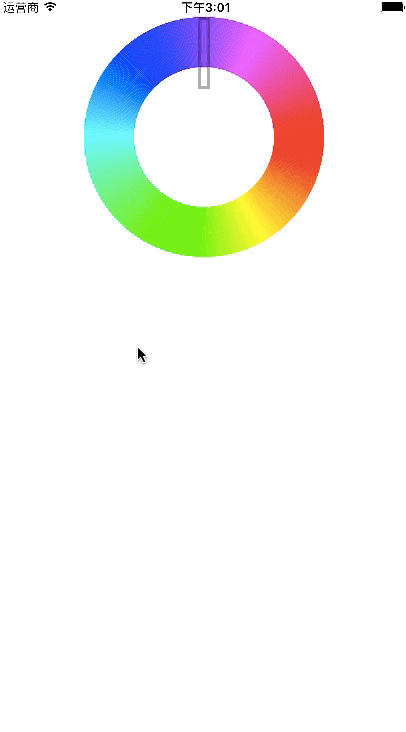
这里的例子是创建了一个画板Canvas,重写了touchesMoved方法
import UIKit@IBDesignablepublic class Canvas : UIView { private var drawing: UIImage? @IBInspectable public var strokeWidth : CGFloat = 4.0 @IBInspectable public var strokeColor : UIColor = UIColor.blackColor()}extension Canvas { public override func touchesMoved(touches: Set , withEvent event: UIEvent?) { if let touch = touches.first { addLineFromPoint(touch.previousLocationInView(self), toPoint: touch.locationInView(self)) } }}extension Canvas { private func addLineFromPoint(from: CGPoint, toPoint: CGPoint) { UIGraphicsBeginImageContextWithOptions(bounds.size, false, 0.0) drawing?.drawInRect(bounds) let cxt = UIGraphicsGetCurrentContext() CGContextMoveToPoint(cxt, from.x, from.y) CGContextAddLineToPoint(cxt, toPoint.x, toPoint.y) CGContextSetLineCap(cxt, .Round) CGContextSetLineWidth(cxt, strokeWidth) strokeColor.setStroke() CGContextStrokePath(cxt) drawing = UIGraphicsGetImageFromCurrentImageContext() layer.contents = drawing?.CGImage UIGraphicsEndImageContext() }} 之后创建了一个ColorRing,主要是通过绘制圆弧来创建CGContextAddArc
import UIKit@IBDesignableclass ColorRing : UIView { private let numberSegments = 400 @IBInspectable var ringWidth : CGFloat = 2.0 { didSet { setNeedsDisplay() } }}extension ColorRing { override func drawRect(rect: CGRect) { if let cxt = UIGraphicsGetCurrentContext() { drawRainbowWheel(cxt, rect: rect) } }}extension ColorRing { private func drawRainbowWheel(context: CGContextRef, rect: CGRect) { CGContextSaveGState(context) let ringRadius = (min(rect.width, rect.height) - ringWidth) / 2 CGContextSetLineWidth(context, ringWidth) CGContextSetLineCap(context, .Butt) for segment in 0 ..< numberSegments { let proportion = CGFloat(segment) / CGFloat(numberSegments) let startAngle = proportion * 2 * CGFloat(M_PI) let endAngle = CGFloat(segment + 1) / CGFloat(numberSegments) * 2 * CGFloat(M_PI) UIColor(hue: proportion, saturation: 1.0, brightness: 1.0, alpha: 1.0).setStroke() CGContextAddArc(context, rect.midX, rect.midY, ringRadius, startAngle, endAngle, 0) CGContextStrokePath(context) } CGContextRestoreGState(context) }} 最后自定义一个AngleGestureRecognizer手势,关于自定义手势参考
import UIKitimport UIKit.UIGestureRecognizerSubclassclass AngleGestureRecognizer : UIPanGestureRecognizer { private var gestureStartAngle : CGFloat? var touchAngle : CGFloat = 0.0 var angleDelta : CGFloat { guard let gestureStartAngle = gestureStartAngle else { return 0 } return touchAngle - gestureStartAngle } override init(target: AnyObject?, action: Selector) { super.init(target: target, action: action) maximumNumberOfTouches = 1 minimumNumberOfTouches = 1 }}extension AngleGestureRecognizer { override func touchesBegan(touches: Set , withEvent event: UIEvent) { super.touchesBegan(touches, withEvent: event) updateTouchAngleWithTouches(touches) gestureStartAngle = touchAngle } override func touchesMoved(touches: Set , withEvent event: UIEvent) { super.touchesMoved(touches, withEvent: event) updateTouchAngleWithTouches(touches) } override func touchesCancelled(touches: Set , withEvent event: UIEvent) { super.touchesCancelled(touches, withEvent: event) touchAngle = 0 gestureStartAngle = .None } override func touchesEnded(touches: Set , withEvent event: UIEvent) { super.touchesEnded(touches, withEvent: event) touchAngle = 0 gestureStartAngle = .None } private func updateTouchAngleWithTouches(touches: Set ) { if let touchPoint = touches.first?.locationInView(view) { touchAngle = calculateAngleToPoint(touchPoint) } } private func calculateAngleToPoint(point: CGPoint) -> CGFloat { guard let bounds = view?.bounds else { return 0 } let centerOffset = CGPoint(x: point.x - bounds.midX, y: point.y - bounds.midY) return atan2(centerOffset.y, centerOffset.x) }} 最终的效果如下:
转载地址:https://windzen.blog.csdn.net/article/details/53836977 如侵犯您的版权,请留言回复原文章的地址,我们会给您删除此文章,给您带来不便请您谅解!
发表评论
最新留言
初次前来,多多关照!
[***.217.46.12]2024年04月23日 10时04分19秒
关于作者

喝酒易醉,品茶养心,人生如梦,品茶悟道,何以解忧?唯有杜康!
-- 愿君每日到此一游!
推荐文章
FTP文件管理项目(本地云)项目日报(七)
2019-04-27
FTP文件管理项目(本地云)项目日报(八)
2019-04-27
【Linux】血泪教训 -- 动态链接库配置方法
2019-04-27
FTP文件管理项目(本地云)项目日报(九)
2019-04-27
以练代学设计模式 -- FTP文件管理项目
2019-04-27
FTP文件管理项目(本地云)项目日报(十)
2019-04-27
学以致用设计模式 之 “组合模式”
2019-04-27
我用过的设计模式(7)--享元模式
2019-04-27
MySQL数据库从入门到实战应用(学习笔记一)
2019-04-27
MySQL数据库从入门到实战应用(学习笔记二)
2019-04-27
种树:二叉树、二叉搜索树、AVL树、红黑树、哈夫曼树、B树、树与森林
2019-04-27
【C++】攻克哈希表(unordered_map)
2019-04-27
转:【答学员问】- 该如何根据岗位学习相关技能
2019-04-27
转:【答学员问】有什么经验教训,是你在面试很多次之后才知道的?
2021-06-30
消息队列:解耦、异步、削峰,现有MQ对比以及新手入门该如何选择MQ?
2021-06-30
【奇技淫巧】-- 三角形最小路径和
2021-06-30
【小技巧】argc和argv的用法
2021-06-30
学不下去了怎么办?
2021-06-30
二叉树的前中后序遍历(迭代法)(带动画)
2021-06-30
【小技巧】【XShell】【Xftp】Windows桌面与Linux虚拟机互传文件
2021-06-30
白红宇的个人博客 - 记录点点滴滴的事 - 您是第 307933116 位访客
访问时间: 2024-04-26 01:25:55
访问IP: 3.21.231.245
Copyright © 2020 - 2023 blog.css8.cn 京ICP备2021015314号-1
手机版