本文共 13262 字,大约阅读时间需要 44 分钟。
简介
原文来自于:和
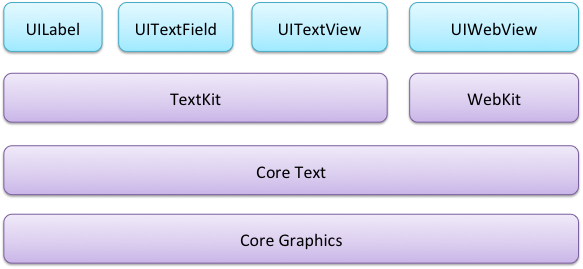
iOS6中的文本控件,都是基于WebKit和Core Graphics的字符串绘制功能。

iOS7,引入了Text Kit。
凸版印刷体效果(Letterpress effects)
凸版印刷替效果是给文字加上奇妙阴影和高光,让文字看起有凹凸感,像是被压在屏幕上。当然这种看起来很高端大气上档次的效果实现起来确实相当的简单,只需要给AttributedString加一个NSTextEffectAttributeName属性,并指定该属性值为NSTextEffectLetterpressStyle就可以了。
static NSString *CellIdentifier = @"Cell";UITableViewCell *cell = [tableView dequeueReusableCellWithIdentifier:CellIdentifier forIndexPath:indexPath];Note* note = [self notes][indexPath.row];UIFont* font = [UIFont preferredFontForTextStyle:UIFontTextStyleHeadline];UIColor* textColor = [UIColor colorWithRed:0.175f green:0.458f blue:0.831f alpha:1.0f];NSDictionary *attrs = @{ NSForegroundColorAttributeName : textColor, NSFontAttributeName : font, NSTextEffectAttributeName : NSTextEffectLetterpressStyle};NSAttributedString* attrString = [[NSAttributedString alloc] initWithString:note.title attributes:attrs];cell.textLabel.attributedText = attrString;return cell; 
路径排除(Exclusion paths)
UIBezierPath* exclusionPath = [_timeView curvePathWithOrigin:_timeView.center];_textView.textContainer.exclusionPaths = @[exclusionPath];
动态文本格式化和存储(Dynamic text formatting and storage)
Text Kit可以依据用户设置文本的大小来动态调整字体。下面的例子,会实现如下的效果:
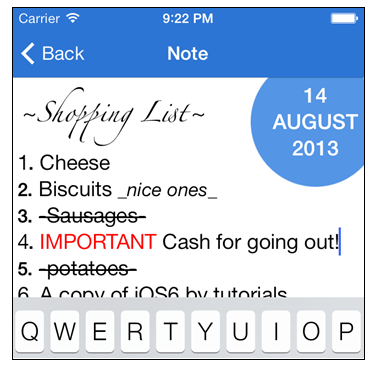
~包裹的字符用一种有趣的字体显示_包裹的字符斜体显示-包裹的字符添加删除线- 大写的text用红色显示

为了实现这种效果,你需要理解Text Kit是如何作用的?如下图:
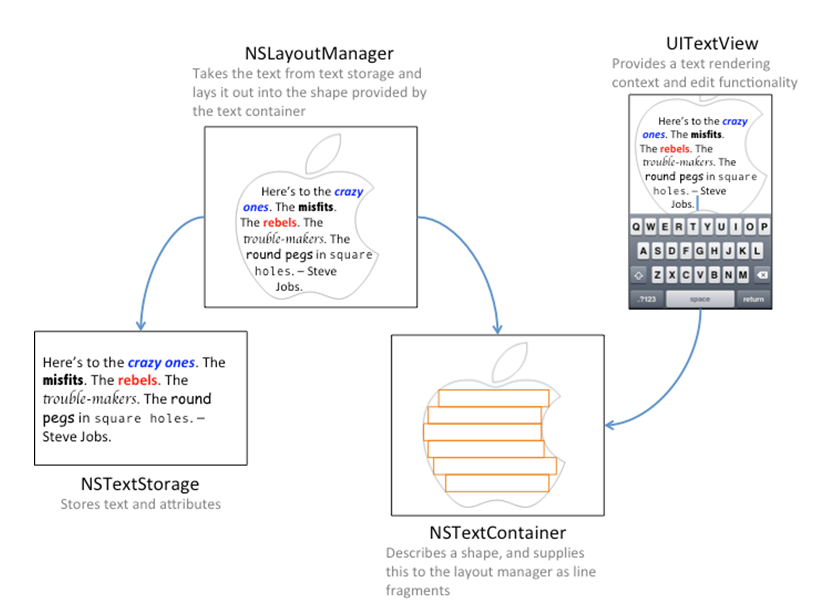
当你创建一个UITextView,UILabel或者UITextField时,Apple会自动创建这些类。在app中,你既可以直接使用他们,也可以自定义一部分。来看一下每一个类:
NSTextStorage存储要渲染的属性字符串,并通知layout manager文本内容的任何改变。在text更新时,为了动态的改变text的属性,你可能需要继承NSTextStorage。NSLayoutManager获取存储的text并在屏幕上渲染,在app中扮演布局引擎。NSTextContainer表示的是text在屏幕上渲染的一个几何区域。每个text container都与UITextView联系在一起。继承NSTextContainer可以定义一个复杂的形状。
为实现动态文本格式,需要继承NSTextStorage,以便用户在输入的时候,能动态的添加文本属性。
NSTextStorage后,需要替换掉UITextView默认的text storage。 继承NSTextStorage
继承NSTextStorage,创建一个名为SyntaxHighlightTextStorage的类。
SyntaxHighlightTextStorage.m,添加一个实例变量和一个初始化方法: #import "SyntaxHighlightTextStorage.h"@implementation SyntaxHighlightTextStorage{ NSMutableAttributedString *_backingStore;}- (id)init{ if (self = [super init]) { _backingStore = [NSMutableAttributedString new]; } return self;}@end text storage的子类必须提供它自己的‘persistence’。
然后,再加入如下的方法:- (NSString *)string{ return [_backingStore string];}- (NSDictionary *)attributesAtIndex:(NSUInteger)location effectiveRange:(NSRangePointer)range{ return [_backingStore attributesAtIndex:location effectiveRange:range];} 上述两种方法直接委托backing store。
最后加上两个需要重写的方法:
- (void)replaceCharactersInRange:(NSRange)range withString:(NSString *)str{ NSLog(@"replaceCharactersInRange:%@ withString:%@", NSStringFromRange(range), str); [self beginEditing]; [_backingStore replaceCharactersInRange:range withString:str]; [self edited:NSTextStorageEditedCharacters | NSTextStorageEditedAttributes range:range changeInLength:str.length - range.length]; [self endEditing];}- (void)setAttributes:(NSDictionary *)attrs range:(NSRange)range{ NSLog(@"setAttributes:%@ range:%@", attrs, NSStringFromRange(range)); [self beginEditing]; [_backingStore setAttributes:attrs range:range]; [self edited:NSTextStorageEditedAttributes range:range changeInLength:0]; [self endEditing];} 这些方法也使用到了backing store。不过,它们却被beginEditing / edited / endEditing包裹了起来。这是为了,当编辑的时候,text storage可以通知关联的layout manager。
关于如何继承NSTextStorage?
NSTextStorageimplements change management (viabeginEditingandendEditing), verification of attributes, delegate handling, and layout management notification. The one aspect it does not implement is managing the actual attributed string storage—this is left up to subclasses which must override the twoNSAttributedStringprimitives:
- (NSString *)string;
- (NSDictionary *)attributesAtIndex:(NSUInteger)location effectiveRange:(NSRangePointer)range;And subclasses must override two
NSMutableAttributedStringprimitives:
- (void)replaceCharactersInRange:(NSRange)range withString:(NSString *)str;
- (void)setAttributes:(NSDictionary *)attrs range:(NSRange)range;These primitives should perform the change, then call
edited:range:changeInLength:to get everything else to happen.
有了自定义的NSTextStorage,需要一个UITextView来使用它。
A UITextView with a custom Text Kit stack
storyboard中的实例化的UITextView会自动创建NSTextStorage,NSLayoutManager和NSTextContainer的实例。
打开Main.storyboard,在NoteEditorViewController的视图中,删除掉UITextView。
然后,打开NoteEditorViewController.m,移除掉UITextView的outlet。
在NoteEditorViewController.m的顶部,导入自定义的text storage:
#import "SyntaxHighlightTextStorage.h"
并声明来两个实例变量:
SyntaxHighlightTextStorage* _textStorage;UITextView* _textView;
移除掉NoteEditorViewController.m中viewDidLoad中如下内容:
self.textView.text = self.note.contents;self.textView.delegate = self;self.textView.font = [UIFont preferredFontForTextStyle:UIFontTextStyleBody];
在NoteEditorViewController.m中加入如下的方法:
- (void)createTextView{ // 1. 创建text storage NSDictionary* attrs = @{NSFontAttributeName: [UIFont preferredFontForTextStyle:UIFontTextStyleBody]}; NSAttributedString* attrString = [[NSAttributedString alloc] initWithString:_note.contents attributes:attrs]; _textStorage = [SyntaxHighlightTextStorage new]; [_textStorage appendAttributedString:attrString]; CGRect newTextViewRect = self.view.bounds; // 2. 创建layout manager NSLayoutManager *layoutManager = [[NSLayoutManager alloc] init]; // 3. 创建一个text container CGSize containerSize = CGSizeMake(newTextViewRect.size.width, CGFLOAT_MAX); NSTextContainer *container = [[NSTextContainer alloc] initWithSize:containerSize]; container.widthTracksTextView = YES; [layoutManager addTextContainer:container]; [_textStorage addLayoutManager:layoutManager]; // 4. 创建一个UITextView _textView = [[UITextView alloc] initWithFrame:newTextViewRect textContainer:container]; _textView.delegate = self; [self.view addSubview:_textView];} 代码很多,依次来看:
- 创建一个自定义的text storage和一个属性字符串
- 创建一个layout manager。
- 创建一个text container,并与layout manager关联起来。
- 使用text container创建text view,设置代理,作为一个子view添加到view上
这样,原来的那张关系图,就更清晰了:

注意的是text container的宽度和view的宽度是相同的,但是却有一个无限大的高度。在本例中,这是足以让UITextView滚动和容纳长段落的文本。
在viewDidLoad中,添加如下的代码:
[self createTextView];
然后,如下修改preferredContentSizeChanged:
_textView.font = [UIFont preferredFontForTextStyle:UIFontTextStyleBody];
再在viewDidLayoutSubviews中,添加如下的代码:
_textView.frame = self.view.bounds;
动态格式化
在这一步,将要修改自定义的text storage来加粗 *号包裹的text。
打开SyntaxHighlightTextStorage.m,添加如下的方法:-(void)processEditing{ [self performReplacementsForRange:[self editedRange]]; [super processEditing];} processEditing会在text改变的时候通知layout manager。也可以在这里做一些编辑操作(It also serves as a convenient home for any post-editing logic)。
在processEditing方法后,添加如下的方法:
- (void)performReplacementsForRange:(NSRange)changedRange{ NSRange extendedRange = NSUnionRange(changedRange, [[_backingStore string] lineRangeForRange:NSMakeRange(changedRange.location, 0)]); extendedRange = NSUnionRange(changedRange, [[_backingStore string] lineRangeForRange:NSMakeRange(NSMaxRange(changedRange), 0)]); [self applyStylesToRange:extendedRange];} 上面的代码会扩大匹配检查字符的范围。changedRange一般表示一个单独的字符,lineRangeForRange会把range扩大到一行。
在performReplacementsForRange后加入如下的方法:
- (void)applyStylesToRange:(NSRange)searchRange{ // 1. 创建字体 UIFontDescriptor* fontDescriptor = [UIFontDescriptor preferredFontDescriptorWithTextStyle:UIFontTextStyleBody]; UIFontDescriptor* boldFontDescriptor = [fontDescriptor fontDescriptorWithSymbolicTraits:UIFontDescriptorTraitBold]; UIFont* boldFont = [UIFont fontWithDescriptor:boldFontDescriptor size: 0.0]; UIFont* normalFont = [UIFont preferredFontForTextStyle:UIFontTextStyleBody]; // 2. 匹配*号间的字符 NSString* regexStr = @"(\\*\\w+(\\s\\w+)*\\*)\\s"; NSRegularExpression* regex = [NSRegularExpression regularExpressionWithPattern:regexStr options:0 error:nil]; NSDictionary* boldAttributes = @{ NSFontAttributeName : boldFont }; NSDictionary* normalAttributes = @{ NSFontAttributeName : normalFont }; // 3. 遍历匹配项,加粗文本 [regex enumerateMatchesInString:[_backingStore string] options:0 range:searchRange usingBlock:^(NSTextCheckingResult *match, NSMatchingFlags flags, BOOL *stop){ NSRange matchRange = [match rangeAtIndex:1]; [self addAttributes:boldAttributes range:matchRange]; // 4. 设置为原来的格式 if (NSMaxRange(matchRange)+1 < self.length) { [self addAttributes:normalAttributes range:NSMakeRange(NSMaxRange(matchRange)+1, 1)]; } }];} 上面代码的为:
- 使用
font descriptors创建一个加粗字体和一个正常的字体。 - 创建一个正则表达式。
- 枚举匹配的结果,应用加粗的属性。
- 设置*号后面的字符的style为“normal”。
编译并运行app,输入一些*号,单词会自动加粗,如下:

添加其它的格式
应用style的基本原则是:使用正则表达式匹配,使用applyStylesToRange来替换。
在SyntaxHighlightTextStorage.m中添加一个新的实例变量:
NSDictionary* _replacements;
添加如下的新的方法:
- (void) createHighlightPatterns { UIFontDescriptor *scriptFontDescriptor = [UIFontDescriptor fontDescriptorWithFontAttributes: @{UIFontDescriptorFamilyAttribute: @"Zapfino"}]; // 1. base our script font on the preferred body font size UIFontDescriptor* bodyFontDescriptor = [UIFontDescriptor preferredFontDescriptorWithTextStyle:UIFontTextStyleBody]; NSNumber* bodyFontSize = bodyFontDescriptor.fontAttributes[UIFontDescriptorSizeAttribute]; UIFont* scriptFont = [UIFont fontWithDescriptor:scriptFontDescriptor size:[bodyFontSize floatValue]]; // 2. create the attributes NSDictionary* boldAttributes = [self createAttributesForFontStyle:UIFontTextStyleBody withTrait:UIFontDescriptorTraitBold];//粗体属性 NSDictionary* italicAttributes = [self createAttributesForFontStyle:UIFontTextStyleBody withTrait:UIFontDescriptorTraitItalic];//斜体属性 NSDictionary* strikeThroughAttributes = @{ NSStrikethroughStyleAttributeName : @1};//中间线 NSDictionary* scriptAttributes = @{ NSFontAttributeName : scriptFont};//脚本font NSDictionary* redTextAttributes = @{ NSForegroundColorAttributeName : [UIColor redColor]}; // construct a dictionary of replacements based on regexes _replacements = @{ @"(\\*\\w+(\\s\\w+)*\\*)\\s" : boldAttributes, @"(_\\w+(\\s\\w+)*_)\\s" : italicAttributes, @"([0-9]+\\.)\\s" : boldAttributes, @"(-\\w+(\\s\\w+)*-)\\s" : strikeThroughAttributes, @"(~\\w+(\\s\\w+)*~)\\s" : scriptAttributes, @"\\s([A-Z]{2,})\\s" : redTextAttributes};} 在SyntaxHighlightTextStorage.m的init方法中调用createHighlightPatterns方法:
- (id)init{ if (self = [super init]) { _backingStore = [NSMutableAttributedString new]; [self createHighlightPatterns]; } return self;} 在SyntaxHighlightTextStorage.m中添加如下的方法:
- (NSDictionary*)createAttributesForFontStyle:(NSString*)style withTrait:(uint32_t)trait { UIFontDescriptor *fontDescriptor = [UIFontDescriptor preferredFontDescriptorWithTextStyle:UIFontTextStyleBody]; UIFontDescriptor *descriptorWithTrait = [fontDescriptor fontDescriptorWithSymbolicTraits:trait]; UIFont* font = [UIFont fontWithDescriptor:descriptorWithTrait size: 0.0]; return @{ NSFontAttributeName : font };} 替换applyStylesToRange方法如下:
- (void)applyStylesToRange:(NSRange)searchRange{ NSDictionary* normalAttrs = @{NSFontAttributeName: [UIFont preferredFontForTextStyle:UIFontTextStyleBody]}; // iterate over each replacement for (NSString* key in _replacements) { NSRegularExpression *regex = [NSRegularExpression regularExpressionWithPattern:key options:0 error:nil]; NSDictionary* attributes = _replacements[key]; [regex enumerateMatchesInString:[_backingStore string] options:0 range:searchRange usingBlock:^(NSTextCheckingResult *match, NSMatchingFlags flags, BOOL *stop){ // apply the style NSRange matchRange = [match rangeAtIndex:1]; [self addAttributes:attributes range:matchRange]; // reset the style to the original if (NSMaxRange(matchRange)+1 < self.length) { [self addAttributes:normalAttrs range:NSMakeRange(NSMaxRange(matchRange)+1, 1)]; } }]; }} 结果如下:
参考
转载地址:https://windzen.blog.csdn.net/article/details/53609996 如侵犯您的版权,请留言回复原文章的地址,我们会给您删除此文章,给您带来不便请您谅解!
发表评论
最新留言
关于作者
