本文共 4584 字,大约阅读时间需要 15 分钟。
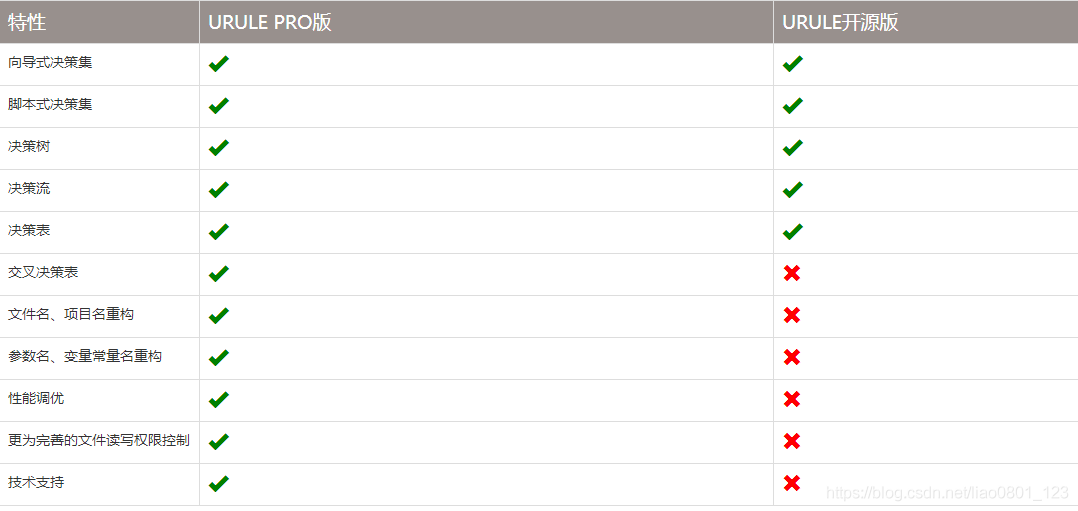
前言: 项目中要使用规则引擎,所以本人有尝试使用urule这款国内公司开发的规则引擎,用的是开源版的
- 相比其他规则引擎,urule有如下特点:
- 响应毫秒级
- 支持规则在client的缓存,并自动比对更新时间,减少网络IO,但客户端需要引入jar
- 原生支持动态规则和两种规则持久化方式(文件,数据库)
- 支持决策树,决策表等
- 集成了可视化规则管理界面,管理规则方便
- 社区活跃度低,技术支持需要付费
- 功能强大,但开源版功能有限
这里介绍一下如何将URule整合到springBoot项目中
官方文档:
先来瞅瞅他的管理界面长啥样!
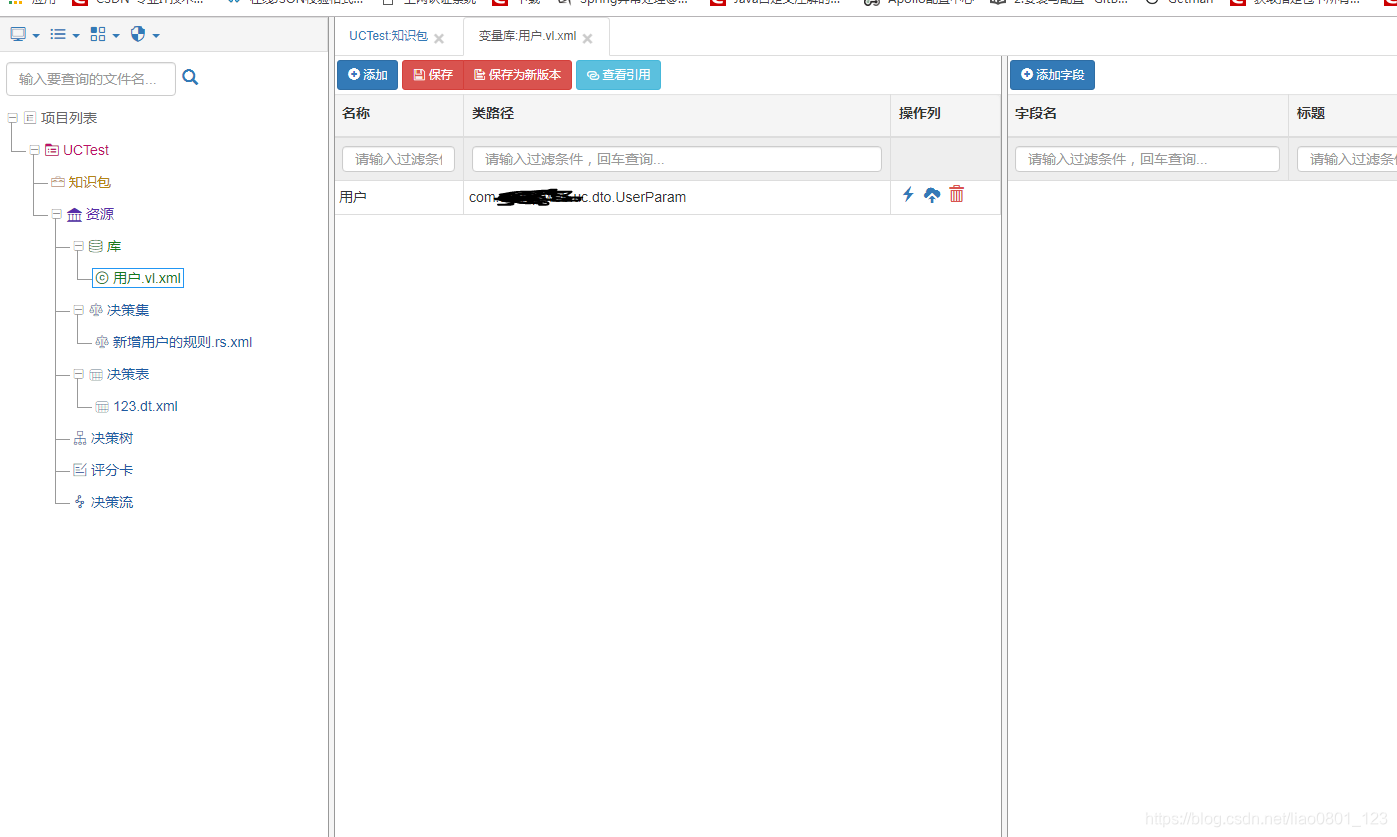
按层级从上往下是 项目(就是图中的UCTest)--知识包--决策表/决策树等--库
1.库是最低的层级: 在这里创建需要校验的基本数据或者POJO, 如图上我就是想对UserParam进行校验.将名称和全类名添加进去.
2.决策集\决策树就是一个个具体的规则了.

在这里以库为校验对象创建规则.
3.知识包是多个决策树/决策集的集合,创建知识包之后再加入决策集
4.项目下面包含多个知识包,可以将知识包暴露给多个客户端
直接在树菜单上右键即可操作.
服务端配置:
pom.xml
org.springframework.boot spring-boot-starter org.springframework.boot spring-boot-starter-test test org.springframework.boot spring-boot-starter-web org.springframework.boot spring-boot-starter-data-jpa mysql mysql-connector-java javax.servlet servlet-api 2.5 provided com.bstek.urule urule-console 2.1.6
需要两个核心类:
1.config.java
@Configuration@ImportResource({"classpath:urule-console-context.xml"})@PropertySource(value = {"classpath:urule-console-context.properties"})public class Config { @Bean public PropertySourcesPlaceholderConfigurer propertySourceLoader() { PropertySourcesPlaceholderConfigurer configurer = new PropertySourcesPlaceholderConfigurer(); configurer.setIgnoreUnresolvablePlaceholders(true); configurer.setOrder(1); return configurer; } @Bean @ConfigurationProperties(prefix = "spring.datasource") public DataSource datasource() { return DataSourceBuilder.create().build(); }} 这里其实就是引入jar包中的配置文件:
classpath:urule-console-context.xml
classpath:urule-console-context.properties
非maven项目参考:
2.URuleServletRegistration.java
package com.example.demo.ur;import org.springframework.boot.web.servlet.ServletRegistrationBean;import org.springframework.context.annotation.Bean;import org.springframework.stereotype.Component;import com.bstek.urule.console.servlet.URuleServlet;@Componentpublic class URuleServletRegistration { @Bean public ServletRegistrationBean registerURuleServlet(){ return new ServletRegistrationBean(new URuleServlet(),"/urule/*"); }} 3. 配置文件:application.yml(当然,这些配置你想放到properties文件或者配置中心都可以), 主要配置持久化的数据库地址
spring: datasource: jdbc-url: 这里写数据库地址 driver-class-name: com.mysql.jdbc.Driver username: root password: 1234 jackson: default-property-inclusion: non_nullserver: port: 8755
然后直接用springBoot启动类启动就好了,再输入
就可以看到管理界面了
客户端配置
pom.xml
com.bstek.urule urule-console 2.1.6
application.yml配置服务端地址:
urule: resporityServerUrl: http://localhost:8755 knowledgeUpdateCycle: 1
如果“urule.knowledgeUpdateCycle”属性值大于1,那么客户端会首先检查本地缓存中是否存在指定的知识包,如果存在,那么就拿当前时间与本地缓存中的知识包的时间戳进行比较,如果小于“urule.knowledgeUpdateCycle”属性值,那么就直接取这个知识包,如果大于它,那么就到URule Server上通过时间戳检查当前知识包有没有更新,如果有更新则取到客户端,同时更新客户端缓存里对应的知识包;如果没有更新,那么就直接采用当前客户端缓存里的知识包。
客户端调用:
package tt;import rete.test.Dept;import rete.test.Employee;import com.bstek.urule.Utils;import com.bstek.urule.runtime.KnowledgePackage;import com.bstek.urule.runtime.KnowledgeSession;import com.bstek.urule.runtime.KnowledgeSessionFactory;import com.bstek.urule.runtime.service.KnowledgeService;public class Invoke { public void doTest() throws Exception{ //从Spring中获取KnowledgeService接口实例 KnowledgeService service=(KnowledgeService)Utils.getApplicationContext().getBean(KnowledgeService.BEAN_ID); //通过KnowledgeService接口获取指定的资源包"项目名/知识包名" KnowledgePackage knowledgePackage=service.getKnowledge("UCTest/UCBag"); //通过取到的KnowledgePackage对象创建KnowledgeSession对象 KnowledgeSession session=KnowledgeSessionFactory.newKnowledgeSession(knowledgePackage); Employee employee=new Employee(); Dept dept=new Dept(); dept.setLevel(12); employee.setDept(dept); employee.setSalary(111000); //将业务数据对象Employee插入到KnowledgeSession中 session.insert(employee); //执行所有满足条件的规则 session.fireRules(); }} 可以直接把上面这段代码嵌入web项目的controller
getKnowledge(..)方法必须传入的是"项目名/知识包名",我之前就没有创建知识包,写的是规则名所以获取服务失败了.
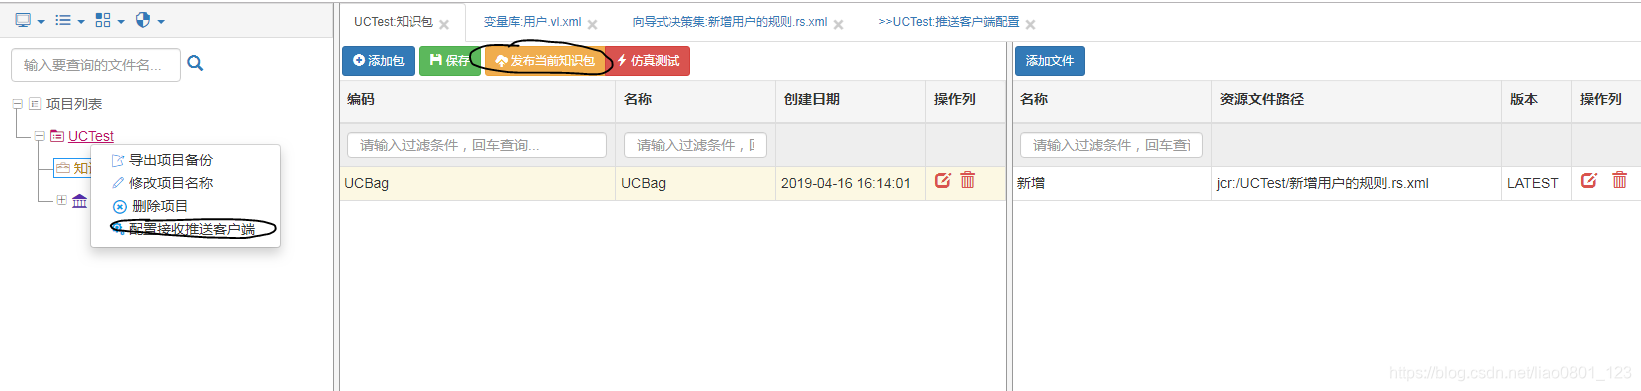
新增修改知识包之后必须先发布知识包,再将其推送至客户端才可以使用
转载地址:https://blog.csdn.net/liao0801_123/article/details/89336677 如侵犯您的版权,请留言回复原文章的地址,我们会给您删除此文章,给您带来不便请您谅解!
发表评论
最新留言
关于作者
