本文共 19024 字,大约阅读时间需要 63 分钟。
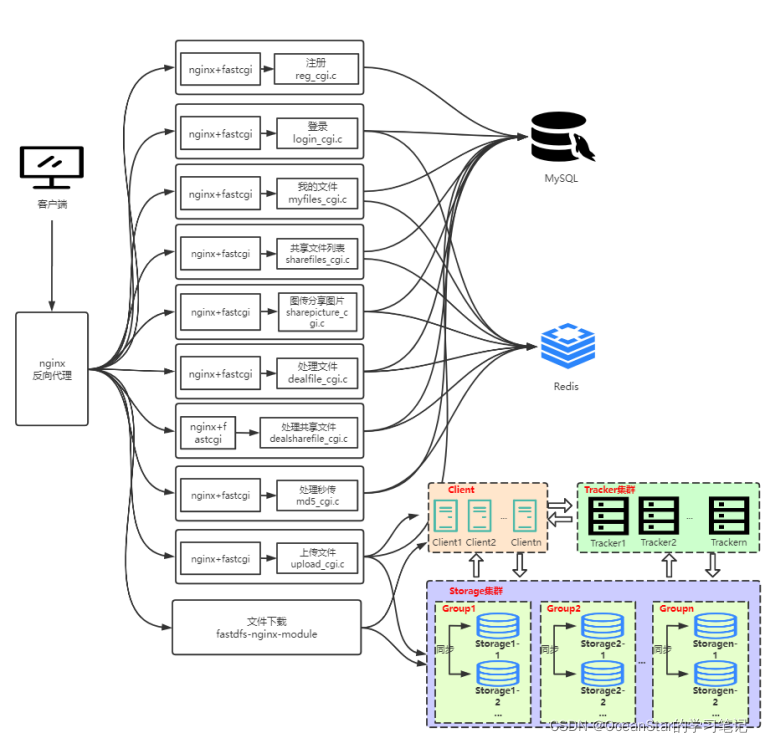
架构
tar -xvf 0voice_tuchuang.tar.gz ├── 0voice_tuchuang_clear.sql├── 0voice_tuchuang.sql 需要导⼊的数据库├── bin_cgi 编译后的执⾏⽂件├── common 通⽤源⽂件├── conf 配置⽂件├── fastdfs.sh 脚本├── fcgi.sh 脚本├── include 头⽂件├── logs 程序⽇志⽂件├── Makefile 编译的makefile├── nginx.sh nginx启动的脚本├── redis├── redis.sh redis启动脚本├── src_cgi├── start.sh 服务器程序启动脚本├── tc-front web客户端程序(编译后的⽂件)└── test
文章目录
准备依赖
MySQL相关
安装
$ apt install mariadb-server # 安装的时候会自动安装mariadb$ mysql -Vmysql Ver 15.1 Distrib 10.3.34-MariaDB, for debian-linux-gnu (x86_64) using readline 5.2$ apt-get install libmysqlclient-dev # 必须,在编写mysql客户端时必须要用到
启动/停⽌/重启
$ sudo systemctl start mysql.service # 启动$ sudo systemctl stop mysql.service # 停止
初始化
mysql -urootuse mysqlselect PASSWORD, USER, HOST from user;SET PASSWORD FOR 'root'@'localhost' = PASSWORD('123456');CREATE USER 'root'@'%' IDENTIFIED BY "123456";grant all privileges on *.* to 'root'@'%' identified by '123456';GRANT ALL PRIVILEGES ON *.* TO 'root'@'%' IDENTIFIED BY '123456' WITH GRANT OPTION;flush privileges; 数据表导入
操作:
mysql> source /home/oceanstar/CLionProjects/0voice_tuchuang/0voice_tuchuang.sqlmysql> use 0voice_tuchuang;mysql> show tables;+---------------------------+| Tables_in_0voice_tuchuang |+---------------------------+| file_info || share_file_list || share_picture_list || user_file_count || user_file_list || user_info |+---------------------------+6 rows in set (0.00 sec)
分析
0voice_tuchuang.sql具体内容:
#数据库表#创建数据库DROP DATABASE IF EXISTS `0voice_tuchuang`;CREATE DATABASE `0voice_tuchuang`;#使用数据库use `0voice_tuchuang`;DROP TABLE IF EXISTS `file_info`;CREATE TABLE `file_info` ( `id` bigint(20) NOT NULL AUTO_INCREMENT COMMENT '文件序号,自动递增,主键', `md5` varchar(256) NOT NULL COMMENT '文件md5', `file_id` varchar(256) NOT NULL COMMENT '文件id:/group1/M00/00/00/xxx.png', `url` varchar(512) NOT NULL COMMENT '文件url 192.168.52.139:80/group1/M00/00/00/xxx.png', `size` bigint(20) DEFAULT '0' COMMENT '文件大小, 以字节为单位', `type` varchar(32) DEFAULT '' COMMENT '文件类型: png, zip, mp4……', `count` int(11) DEFAULT '0' COMMENT '文件引用计数,默认为1。每增加一个用户拥有此文件,此计数器+1', PRIMARY KEY (`id`)) ENGINE=InnoDB AUTO_INCREMENT=70 DEFAULT CHARSET=utf8 COMMENT='文件信息表';DROP TABLE IF EXISTS `share_file_list`;CREATE TABLE `share_file_list` ( `id` int(11) NOT NULL AUTO_INCREMENT COMMENT '编号', `user` varchar(32) NOT NULL COMMENT '文件所属用户', `md5` varchar(256) NOT NULL COMMENT '文件md5', `file_name` varchar(128) DEFAULT NULL COMMENT '文件名字', `pv` int(11) DEFAULT '1' COMMENT '文件下载量,默认值为1,下载一次加1', `create_time` timestamp NULL DEFAULT CURRENT_TIMESTAMP COMMENT '文件共享时间', PRIMARY KEY (`id`)) ENGINE=InnoDB AUTO_INCREMENT=16 DEFAULT CHARSET=utf8 COMMENT='共享文件列表';DROP TABLE IF EXISTS `share_picture_list`;CREATE TABLE `share_picture_list` ( `id` int(11) NOT NULL AUTO_INCREMENT COMMENT '编号', `user` varchar(32) NOT NULL COMMENT '文件所属用户', `filemd5` varchar(256) NOT NULL COMMENT '文件md5', `file_name` varchar(128) DEFAULT NULL COMMENT '文件名字', `urlmd5` varchar(256) NOT NULL COMMENT '图床urlmd5', `key` varchar(8) NOT NULL COMMENT '提取码', `pv` int(11) DEFAULT '1' COMMENT '文件下载量,默认值为1,下载一次加1', `create_time` timestamp NULL DEFAULT CURRENT_TIMESTAMP COMMENT '文件创建时间', PRIMARY KEY (`id`)) ENGINE=InnoDB AUTO_INCREMENT=16 DEFAULT CHARSET=utf8 COMMENT='图床文件列表';DROP TABLE IF EXISTS `user_file_count`;CREATE TABLE `user_file_count` ( `id` int(11) NOT NULL AUTO_INCREMENT, `user` varchar(128) NOT NULL COMMENT '文件所属用户', `count` int(11) DEFAULT NULL COMMENT '拥有文件的数量', PRIMARY KEY (`id`), UNIQUE KEY `user_UNIQUE` (`user`)) ENGINE=InnoDB AUTO_INCREMENT=5 DEFAULT CHARSET=utf8 COMMENT='用户文件数量表';DROP TABLE IF EXISTS `user_file_list`;CREATE TABLE `user_file_list` ( `id` int(11) NOT NULL AUTO_INCREMENT COMMENT '编号', `user` varchar(32) NOT NULL COMMENT '文件所属用户', `md5` varchar(256) NOT NULL COMMENT '文件md5', `create_time` timestamp NULL DEFAULT CURRENT_TIMESTAMP COMMENT '文件创建时间', `file_name` varchar(128) DEFAULT NULL COMMENT '文件名字', `shared_status` int(11) DEFAULT NULL COMMENT '共享状态, 0为没有共享, 1为共享', `pv` int(11) DEFAULT NULL COMMENT '文件下载量,默认值为0,下载一次加1', PRIMARY KEY (`id`)) ENGINE=InnoDB AUTO_INCREMENT=30 DEFAULT CHARSET=utf8 COMMENT='用户文件列表';DROP TABLE IF EXISTS `user_info`;CREATE TABLE `user_info` ( `id` bigint(20) NOT NULL AUTO_INCREMENT COMMENT '用户序号,自动递增,主键', `user_name` varchar(32) NOT NULL DEFAULT '' COMMENT '用户名称', `nick_name` varchar(32) CHARACTER SET utf8mb4 NOT NULL DEFAULT '' COMMENT '用户昵称', `password` varchar(32) NOT NULL DEFAULT '' COMMENT '密码', `phone` varchar(16) NOT NULL DEFAULT '' COMMENT '手机号码', `email` varchar(64) DEFAULT '' COMMENT '邮箱', `create_time` timestamp NULL DEFAULT CURRENT_TIMESTAMP COMMENT '时间', PRIMARY KEY (`id`), UNIQUE KEY `uq_nick_name` (`nick_name`), UNIQUE KEY `uq_user_name` (`user_name`)) ENGINE=InnoDB AUTO_INCREMENT=14 DEFAULT CHARSET=utf8 COMMENT='用户信息表';
file_info:描述一个文件的存储
- md5:文件的md5值,文件上传可以先匹对数据库是否存在相同的md5值,如果存在意味着是同一文件
- file_id:文件id,对应FastDFS的文件路径
- url :文件的完整存储路径,比如 192.168.52.139:80/group1/M00/00/00/xxx.png
- count :文件引用计数,每增加一个用户拥有此文件,此计数器+1
mysql> desc file_info;+---------+--------------+------+-----+---------+----------------+| Field | Type | Null | Key | Default | Extra |+---------+--------------+------+-----+---------+----------------+| id | bigint | NO | PRI | NULL | auto_increment || md5 | varchar(256) | NO | | NULL | || file_id | varchar(256) | NO | | NULL | || url | varchar(512) | NO | | NULL | || size | bigint | YES | | 0 | || type | varchar(32) | YES | | | || count | int | YES | | 0 | |+---------+--------------+------+-----+---------+----------------+
share_file_list:分享文件列表
- user:文件所属用户
- md5:对应的MD5值
- file_name:文件名
- pv:文件下载量
desc share_file_list;+-------------+--------------+------+-----+-------------------+-------------------+| Field | Type | Null | Key | Default | Extra |+-------------+--------------+------+-----+-------------------+-------------------+| id | int | NO | PRI | NULL | auto_increment || user | varchar(32) | NO | | NULL | || md5 | varchar(256) | NO | | NULL | || file_name | varchar(128) | YES | | NULL | || pv | int | YES | | 1 | || create_time | timestamp | YES | | CURRENT_TIMESTAMP | DEFAULT_GENERATED |+-------------+--------------+------+-----+-------------------+-------------------+6 rows in set (0.00 sec)
share_picture_list
mysql> desc share_picture_list;+-------------+--------------+------+-----+-------------------+-------------------+| Field | Type | Null | Key | Default | Extra |+-------------+--------------+------+-----+-------------------+-------------------+| id | int | NO | PRI | NULL | auto_increment || user | varchar(32) | NO | | NULL | || filemd5 | varchar(256) | NO | | NULL | || file_name | varchar(128) | YES | | NULL | || urlmd5 | varchar(256) | NO | | NULL | || key | varchar(8) | NO | | NULL | || pv | int | YES | | 1 | || create_time | timestamp | YES | | CURRENT_TIMESTAMP | DEFAULT_GENERATED |+-------------+--------------+------+-----+-------------------+-------------------+8 rows in set (0.01 sec)
user_file_count:用户文件数量,记录每个用户拥有的文件数量
- user:用户名
- count:文件数量
mysql> desc user_file_count;+-------+--------------+------+-----+---------+----------------+| Field | Type | Null | Key | Default | Extra |+-------+--------------+------+-----+---------+----------------+| id | int | NO | PRI | NULL | auto_increment || user | varchar(128) | NO | UNI | NULL | || count | int | YES | | NULL | |+-------+--------------+------+-----+---------+----------------+3 rows in set (0.00 sec)
user_file_list 表:用户个人文件列表,记录每个人拥有的文件
- user:用户名
- md5 值:根据该值去 file_info 进一步查找具体的文件
- file_name:文件名
- shared_status:分享状态
- pv:下载量
mysql> desc user_file_list ;+---------------+--------------+------+-----+-------------------+-------------------+| Field | Type | Null | Key | Default | Extra |+---------------+--------------+------+-----+-------------------+-------------------+| id | int | NO | PRI | NULL | auto_increment || user | varchar(32) | NO | | NULL | || md5 | varchar(256) | NO | | NULL | || create_time | timestamp | YES | | CURRENT_TIMESTAMP | DEFAULT_GENERATED || file_name | varchar(128) | YES | | NULL | || shared_status | int | YES | | NULL | || pv | int | YES | | NULL | |+---------------+--------------+------+-----+-------------------+-------------------+
user_info 表
- user_name:用户名
- nick_name:密码,md加密
mysql> desc user_info;+-------------+-------------+------+-----+-------------------+-------------------+| Field | Type | Null | Key | Default | Extra |+-------------+-------------+------+-----+-------------------+-------------------+| id | bigint | NO | PRI | NULL | auto_increment || user_name | varchar(32) | NO | UNI | | || nick_name | varchar(32) | NO | UNI | | || password | varchar(32) | NO | | | || phone | varchar(16) | NO | | | || email | varchar(64) | YES | | | || create_time | timestamp | YES | | CURRENT_TIMESTAMP | DEFAULT_GENERATED |+-------------+-------------+------+-----+-------------------+-------------------+7 rows in set (0.00 sec)
密码设置与远程连接(待验证)
1)密码相关(设置密码(密码没法设置,一直报错):))
mysql> use mysqlmysql> select user, authentication_string,plugin from user;# 密码不知道怎么设置mysql> flush privileges;
2)设置远程连接
2.1)修改配置文件gedit /etc/mysql/mysql.conf.d/mysqld.cnf#注释blind-address#bind-address=127.0.0.1
2.2)修改远程连接
use mysql; #update修改连接⽤户的host字段值为'%',此处以root⽤户为例。update user set host='%' where user='root';
redis配置
- 配置文件:/home/oceanstar/CLionProjects/0voice_tuchuang/conf/redis.conf
- 启动脚本:/home/oceanstar/CLionProjects/0voice_tuchuang/redis.sh
安装
#下载git clone https://gitee.com/mirrors/redis.gitcd redisgit checkout 6.2.3makemake install# 编译 hireidscd ./deps/hiredismakemake install# 查看版本命令redis-server -v
显示:Redis server v=6.2.3 sha=e90e5640:0 malloc=jemalloc-5.1.0 bits=64 build=cd35a1cfc1f02ec8
安装nodejs
 下载解压:
下载解压: $ wget https://nodejs.org/dist/v16.14.0/node-v16.14.0-linux-x64.tar.xz --no-check-certificate$ tar -xvf node-v16.14.0-linux-x64.tar.xz
创建符号链接,供直接从命令⾏访问⽆需输⼊路径
$ ln -s /home/oceanstar/CLionProjects/node-v16.14.0-linux-x64/bin/node /usr/local/bin/node$ ln -s /home/oceanstar/CLionProjects/node-v16.14.0-linux-x64/bin/npm /usr/local/bin/npm
查看版本:
$ node -vv16.14.0$ npm -v8.3.1
FastCGI
进程管理器:spawn-fcgi
什么是spawn-fcgi
- Nginx不能像Apache那样直接执⾏外部可执⾏程序,但Nginx可以作为代理服务器,将请求转发给后端服 务器,这也是Nginx的主要作⽤之⼀。其中Nginx就⽀持FastCGI代理,接收客户端的请求,然后将请求转发给后端FastCGI进程。
- 由于FastCGI进程由FastCGI进程管理器管理,⽽不是Nginx。这样就需要⼀个FastCGI进程管理器,管理我们编写FastCGI程序。
- spawn-fcgi是⼀个通⽤的FastCGI进程管理器,简单⼩巧,原先是属于lighttpd的⼀部分,后来由于使⽤⽐较⼴泛,所以就迁移出来作为独⽴项⽬。
- spawn-fcgi使⽤pre-fork 模型,功能主要是打开监听端⼝,绑定地址,然后fork-and-exec创建我们编写的FastCGI应⽤程序进程,退出完成⼯作。FastCGI应⽤程序初始化,然后进⼊死循环侦听socket的连接请求。
编译安装spawn-fcgi
wget http://download.lighttpd.net/spawn-fcgi/releases-1.6.x/spawn-fcgi-1.6.4.tar.gztar -zxf spawn-fcgi-1.6.4.tar.gzcd spawn-fcgi-1.6.4/./configuremakemake install
如果遇到错误: ./autogen.sh: x: autoreconf: not found
因为没有安装automake⼯具,ubuntu⽤下⾯的命令安装即可:
apt-get install autoconf automake libtool
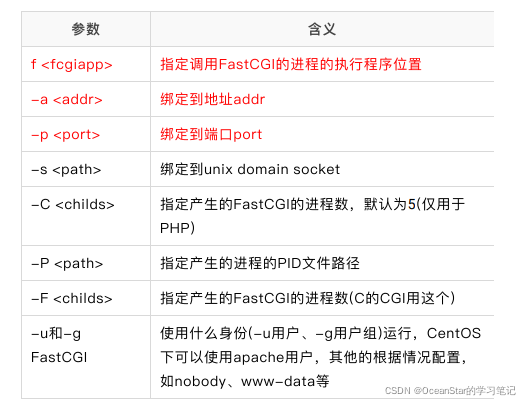
spawn-fcgi的帮助信息可以通过man spawn-fcgi或spawn-fcgi -h获得
spawn-fcgi -h
下⾯是部分常⽤spawn-fcgi参数信息:
软件开发套件:fcgi
安装
使⽤C/C++编写FastCGI应⽤程序,可以使⽤FastCGI软件开发套件或者其它开发框架,如fcgi。
$ wget https://fossies.org/linux/www/old/fcgi-2.4.0.tar.gz --no-check-certificate$ tar -zxf fcgi-2.4.0.tar.gz$ cd fcgi-2.4.0$ ./configure#编译前在libfcgi/fcgio.cpp ⽂件上添加#include$ make$ make install
如果编译出现下⾯问题:
fcgio.cpp: In destructor 'virtual fcgi_streambuf::~fcgi_streambuf()':fcgio.cpp:50:14: error: 'EOF' was not declared in this scopeoverflow(EOF);^fcgio.cpp: In member function 'virtual int fcgi_streambuf::overflow(int)':fcgio.cpp:70:72: error: 'EOF' was not declared in this scopeif (FCGX_PutStr(pbase(), plen, this->fcgx) != plen) return EOF;^fcgio.cpp:75:14: error: 'EOF' was not declared in this scopeif (c != EOF)^fcgio.cpp: In member function 'virtual int fcgi_streambuf::sync()':fcgio.cpp:86:18: error: 'EOF' was not declared in this scopeif (overflow(EOF)) return EOF;^fcgio.cpp:87:41: error: 'EOF' was not declared in this scopeif (FCGX_FFlush(this->fcgx)) return EOF;^fcgio.cpp: In member function 'virtual int fcgi_streambuf::underflow()':fcgio.cpp:113:35: error: 'EOF' was not declared in this scopeif (glen <= 0) return EOF;
解决⽅法:在fcgio.h/fcgio.cpp ⽂件上添加#include <stdio.h>
测试
示例代码:gedit fcgi.c
#include#include #include #include #include "fcgi_stdio.h"int main(int argc, char *argv[]){ int count = 0; //阻塞等待并监听某个端⼝,等待Nginx将数据发过来 while (FCGI_Accept() >= 0) { //如果想得到数据,需要从stdin去读,实际上从Nginx上去读 //如果想上传数据,需要往stdout写,实际上是给Nginx写数据 printf("Content-type: text/html\r\n"); printf("\r\n"); printf(" Fast CGI Hello! "); printf("Fast CGI Hello!
"); //SERVER_NAME:得到server的host名称 printf("Request number %d running on host %s\n", ++count, getenv("SERVER_NAME")); } return 0;}
编译代码:
$ gcc fcgi.c -o test -lfcgi
test 就是其中针对client一个http请求的业务程序应用程序。需要在后台跑起来,并让spawn负责管理:
$ ldconfig #记得先:ldconfig,否则spawn-fcgi启动异常$ spawn-fcgi -a 127.0.0.1 -p 8001 -f ./testspawn-fcgi: child spawned successfully: PID: 8877$ lsof -i:8001COMMAND PID USER FD TYPE DEVICE SIZE/OFF NODE NAMEtest 8877 root 0u IPv4 94909 0t0 TCP localhost:8001 (LISTEN)
有关Nginx的fcgi的配置
1). 修改配置文件
gedit /usr/local/nginx/conf/nginx.conf
#监听⽤户的test请求,通过fastcgi_pass交给本地8001端⼝处理#此时spwan-cgi已经将8001端⼝交给之前我们写好的test进程处理location /test { fastcgi_pass 127.0.0.1:8001; fastcgi_index test; include fastcgi.conf;} 2). nginx重新加载配置文件
/usr/local/nginx/sbin/nginx -s reload
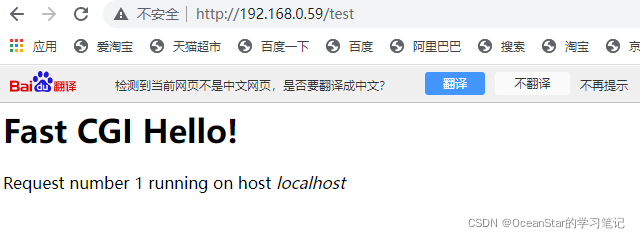
当Nginx收到http://ip/test请求时,⽐如http://192.168.0.59/test,会匹配到location test块,将请求传到后端的FastCGI应⽤程序处理:
部署
客户端部署
查看当前web客户端的路径:
$ pwd/home/oceanstar/CLionProjects/0voice_tuchuang/tc-front
这个路径将会在【服务端部署-配置nginx】时配置到nginx.conf
服务端部署
配置conf/cfg.json
{ "redis": { "ip": "127.0.0.1", "port": "6379" }, "mysql": { "ip": "127.0.0.1", "port": "3306", "database": "0voice_tuchuang", "user": "root", "password": "123456" }, "dfs_path": { "client": "/etc/fdfs/client.conf" }, "web_server": { "ip": "192.168.0.59", "port": "80" }, "storage_web_server": { "ip": "192.168.0.59", "port": "80" } } 设置权限:
chmod a+x start.shchmod a+x fastdfs.shchmod a+x fcgi.shchmod a+x nginx.shchmod a+x redis.sh
可以⽤⼀条命令执⾏ chmod a+x *.sh
配置nginx
cd /usr/local/nginx/conf/cp nginx.conf nginx.confbk
修改nginx.conf配置如下:
user root;worker_processes 1;#error_log logs/error.log;#error_log logs/error.log notice;#error_log logs/error.log info;#pid logs/nginx.pid;events { worker_connections 1024;}http { include mime.types; default_type application/octet-stream; #log_format main '$remote_addr - $remote_user [$time_local] "$request" ' # '$status $body_bytes_sent "$http_referer" ' # '"$http_user_agent" "$http_x_forwarded_for"'; #access_log logs/access.log main; sendfile on; #tcp_nopush on; #keepalive_timeout 0; keepalive_timeout 65; #gzip on; server { listen 80; server_name localhost; index index.html index.htm default.htm default.html; root /home/oceanstar/CLionProjects/0voice_tuchuang/tc-front; autoindex off; # 指定允许跨域的方法,*代表所有 add_header Access-Control-Allow-Methods *; # 预检命令的缓存,如果不缓存每次会发送两次请求 add_header Access-Control-Max-Age 3600; # 带cookie请求需要加上这个字段,并设置为true add_header Access-Control-Allow-Credentials true; # 表示允许这个域跨域调用(客户端发送请求的域名和端口) # $http_origin动态获取请求客户端请求的域 不用*的原因是带cookie的请求不支持*号 add_header Access-Control-Allow-Origin $http_origin; # 表示请求头的字段 动态获取 add_header Access-Control-Allow-Headers $http_access_control_request_headers; # charset koi8-r; # access_log logs/host.access.log main; location / { #root html; root /home/oceanstar/CLionProjects/0voice_tuchuang/tc-front; index index.html index.htm; try_files $uri $uri/ /index.html; } location ~/group([0-9])/M([0-9])([0-9]) { ngx_fastdfs_module; } location /test { fastcgi_pass 127.0.0.1:8001; fastcgi_index test; include fastcgi.conf; } location /api/login{ fastcgi_pass 127.0.0.1:10000; include fastcgi.conf; } location /api/reg{ fastcgi_pass 127.0.0.1:10001; include fastcgi.conf; } location /api/upload{ fastcgi_pass 127.0.0.1:10002; include fastcgi.conf; } location /api/md5{ fastcgi_pass 127.0.0.1:10003; include fastcgi.conf; } location /api/myfiles{ fastcgi_pass 127.0.0.1:10004; include fastcgi.conf; } location /api/dealfile{ fastcgi_pass 127.0.0.1:10005; include fastcgi.conf; } location /api/sharefiles{ fastcgi_pass 127.0.0.1:10006; include fastcgi.conf; } location /api/dealsharefile{ fastcgi_pass 127.0.0.1:10007; include fastcgi.conf; } location /api/sharepic{ fastcgi_pass 127.0.0.1:10008; include fastcgi.conf; } #error_page 404 /404.html; # redirect server error pages to the static page /50x.html # error_page 500 502 503 504 /50x.html; location = /50x.html { root html; } }} 停⽌并启动nginx
/usr/local/nginx/sbin/nginx -s stop/usr/local/nginx/sbin/nginx
http://192.168.0.59正常登录画⾯
· 可能发生的错误:
  查看nginx⽇志: tail -f /usr/local/nginx/logs/error.log 查看到访问的时候报错:tail -f /usr/local/nginx/logs/error.log 原因:root权限的问题,可以先在nginx.conf加⼊user root;权限
 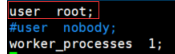 然后重新:/usr/local/nginx/sbin/nginx -s reload
 部署服务器程序
在0voice_tuchuang⽬录下进⾏
1)编译:
make cleanldconfigmake
2)运行
./start.sh
转载地址:https://blog.csdn.net/zhizhengguan/article/details/123247880 如侵犯您的版权,请留言回复原文章的地址,我们会给您删除此文章,给您带来不便请您谅解!
发表评论
最新留言
关于作者
