本文共 16427 字,大约阅读时间需要 54 分钟。
首先新建一个Activity(如下图所示),我们点击AndroidStudio的顶部菜单栏的Tools菜单,依次点击里面的Android》Layout Inspector;这样就会弹出一个展示Activity窗口视图结构的窗口出来,如图
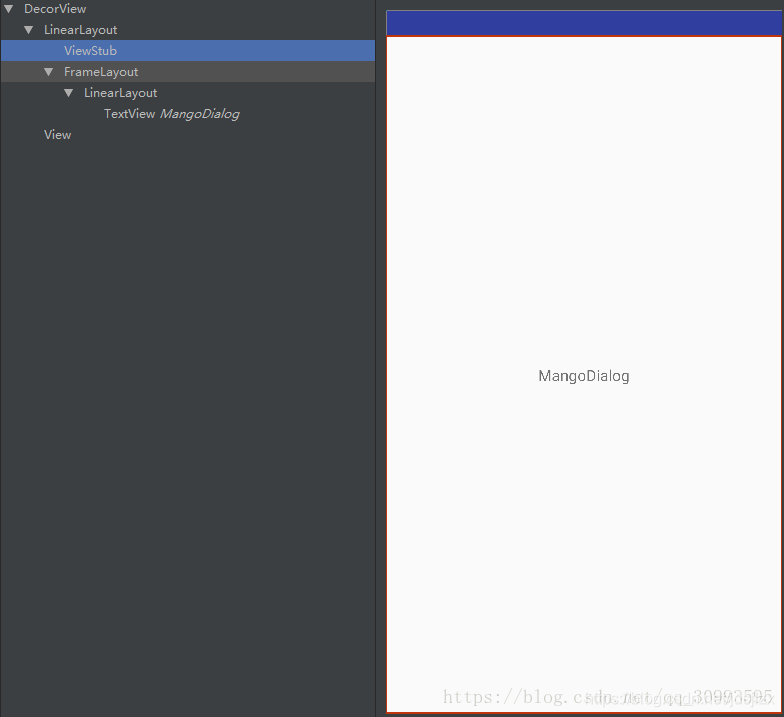
当前activity的布局里只添加了一个textview,并且当前Activity在setContentView之前没有进行Features设置。
当用鼠标放在左边具体view上面,右边视图上会展示相应的范围
- 从这里可以看出来Activity最根部的view是DecorView,后面我们会说到DecorView其实是一个FrameLayout
- DecorView包含两部分,一个装载内容的LinearLayout和一个顶部View
- LinearLayout包含一个ViewStub和FrameLayout,其实就是一个action_bar,只不过使用ViewStub来修饰,因为开发者是可以设置不要标题栏的;至于FrameLayout就是真正装载我们通过setContentView设置进去的View
- 最后这个TextView就是我们自己布局的内容
结构了解之后再回来通过setContentView去探索它是怎么形成的:
Activity setContentView
通过在onCreate中点击setContentView方法进入到源码中查看
public void setContentView(@LayoutRes int layoutResID) { getWindow().setContentView(layoutResID); initWindowDecorActionBar();} 这里先调用getWindow()方法
public Window getWindow() { return mWindow;} 这个mWindow是activity类的全局变量 private Window mWindow;它是在attach方法中实例化的,并且实现了Callback接口,这个后续会用到
mWindow = new PhoneWindow(this, window);mWindow.setCallback(this);
可以看到其实是实例化了一个PhoneWindow对象,Window是个什么东西呢,可以这样说,它是顶级窗口外观和行为策略的抽象基类。 应该将此类的实例用作添加到窗口管理器的顶级视图。 它提供标准的UI策略,例如背景,标题区域,默认密钥处理等。此抽象类的唯一现有实现是android.view.PhoneWindow。
PhoneWindow setContentView
回到setContentView方法,获取窗口实例后,调用PhoneWindow的setContentView方法:
@Override public void setContentView(int layoutResID) { // Note: FEATURE_CONTENT_TRANSITIONS may be set in the process of installing the window // decor, when theme attributes and the like are crystalized. Do not check the feature // before this happens. if (mContentParent == null) { installDecor(); } else if (!hasFeature(FEATURE_CONTENT_TRANSITIONS)) { mContentParent.removeAllViews(); } if (hasFeature(FEATURE_CONTENT_TRANSITIONS)) { final Scene newScene = Scene.getSceneForLayout(mContentParent, layoutResID, getContext()); transitionTo(newScene); } else { mLayoutInflater.inflate(layoutResID, mContentParent); } mContentParent.requestApplyInsets(); final Callback cb = getCallback(); if (cb != null && !isDestroyed()) { cb.onContentChanged(); } mContentParentExplicitlySet = true; } 我们第一次进来的时候,这个mContentParent(这个就是装载我们设置的布局view的容器)肯定是null,那么就进入installDecor方法,这个方法很长,就不全部贴上来了,贴关键部分
if (mDecor == null) { //通过new 创建Decorview mDecor = generateDecor(-1); mDecor.setDescendantFocusability(ViewGroup.FOCUS_AFTER_DESCENDANTS); mDecor.setIsRootNamespace(true); if (!mInvalidatePanelMenuPosted && mInvalidatePanelMenuFeatures != 0) { mDecor.postOnAnimation(mInvalidatePanelMenuRunnable); } } else { mDecor.setWindow(this); } if (mContentParent == null) { //根据mDecor实例获取mContentParent mContentParent = generateLayout(mDecor); 第一步:如果DecorView为null,就通过generateDecor来构造一个实例,看看DecorView这个类
public class DecorView extends FrameLayout
说明这就是布局控件,也表明Activity的根布局就是一个FrameLayout
第二步:根布局有了,就需要往里面塞东西了,这时候就判断如果mContentParent 为null,就通过generateLayout来构建,我们看看这个方法,这个方法很长,我把一些类似的代码删了
protected ViewGroup generateLayout(DecorView decor) { // Apply data from current theme. //根据Manifest里设置的theme来进行相应设置 TypedArray a = getWindowStyle(); if (false) { System.out.println("From style:"); String s = "Attrs:"; for (int i = 0; i < R.styleable.Window.length; i++) { s = s + " " + Integer.toHexString(R.styleable.Window[i]) + "=" + a.getString(i); } System.out.println(s); } mIsFloating = a.getBoolean(R.styleable.Window_windowIsFloating, false); int flagsToUpdate = (FLAG_LAYOUT_IN_SCREEN|FLAG_LAYOUT_INSET_DECOR) & (~getForcedWindowFlags()); if (mIsFloating) { setLayout(WRAP_CONTENT, WRAP_CONTENT); setFlags(0, flagsToUpdate); } else { setFlags(FLAG_LAYOUT_IN_SCREEN|FLAG_LAYOUT_INSET_DECOR, flagsToUpdate); } //比如主题里设置了notitle,这里就会进行设置 if (a.getBoolean(R.styleable.Window_windowNoTitle, false)) { requestFeature(FEATURE_NO_TITLE); } else if (a.getBoolean(R.styleable.Window_windowActionBar, false)) { // Don't allow an action bar if there is no title. requestFeature(FEATURE_ACTION_BAR); } . . . . // Inflate the window decor. //添加布局到DecorView,前面说到,DecorView是继承与FrameLayout,它本身也是一个ViewGroup, // 而我们前面创建它的时候,只是调用了new DecorView,此时里面并无什么东西。 // 而下面的步骤则是根据用户设置的Feature来创建相应的默认布局主题。举个例子, // 如果我在setContentView之前调用了requestWindowFeature(Window.FEATURE_NO_TITLE), // 这里则会通过getLocalFeatures来获取你设置的feature,进而选择加载对应的布局, // 此时MainActivity没有进行任何设置,对应的就是R.layout.screen_simple int layoutResource; int features = getLocalFeatures(); // System.out.println("Features: 0x" + Integer.toHexString(features)); if ((features & (1 << FEATURE_SWIPE_TO_DISMISS)) != 0) { layoutResource = R.layout.screen_swipe_dismiss; } else if ((features & ((1 << FEATURE_LEFT_ICON) | (1 << FEATURE_RIGHT_ICON))) != 0) { if (mIsFloating) { TypedValue res = new TypedValue(); getContext().getTheme().resolveAttribute( R.attr.dialogTitleIconsDecorLayout, res, true); layoutResource = res.resourceId; } else { layoutResource = R.layout.screen_title_icons; } // XXX Remove this once action bar supports these features. removeFeature(FEATURE_ACTION_BAR); // System.out.println("Title Icons!"); } else if ((features & ((1 << FEATURE_PROGRESS) | (1 << FEATURE_INDETERMINATE_PROGRESS))) != 0 && (features & (1 << FEATURE_ACTION_BAR)) == 0) { // Special case for a window with only a progress bar (and title). // XXX Need to have a no-title version of embedded windows. layoutResource = R.layout.screen_progress; // System.out.println("Progress!"); } else if ((features & (1 << FEATURE_CUSTOM_TITLE)) != 0) { // Special case for a window with a custom title. // If the window is floating, we need a dialog layout if (mIsFloating) { TypedValue res = new TypedValue(); getContext().getTheme().resolveAttribute( R.attr.dialogCustomTitleDecorLayout, res, true); layoutResource = res.resourceId; } else { layoutResource = R.layout.screen_custom_title; } // XXX Remove this once action bar supports these features. removeFeature(FEATURE_ACTION_BAR); } else if ((features & (1 << FEATURE_NO_TITLE)) == 0) { // If no other features and not embedded, only need a title. // If the window is floating, we need a dialog layout if (mIsFloating) { TypedValue res = new TypedValue(); getContext().getTheme().resolveAttribute( R.attr.dialogTitleDecorLayout, res, true); layoutResource = res.resourceId; } else if ((features & (1 << FEATURE_ACTION_BAR)) != 0) { layoutResource = a.getResourceId( R.styleable.Window_windowActionBarFullscreenDecorLayout, R.layout.screen_action_bar); } else { layoutResource = R.layout.screen_title; } // System.out.println("Title!"); } else if ((features & (1 << FEATURE_ACTION_MODE_OVERLAY)) != 0) { layoutResource = R.layout.screen_simple_overlay_action_mode; } else { // Embedded, so no decoration is needed. layoutResource = R.layout.screen_simple; // System.out.println("Simple!"); } mDecor.startChanging(); //将上述确定的布局添加到mDecor中 mDecor其实是一个FrameLayout mDecor.onResourcesLoaded(mLayoutInflater, layoutResource); //contentParent是mDecor布局中的一个子view FrameLayout id是content ViewGroup contentParent = (ViewGroup)findViewById(ID_ANDROID_CONTENT); if (contentParent == null) { throw new RuntimeException("Window couldn't find content container view"); } if ((features & (1 << FEATURE_INDETERMINATE_PROGRESS)) != 0) { ProgressBar progress = getCircularProgressBar(false); if (progress != null) { progress.setIndeterminate(true); } } if ((features & (1 << FEATURE_SWIPE_TO_DISMISS)) != 0) { registerSwipeCallbacks(); } // Remaining setup -- of background and title -- that only applies // to top-level windows. if (getContainer() == null) { final Drawable background; if (mBackgroundResource != 0) { background = getContext().getDrawable(mBackgroundResource); } else { background = mBackgroundDrawable; } mDecor.setWindowBackground(background); final Drawable frame; if (mFrameResource != 0) { frame = getContext().getDrawable(mFrameResource); } else { frame = null; } mDecor.setWindowFrame(frame); mDecor.setElevation(mElevation); mDecor.setClipToOutline(mClipToOutline); if (mTitle != null) { setTitle(mTitle); } if (mTitleColor == 0) { mTitleColor = mTextColor; } setTitleColor(mTitleColor); } mDecor.finishChanging(); return contentParent; } 方法很长,我们从头看,
- 首先调用getWindowStyle()方法,这个就是获取我们在AndroidManifest里对activity设置的Theme,然后做相应的设置;比如主题里设置了windowNoTitle,那这里就会设置不要标题栏
- 接下来会调用getLocalFeatures()方法,我们有时候会在activity的setContentView方法前设置requestWindowFeature(Window.FEATURE_NO_TITLE)类似的属性,这个方法就是获取这些设置的并做相应的处理;这也说明了为什么我们要在setContentView之前调用这些设置方法了
- 我上面的例子没有做相关设置,if-else语句最终会走到最后一个layoutResource = R.layout.screen_simple;这个布局文件就会通过下面的 mDecor.onResourcesLoaded(mLayoutInflater, layoutResource)方法被添加到DecorView中,看看这个布局代码
这个布局是不是跟我最上面贴的activity的视图结构一样的,这样之前构建的DecorView这个ViewGroup里就有内容了
4. 添加完之后就要获取这个布局里面的view拿来用了,然后就有这句
ViewGroup contentParent = (ViewGroup)findViewById(ID_ANDROID_CONTENT);public static final int ID_ANDROID_CONTENT = com.android.internal.R.id.content;
这样就拿到了布局里的FrameLayout并赋值给contentParent,最后把这个contentParent返回
第三步:mContentParent 这样就有值了,installDecor就基本上结束了
最后再回到setContentView方法
通过installDecor方法构建了一个DecorView,这个是作为Activity的根部View,并且添加了一个布局到DecorView里;通过id找到布局里的FrameLayout赋值给mContentParent ,这个ViewGroup就是用来给我们放置要设置的布局的
接下来会执行到mLayoutInflater.inflate(layoutResID, mContentParent);第一个参数就是我们传入的布局id,第二个参数就是上面构建的FrameLayout。
这个inflate方法最终会走到下面
public View inflate(@LayoutRes int resource, @Nullable ViewGroup root, boolean attachToRoot) { final Resources res = getContext().getResources(); if (DEBUG) { Log.d(TAG, "INFLATING from resource: \"" + res.getResourceName(resource) + "\" (" + Integer.toHexString(resource) + ")"); } final XmlResourceParser parser = res.getLayout(resource); try { return inflate(parser, root, attachToRoot); } finally { parser.close(); } }public View inflate(XmlPullParser parser, @Nullable ViewGroup root, boolean attachToRoot) { synchronized (mConstructorArgs) { //记录解析日志 Trace.traceBegin(Trace.TRACE_TAG_VIEW, "inflate"); final Context inflaterContext = mContext; //通过parser得到layout中的所有view的属性集保存在attrs中 final AttributeSet attrs = Xml.asAttributeSet(parser); Context lastContext = (Context) mConstructorArgs[0]; mConstructorArgs[0] = inflaterContext; View result = root; try { // Look for the root node. int type; while ((type = parser.next()) != XmlPullParser.START_TAG && type != XmlPullParser.END_DOCUMENT) { // Empty } if (type != XmlPullParser.START_TAG) { throw new InflateException(parser.getPositionDescription() + ": No start tag found!"); } //得到layout的节点,例如,view、merge、include等 final String name = parser.getName(); if (DEBUG) { System.out.println("**************************"); System.out.println("Creating root view: " + name); System.out.println("**************************"); } if (TAG_MERGE.equals(name)) { if (root == null || !attachToRoot) { throw new InflateException(" 这方法逻辑就是通过createViewFromTag方法不断解析并创建出对应的view,然后通过root.addView(temp, params)方法,就将我们编写的布局添加到了mContentParent 这个FrameLayout布局中。
最后就是通过cb.onContentChanged()来通知activity布局内容已经变化了;在最上面我们知道Activity的attach方法中实例化PhoneWindow的时候注册了这个接口,并实现了onContentChanged方法
public void onContentChanged() {} 显然这是一个空的实现,所以我们可以在我们自己的Activity里重写这个方法来监测页面布局的变化。
到这里setContentView方法就分析结束了,做个总结
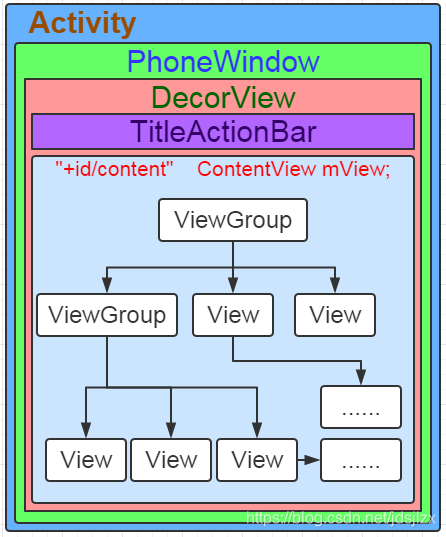
- Activity启动后在attach方法中会实例化一个PhoneWindow对象,说明每个Activity都会拥有一个Window窗口,并且界面展示的特性是由Window控制
- 我们的Activity通过setContentView方法设置页面内容,会走到PhoneWindow类的setContentView方法中
- 在setContentView方法中,会实例化一个DecorView,这是每个Activity根布局,并根据Theme,Feature往这个布局里添加了一个LinearLayout
- LinearLayout布局里有title和FrameLayout,把FrameLayout作为mContentParent来存放我们添加的ViewGroup或者View
- 最后通过Callback来通知activity页面布局更新
最终就是这张图,网上借鉴
转载地址:https://blog.csdn.net/jdsjlzx/article/details/97895322 如侵犯您的版权,请留言回复原文章的地址,我们会给您删除此文章,给您带来不便请您谅解!
发表评论
最新留言
关于作者
