本文共 18123 字,大约阅读时间需要 60 分钟。
原文链接:
作为一名Android程序猿,想必在最开始都碰到这么一个问题,就是在子线程中弹出一个 Toast,会抛出以下的异常:
java.lang.RuntimeException: Can't create handler inside thread that has not called Looper.prepare() at android.os.Handler.(Handler.java:121) at android.widget.Toast$TN. (Toast.java:322) at android.widget.Toast. (Toast.java:91) at android.widget.Toast.makeText(Toast.java:238) at com.example.testapp.MyActivity$MyAsyncTask.doInBackground(MyActivity.java:25) at com.example.testapp.MyActivity$MyAsyncTask.doInBackground(MyActivity.java:21)
按传统的说法就是 Toast 只能在UI线程中显示,实际上不是的,应该是 Toast 只能在带有 Looper 的线程中显示。
另一个常见的场景,就是在子线程创建一个 Handler 也会抛出与上述一样的异常:
Java.lang.RuntimeException: Can't create handler inside thread that has not called Looper.prepare() at android.os.Handler.(Handler.java:121)
而在主线程为什么不会有该异常呢?这就是源码的东西了,在程序入口方法已经调用过以下代码,来创建一个主线程了:
Looper.prepareMainLooper();ActivityThread thread = new ActivityThread();thread.attach(false);Looper.loop();
先来看一张图,初步了解一下 Handler、Looper、Message、MessageQueue 之间的关系
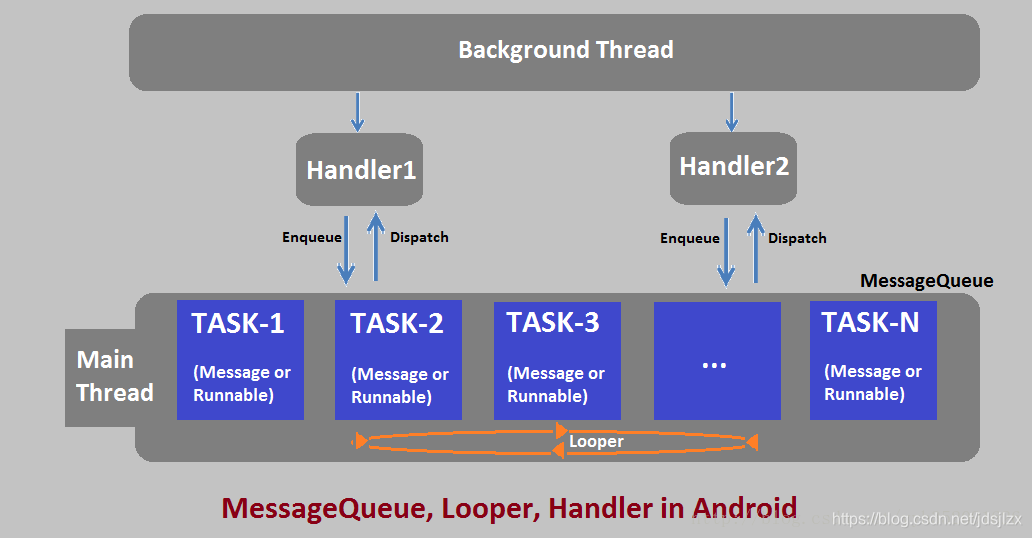
对于一个线程来说,Handler 允许发送和处理与该线程的 MessageQueue 相关联的 Message 或 Runnable 对象。每一个 Handler 实例与单个线程的 MessageQueue 相关联。
当我们创建一个 Handler 实例的时候,它将会绑定到当前所处的线程及其对应的消息队列,然后就是往消息队列里面传递消息或者 Runabble对象,并在消息队列中取出消息来处理,或者取出 Runnable 对象进行执行!
Handler
从本质上来讲,Handler 主要有以下两个作用
调度消息和runnable对象去被执行,换句话说,就是在同一个线程中处理一些消息
使得某个消息动作在不同线程中执行,也就是往其他线程的消息队列里插入消息 消息的调度主要有以下几种方式:- post(Runnable)
- postAtTime(Runnable,long)
- postDelayed(Runnable,long)
- sendMessage(Message)
- sendMessageAtTime(Message,long)
- sendMessageDelayed(Message,long)
- sendEmptyMessage(int)
- sendEmptyMessageAtTime(int, long)
- sendEmptyMessageDelayed(int, long)
最后实际上都是调用 sendEmptyMessageAtTime(Message,long) 方法
从上面的这些方法中可以看出:
post开头的几个方法,允许将 Runnable 对象插入到消息队列以便调用。
sendMessage 对应的几个方法,可以将 Message 插入到 MessageQueue,然后通过 Handler 的 handleMessage 方法来处理相应的消息。Message
Message 结构
Message 类主要包含以下几个参数
public int what; // sendEmptyMessage 里面的 what,在 ```handleMessage``` 方法可以对不同的 Message.what 值做相应处理。public Object obj; // Message 可以携带一个对象Handler target; // 处理该消息的HandlerMessage next;Runnable callback; // 消息处理动作
1、从next参数可知,消息队列实际上是一个链表结构;
2、来看一下 Handler 的 dispatchMessage 方法:
/** * Handle system messages here. */public void dispatchMessage(Message msg) { if (msg.callback != null) { handleCallback(msg); } else { if (mCallback != null) { if (mCallback.handleMessage(msg)) { return; } } handleMessage(msg); }} 从中我们可以知道,如果 Message 有定义 callback,那么消息处理会交由callback 去执行,否则,交由 Handler 的 handleMessage 去执行。
Message 创建及发送
一般发送一条消息,我们会调用以下代码:
handler.obtainMessage(int what, Object obj).sendToTarget();
那么,我们就简单分析一下消息创建的流程
1、Handler.obtainMessage
public final Message obtainMessage(int what, Object obj){ return Message.obtain(this, what, obj);} 2、 Message.obtain 创建消息
public static Message obtain(Handler h, int what, Object obj) { Message m = obtain(); m.target = h; // 指定了处理消息的Handler m.what = what; m.obj = obj; return m;} 3、 Message.sendToTarget 发送消息
public void sendToTarget() { target.sendMessage(this); // 调用 Handler的sendMessage} 4、Handler.sendMessage(Message) 发送消息,最后实际上是调用sendMessageAtTime方法,往MessageQueue里面插入一条消息
public boolean sendMessageAtTime(Message msg, long uptimeMillis) { MessageQueue queue = mQueue; if (queue == null) { RuntimeException e = new RuntimeException( this + " sendMessageAtTime() called with no mQueue"); Log.w("Looper", e.getMessage(), e); return false; } return enqueueMessage(queue, msg, uptimeMillis);} 至此,消息就发送完毕,也就是插入到了消息队列里面,接下来就是由消息队列处理了。
MessageQueue
MessageQueue 结构
private final boolean mQuitAllowed; // 是否允许MessageQueue退出;private long mPtr; // MessageQueue 是通过调用 C++ native MessageQueue 实现的,这个 mPtr 就是指向 native MessageQueue;Message mMessages; // 表示存储消息链表的 Headprivate boolean mQuitting; // 当前MessageQueue是否正在终止;private boolean mBlocked; // 表示next()方法调用是否被block在timeout不为0的pollOnce上;
MessageQueue 主要包含两个操作:插入和读取。读取操作本身会伴随着删除操作,插入和读取对应的方法分别是 enqueueMessage()和 next()。
插入消息
boolean enqueueMessage(Message msg, long when) { if (msg.target == null) { throw new IllegalArgumentException("Message must have a target."); } if (msg.isInUse()) { throw new IllegalStateException(msg + " This message is already in use."); } synchronized (this) { if (mQuitting) { IllegalStateException e = new IllegalStateException( msg.target + " sending message to a Handler on a dead thread"); Log.w(TAG, e.getMessage(), e); msg.recycle(); return false; } msg.markInUse(); msg.when = when; Message p = mMessages; boolean needWake; // 插入到链表的头部,条件:链表为null或者当前消息的对应的触发时间比链表头的触发时间小,也就是比链表头早执行 if (p == null || when == 0 || when < p.when) { // New head, wake up the event queue if blocked. msg.next = p; mMessages = msg; needWake = mBlocked; } else { // 通过触发时间,将消息插入到队列中合适的位置 // 如果需要唤醒线程处理则调用C++中的nativeWake()函数. needWake = mBlocked && p.target == null && msg.isAsynchronous(); Message prev; for (;;) { prev = p; p = p.next; if (p == null || when < p.when) { break; } if (needWake && p.isAsynchronous()) { needWake = false; } } // 执行链表插入 msg.next = p; prev.next = msg; } // We can assume mPtr != 0 because mQuitting is false. if (needWake) { nativeWake(mPtr); } } return true;} 读取消息
消息循环读取,是在 Looper.loop() 方法调用之后,最后来执行 MessageQueue.next() 方法,我们来看一下该方法:
Message next() { // Return here if the message loop has already quit and been disposed. // This can happen if the application tries to restart a looper after quit // which is not supported. final long ptr = mPtr; if (ptr == 0) { return null; } int pendingIdleHandlerCount = -1; // -1 only during first iteration int nextPollTimeoutMillis = 0; // 无限循环,往消息队列里面取消息 for (;;) { if (nextPollTimeoutMillis != 0) { Binder.flushPendingCommands(); } nativePollOnce(ptr, nextPollTimeoutMillis); synchronized (this) { // Try to retrieve the next message. Return if found. final long now = SystemClock.uptimeMillis(); Message prevMsg = null; Message msg = mMessages; if (msg != null && msg.target == null) { // 过滤掉同步消息 do { prevMsg = msg; msg = msg.next; } while (msg != null && !msg.isAsynchronous()); } if (msg != null) { if (now < msg.when) { // 还未达到下一条消息的触发时间,为下一条待处理的消息设置就绪时间 nextPollTimeoutMillis = (int) Math.min(msg.when - now, Integer.MAX_VALUE); } else { // Got a message. mBlocked = false; if (prevMsg != null) { prevMsg.next = msg.next; } else { mMessages = msg.next; } msg.next = null; if (DEBUG) Log.v(TAG, "Returning message: " + msg); msg.markInUse(); return msg; } } else { // No more messages. nextPollTimeoutMillis = -1; } // Process the quit message now that all pending messages have been handled. if (mQuitting) { dispose(); return null; } // If first time idle, then get the number of idlers to run. // Idle handles only run if the queue is empty or if the first message // in the queue (possibly a barrier) is due to be handled in the future. if (pendingIdleHandlerCount < 0 && (mMessages == null || now < mMessages.when)) { pendingIdleHandlerCount = mIdleHandlers.size(); } if (pendingIdleHandlerCount <= 0) { // No idle handlers to run. Loop and wait some more. mBlocked = true; continue; } if (mPendingIdleHandlers == null) { mPendingIdleHandlers = new IdleHandler[Math.max(pendingIdleHandlerCount, 4)]; } mPendingIdleHandlers = mIdleHandlers.toArray(mPendingIdleHandlers); } // Run the idle handlers. // We only ever reach this code block during the first iteration. for (int i = 0; i < pendingIdleHandlerCount; i++) { final IdleHandler idler = mPendingIdleHandlers[i]; mPendingIdleHandlers[i] = null; // release the reference to the handler boolean keep = false; try { keep = idler.queueIdle(); } catch (Throwable t) { Log.wtf(TAG, "IdleHandler threw exception", t); } if (!keep) { synchronized (this) { mIdleHandlers.remove(idler); } } } // Reset the idle handler count to 0 so we do not run them again. pendingIdleHandlerCount = 0; // While calling an idle handler, a new message could have been delivered // so go back and look again for a pending message without waiting. nextPollTimeoutMillis = 0; }} 通过上面源码可知:
首先会去判断handler是否为null,是的话就跳过所有的同步消息,查找到需要最先处理的异步消息。如果第一个待处理的消息还没有到要触发时间,则设置激活等待时间;否则这个消息就是需要处理的消息,将该消息设置为 inuse状态,并将队列设置为非 blocked 状态,然后返回该消息。
next() 方法是一个无限循环的方法,如果消息队列中没有消息,那么 next() 方法会一直阻塞,当有新消息到来时,next() 会将这条消息返回同时也将这条消息从链表中移除。
Looper
首先,在理解 Looper 之前,我们需要稍微了解一下 ThreadLocal 这个类。ThreadLocal 是用于为每个线程创建一个单独的变量副本,提供了保持对象的方法和避免参数传递的复杂性。ThreadLocal 类有一个泛型参数,设置了保存到 ThreadLocal 容器中的数据类型。
实际上在 ThreadLocal 类中有一个静态内部类 ThreadLocalMap (其类似于Map),用键值对的形式存储每一个线程的变量副本,ThreadLocalMap 中元素的key为当前 ThreadLocal 对象,而value对应线程的变量副本,每个线程可能存在多个 ThreadLocal。
那么,在 Looper中,也存储该着为每个线程单独创建的 ThreadLocal,里面保存着该线程对应的 Looper。
Looper 创建
我们来看一下 Looper.prepare() 方法:static final ThreadLocalsThreadLocal = new ThreadLocal ();public static void prepare() { prepare(true);}private static void prepare(boolean quitAllowed) { if (sThreadLocal.get() != null) { // 这也就意味着 prepare 方法,创建了当前线程的一个 Looper,并且每个线程 只能创建一次 throw new RuntimeException("Only one Looper may be created per thread"); } sThreadLocal.set(new Looper(quitAllowed));}
Looper 开启循环
来看一下 Looper.loop() 方法:
/** * Run the message queue in this thread. Be sure to call * {@link #quit()} to end the loop. */public static void loop() { // 进入当前线程的消息循环 final Looper me = myLooper(); if (me == null) { throw new RuntimeException("No Looper; Looper.prepare() wasn't called on this thread."); } final MessageQueue queue = me.mQueue; // Make sure the identity of this thread is that of the local process, // and keep track of what that identity token actually is. Binder.clearCallingIdentity(); final long ident = Binder.clearCallingIdentity(); for (;;) { // 从队列中取出一条消息 Message msg = queue.next(); // might block if (msg == null) { // No message indicates that the message queue is quitting. return; } // This must be in a local variable, in case a UI event sets the logger final Printer logging = me.mLogging; if (logging != null) { logging.println(">>>>> Dispatching to " + msg.target + " " + msg.callback + ": " + msg.what); } final long traceTag = me.mTraceTag; if (traceTag != 0 && Trace.isTagEnabled(traceTag)) { Trace.traceBegin(traceTag, msg.target.getTraceName(msg)); } try { // 分发消息给 Handler 处理 msg.target.dispatchMessage(msg); } finally { if (traceTag != 0) { Trace.traceEnd(traceTag); } } if (logging != null) { logging.println("<<<<< Finished to " + msg.target + " " + msg.callback); } // 回收释放 msg.recycleUnchecked(); }} 线程阻塞问题
细心的童鞋就会有个疑问,主线程对应的这个 Looper,在调用 Looper.loop() 方法之后,开启了无限死循环,那么为什么不会造成线程阻塞,导致 UI 动不了?这个问题实际上就需要了解一下 Activity 的启动过程了。这里就不细说了,主要先了解一下 ActivityThread.H 这个类,它是继承于 Handler,我们可以看一下他的消息处理:
private final class H extends Handler { public void handleMessage(Message msg) { if (DEBUG_MESSAGES) Slog.v(TAG, ">>> handling: " + msg.what); switch (msg.what) { case LAUNCH_ACTIVITY: { ActivityClientRecord r = (ActivityClientRecord)msg.obj; r.packageInfo = getPackageInfoNoCheck( r.activityInfo.applicationInfo); handleLaunchActivity(r, null); } break; case RELAUNCH_ACTIVITY: { ActivityClientRecord r = (ActivityClientRecord)msg.obj; handleRelaunchActivity(r, msg.arg1); } break; case PAUSE_ACTIVITY: handlePauseActivity((IBinder)msg.obj, false, msg.arg1 != 0, msg.arg2); maybeSnapshot(); break; case PAUSE_ACTIVITY_FINISHING: handlePauseActivity((IBinder)msg.obj, true, msg.arg1 != 0, msg.arg2); break; case STOP_ACTIVITY_SHOW: handleStopActivity((IBinder)msg.obj, true, msg.arg2); break; case STOP_ACTIVITY_HIDE: handleStopActivity((IBinder)msg.obj, false, msg.arg2); break; case SHOW_WINDOW: handleWindowVisibility((IBinder)msg.obj, true); break; case HIDE_WINDOW: handleWindowVisibility((IBinder)msg.obj, false); break; case RESUME_ACTIVITY: handleResumeActivity((IBinder)msg.obj, true, msg.arg1 != 0); break; case SEND_RESULT: handleSendResult((ResultData)msg.obj); break; case DESTROY_ACTIVITY: handleDestroyActivity((IBinder)msg.obj, msg.arg1 != 0, msg.arg2, false); break; case BIND_APPLICATION: AppBindData data = (AppBindData)msg.obj; handleBindApplication(data); break; case EXIT_APPLICATION: if (mInitialApplication != null) { mInitialApplication.onTerminate(); } Looper.myLooper().quit(); break; case NEW_INTENT: handleNewIntent((NewIntentData)msg.obj); break; case RECEIVER: handleReceiver((ReceiverData)msg.obj); maybeSnapshot(); break; case CREATE_SERVICE: handleCreateService((CreateServiceData)msg.obj); break; case BIND_SERVICE: handleBindService((BindServiceData)msg.obj); break; case UNBIND_SERVICE: handleUnbindService((BindServiceData)msg.obj); break; case SERVICE_ARGS: handleServiceArgs((ServiceArgsData)msg.obj); break; case STOP_SERVICE: handleStopService((IBinder)msg.obj); maybeSnapshot(); break; case REQUEST_THUMBNAIL: handleRequestThumbnail((IBinder)msg.obj); break; case CONFIGURATION_CHANGED: handleConfigurationChanged((Configuration)msg.obj); break; case CLEAN_UP_CONTEXT: ContextCleanupInfo cci = (ContextCleanupInfo)msg.obj; cci.context.performFinalCleanup(cci.who, cci.what); break; case GC_WHEN_IDLE: scheduleGcIdler(); break; case DUMP_SERVICE: handleDumpService((DumpServiceInfo)msg.obj); break; case LOW_MEMORY: handleLowMemory(); break; case ACTIVITY_CONFIGURATION_CHANGED: handleActivityConfigurationChanged((IBinder)msg.obj); break; case PROFILER_CONTROL: handleProfilerControl(msg.arg1 != 0, (ProfilerControlData)msg.obj); break; case CREATE_BACKUP_AGENT: handleCreateBackupAgent((CreateBackupAgentData)msg.obj); break; case DESTROY_BACKUP_AGENT: handleDestroyBackupAgent((CreateBackupAgentData)msg.obj); break; case SUICIDE: Process.killProcess(Process.myPid()); break; case REMOVE_PROVIDER: completeRemoveProvider((IContentProvider)msg.obj); break; case ENABLE_JIT: ensureJitEnabled(); break; case DISPATCH_PACKAGE_BROADCAST: handleDispatchPackageBroadcast(msg.arg1, (String[])msg.obj); break; case SCHEDULE_CRASH: throw new RemoteServiceException((String)msg.obj); } if (DEBUG_MESSAGES) Slog.v(TAG, "<<< done: " + msg.what); }} 那么,对于创建一个Service来说,我们看一下 ApplicationThread 的调度:
public final void scheduleCreateService(IBinder token, ServiceInfo info, CompatibilityInfo compatInfo, int processState) { updateProcessState(processState, false); CreateServiceData s = new CreateServiceData(); s.token = token; s.info = info; s.compatInfo = compatInfo; // 发送创建 Service 的消息 sendMessage(H.CREATE_SERVICE, s);} 不难看出,实际上创建 Service、包括执行其生命周期,最后都是交由 ActivityThread.H 处理,包括 Activity 的生命周期,也是一样,所以 Looper 虽然死循环,但是本质上我们UI的展示、更新,也是通过 Handler 来处理了,所以并不会造成真正的UI阻塞。
所以,简单来讲,ActivityThread 实际上就是开启了一个消息循环,来执行 Activity、Service 等等的相关操作,一旦这个消息循环停止了,则意味着App进程也结束了。
但是,如果 handlerMessage 是在主线程执行,其处理尽可能不要执行耗时操作,避免UI卡顿或发生 ANR。
转载地址:https://blog.csdn.net/jdsjlzx/article/details/97803175 如侵犯您的版权,请留言回复原文章的地址,我们会给您删除此文章,给您带来不便请您谅解!
发表评论
最新留言
关于作者
