本文共 15039 字,大约阅读时间需要 50 分钟。
首先解释一下什么是对称路由和不对称路由。
对称路由:symmetric route,指从A到B所走的路由和从B到A所走的路由是相同的
不对称路由:asymmetric route,指从A到B所走的路由和从B到A所走的路由是不同的
测试过程如下
说明:
1 以下这三种情况中,iptables和selinux都已关闭
2 所有测试均基于RHEL6.8
*********************************
【情况1】这是测试中遇到的问题。这个问题不是非对称路由问题,而是普通的路由问题
*********************************
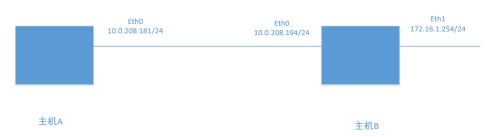
我这里只是单纯的ping不通。在主机B上执行ping -I 172.16.1.254 10.0.208.181(ping的-I是指定源地址),在主机B上进行ping的时候,指定了原IP为eth1接口的地址,目的地址是主机A的eth0 IP
主机A和主机B的默认网关都指向了10.0.208.254

step1:查看两台主机上的路由表
主机B上有2个网段:172和10,主机B的路由表如下
[root@storage ~]# route -n
Kernel IP routing table
Destination Gateway Genmask Flags Metric Ref Use Iface
10.0.208.0 0.0.0.0 255.255.255.0 U 0 0 0 eth0
172.16.1.0 0.0.0.0 255.255.255.0 U 0 0 0 eth1
169.254.0.0 0.0.0.0 255.255.0.0 U 1002 0 0 eth0
169.254.0.0 0.0.0.0 255.255.0.0 U 1003 0 0 eth1
0.0.0.0 10.0.208.254 0.0.0.0 UG 0 0 0 eth0
主机A上有3个网段:10.0.0.0/24,10.0.1.0/24和10.0.208.0/24,这里只是用10.0.208.0/24网络。主机A的路由表如下
[root@compute ~]# route -n
Kernel IP routing table
Destination Gateway Genmask Flags Metric Ref Use Iface
10.0.208.0 0.0.0.0 255.255.255.0 U 0 0 0 eth0
10.0.0.0 0.0.0.0 255.255.255.0 U 0 0 0 eth1
10.0.1.0 0.0.0.0 255.255.255.0 U 0 0 0 eth2
169.254.0.0 0.0.0.0 255.255.0.0 U 1002 0 0 eth0
169.254.0.0 0.0.0.0 255.255.0.0 U 1003 0 0 eth1
169.254.0.0 0.0.0.0 255.255.0.0 U 1004 0 0 eth2
0.0.0.0 10.0.208.254 0.0.0.0 UG 0 0 0 eth0
默认情况下是ping不通的:
[root@storage ~]# ping -I 172.16.1.254 10.0.208.181
PING 10.0.208.181 (10.0.208.181) from 172.16.1.254 : 56(84) bytes of data.
^C
--- 10.0.208.181 ping statistics ---
2 packets transmitted, 0 received, 100% packet loss, time 1774ms
step2:设置主机A的非对称路由参数
主机A的路由参数
[root@compute ~]# sysctl -a|grep rp_filter
net.ipv4.conf.all.rp_filter = 1
net.ipv4.conf.all.arp_filter = 0
net.ipv4.conf.default.rp_filter = 1
net.ipv4.conf.default.arp_filter = 0
net.ipv4.conf.lo.rp_filter = 1
net.ipv4.conf.lo.arp_filter = 0
net.ipv4.conf.eth0.rp_filter = 1
net.ipv4.conf.eth0.arp_filter = 0
net.ipv4.conf.eth1.rp_filter = 1
net.ipv4.conf.eth1.arp_filter = 0
net.ipv4.conf.eth2.rp_filter = 1
net.ipv4.conf.eth2.arp_filter = 0
设置主机A的default.rp_filter
[root@compute ~]# sysctl -w net.ipv4.conf.default.rp_filter=0
[root@compute ~]# sysctl -a|grep rp_filter
net.ipv4.conf.all.rp_filter = 1
net.ipv4.conf.all.arp_filter = 0
net.ipv4.conf.default.rp_filter = 0
net.ipv4.conf.default.arp_filter = 0
net.ipv4.conf.lo.rp_filter = 1
net.ipv4.conf.lo.arp_filter = 0
net.ipv4.conf.eth0.rp_filter = 1
net.ipv4.conf.eth0.arp_filter = 0
net.ipv4.conf.eth1.rp_filter = 1
net.ipv4.conf.eth1.arp_filter = 0
net.ipv4.conf.eth2.rp_filter = 1
net.ipv4.conf.eth2.arp_filter = 0
在主机B上继续ping
[root@storage ~]# ping -I 172.16.1.254 10.0.208.181
PING 10.0.208.181 (10.0.208.181) from 172.16.1.254 : 56(84) bytes of data.
^C
--- 10.0.208.181 ping statistics ---
5 packets transmitted, 0 received, 100% packet loss, time 4662ms
发现还是不通
step3:在主机A上添加到172网段的路由
在主机A上添加路由172.16.1.0/24,下一跳指向主机B的eth0端口
[root@compute ~]# ip route add 172.16.1.0/24 via 10.0.208.194
[root@compute ~]# route -n
Kernel IP routing table
Destination Gateway Genmask Flags Metric Ref Use Iface
10.0.208.0 0.0.0.0 255.255.255.0 U 0 0 0 eth0
10.0.0.0 0.0.0.0 255.255.255.0 U 0 0 0 eth1
10.0.1.0 0.0.0.0 255.255.255.0 U 0 0 0 eth2
172.16.1.0 10.0.208.194 255.255.255.0 UG 0 0 0 eth0
169.254.0.0 0.0.0.0 255.255.0.0 U 1002 0 0 eth0
169.254.0.0 0.0.0.0 255.255.0.0 U 1003 0 0 eth1
169.254.0.0 0.0.0.0 255.255.0.0 U 1004 0 0 eth2
0.0.0.0 10.0.208.254 0.0.0.0 UG 0 0 0 eth0
此时在主机B上就可以ping通了
[root@storage ~]# ping -I 172.16.1.254 10.0.208.181
PING 10.0.208.181 (10.0.208.181) from 172.16.1.254 : 56(84) bytes of data.
64 bytes from 10.0.208.181: icmp_seq=1 ttl=64 time=0.414 ms
64 bytes from 10.0.208.181: icmp_seq=2 ttl=64 time=0.417 ms
64 bytes from 10.0.208.181: icmp_seq=3 ttl=64 time=0.360 ms
^C
--- 10.0.208.181 ping statistics ---
3 packets transmitted, 3 received, 0% packet loss, time 2294ms
rtt min/avg/max/mdev = 0.360/0.397/0.417/0.026 ms
结论:这个问题的根本原因在于:
在主机A上,默认网关指向10.0.208.254,当收到源地址是172.16.1.254的包时,回复的包的目的地址是172.16.1.254,而主机A不知道172网段在哪里,就会将该包发给网关10.0.208.254,而这个网关上也没有到172.16.1.0/24网段的路由,所以就丢弃了。解决方法是在主机A上添加172.16.1.0/24网段的静态路由,下一跳指向主机B的10.0.208.194地址即可。这是一个纯粹的路由问题,之所以放到这篇文章中,就是要提醒大家在测试的时候要注意这种情况。
*********************************
【情况2】这是遇到的实际问题,实际项目中的IP地址被我修改成了10网段
*********************************
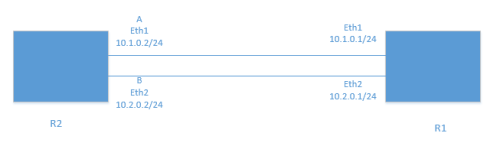
在R1上,执行ping -c 100 -I 10.1.0.1 10.2.0.2不通,需要能够ping通。也就是在R1上,在ping的时候指定了原IP为eth1接口的IP,目的IP为R2的eth2接口IP
默认情况下是无法ping通的
情况2和情况3基本上是一样的,只是情况3需要多配置一步而已
标红的是使用到的端口
step1:查看三台设备的端口IP和路由
controller R2 ,本例中使用eth1/2
[root@controller ~]# ip addr list|egrep -E 'mtu|inet'|grep -v inet6
1: lo: mtu 65536 qdisc noqueue state UNKNOWN
inet 127.0.0.1/8 scope host lo
2: eth0: mtu 1500 qdisc pfifo_fast state UP qlen 1000
inet 10.0.208.179/24 brd 10.0.208.255 scope global eth0
3: eth1: mtu 1500 qdisc pfifo_fast state UP qlen 1000
inet 10.1.0.2/24 brd 10.1.0.255 scope global eth1
4: eth2: mtu 1500 qdisc pfifo_fast state UP qlen 1000
inet 10.2.0.2/24 brd 10.2.0.255 scope global eth2
[root@controller ~]# ip route
10.0.208.0/24 dev eth0 proto kernel scope link src 10.0.208.179
10.2.0.0/24 dev eth2 proto kernel scope link src 10.2.0.2
10.1.0.0/24 dev eth1 proto kernel scope link src 10.1.0.2
169.254.0.0/16 dev eth0 scope link metric 1002
169.254.0.0/16 dev eth1 scope link metric 1003
169.254.0.0/16 dev eth2 scope link metric 1004
default via 10.1.0.1 dev eth1
network R1 ,本例中使用eth1/2/3
[root@network ~]# ip addr list|egrep -E 'mtu|inet'|grep -v inet6
1: lo: mtu 65536 qdisc noqueue state UNKNOWN
inet 127.0.0.1/8 scope host lo
2: eth0: mtu 1500 qdisc pfifo_fast state UP qlen 1000
inet 10.0.208.180/24 brd 10.0.208.255 scope global eth0
3: eth1: mtu 1500 qdisc pfifo_fast state UP qlen 1000
inet 10.1.0.1/24 brd 10.1.0.255 scope global eth1
4: eth2: mtu 1500 qdisc pfifo_fast state UP qlen 1000
inet 10.2.0.1/24 brd 10.2.0.255 scope global eth2
5: eth3: mtu 1500 qdisc pfifo_fast state UP qlen 1000
inet 10.3.0.1/24 brd 10.3.0.255 scope global eth3
[root@network ~]# ip route
10.0.208.0/24 dev eth0 proto kernel scope link src 10.0.208.180
10.2.0.0/24 dev eth2 proto kernel scope link src 10.2.0.1
10.3.0.0/24 dev eth3 proto kernel scope link src 10.3.0.1
10.1.0.0/24 dev eth1 proto kernel scope link src 10.1.0.1
169.254.0.0/16 dev eth0 scope link metric 1002
169.254.0.0/16 dev eth1 scope link metric 1003
169.254.0.0/16 dev eth2 scope link metric 1004
169.254.0.0/16 dev eth3 scope link metric 1005
default via 10.0.208.254 dev eth0
在R1上ping -I 10.1.0.1 10.2.0.2是不通的
step2:在R2上修改反向路径检查参数
[root@controller ~]# sysctl -a |grep -i rp_filter
net.ipv4.conf.all.rp_filter = 0
net.ipv4.conf.all.arp_filter = 0
net.ipv4.conf.default.rp_filter = 1
net.ipv4.conf.default.arp_filter = 0
net.ipv4.conf.lo.rp_filter = 1
net.ipv4.conf.lo.arp_filter = 0
net.ipv4.conf.eth0.rp_filter = 1
net.ipv4.conf.eth0.arp_filter = 0
net.ipv4.conf.eth1.rp_filter = 1
net.ipv4.conf.eth1.arp_filter = 0
net.ipv4.conf.eth2.rp_filter = 1
net.ipv4.conf.eth2.arp_filter = 0
sysctl -w net.ipv4.conf.default.rp_filter=0 ###禁用反向路径检查
sysctl -w net.ipv4.conf.eth1.rp_filter=0 ###注意:要设置default和所有使用到的接口的参数,不能只设置default
sysctl -w net.ipv4.conf.eth2.rp_filter=0 ###同上
[root@controller ~]# sysctl -a |grep -i rp_filter
net.ipv4.conf.all.rp_filter = 0
net.ipv4.conf.all.arp_filter = 0
net.ipv4.conf.default.rp_filter = 0
net.ipv4.conf.default.arp_filter = 0
net.ipv4.conf.lo.rp_filter = 1
net.ipv4.conf.lo.arp_filter = 0
net.ipv4.conf.eth0.rp_filter = 1
net.ipv4.conf.eth0.arp_filter = 0
net.ipv4.conf.eth1.rp_filter = 0
net.ipv4.conf.eth1.arp_filter = 0
net.ipv4.conf.eth2.rp_filter = 0
net.ipv4.conf.eth2.arp_filter = 0
之后在R1上ping -I 10.1.0.1 10.2.0.2还是不通
step3:继续在R1上也修改反向路径检查参数
sysctl -w net.ipv4.conf.default.rp_filter=0
sysctl -w net.ipv4.conf.eth1.rp_filter=0
sysctl -w net.ipv4.conf.eth2.rp_filter=0
[root@network ~]# ping -I 10.1.0.1 10.2.0.2
PING 10.2.0.2 (10.2.0.2) from 10.1.0.1 : 56(84) bytes of data.
64 bytes from 10.2.0.2: icmp_seq=1 ttl=64 time=0.352 ms
64 bytes from 10.2.0.2: icmp_seq=2 ttl=64 time=0.454 ms
64 bytes from 10.2.0.2: icmp_seq=3 ttl=64 time=0.316 ms
^C
--- 10.2.0.2 ping statistics ---
3 packets transmitted, 3 received, 0% packet loss, time 2302ms
结论:
1 可以看到,在R2和R1上都禁用了反向路由检查参数(注意:是所有使用到的接口+default)之后,才能在R1上ping通
2 反向路径检查参数就是控制是否允许非对称路由的。默认是打开反向路径检查(1),不允许非对称路由;设置为0表示禁用反向路径检查,允许非对称路由。
3 原理如下:默认情况下是打开反向路径检查的,这是为了阻止地址欺骗***。所以,默认情况下,在R1上ping -I 10.1.0.1 10.2.0.2的时候,发送的数据包【源地址:10.1.0.1,目的地址:10.2.0.2】会从R1的eth2(10.2.0.1)出去,到R2的eth2(10.2.0.2)接口,因为R1的路由表上有到10.2.0.0/24网段的路由,出口是eth2(详见R1的路由表);而R2收到包后,需要检查反向路由,此时的包【源地址:10.2.0.2,目的地址:10.1.0.1】会从R2的eth1(10.1.0.2)出去,到R1的eth1(10.1.0.1)接口,因为R2的路由表上有到10.1.0.0/24网段的路由,出口是eth1(详见R2的路由表),这样,对R2和R1来说就造成了非对称路由。解决方法就是禁止反向路由检查。
需要注意的是:有时路由条目的缓存会影响测试效果,所以在每次配置修改完成后先刷新一下路由缓存:ip route flush cache
*********************************
*********************************
要求如下:
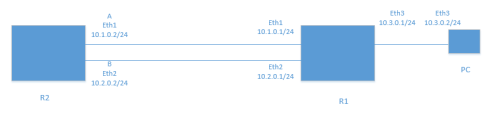
如果一台主机(或路由器)从接口A收到一个包,其源地址和目的地址分别是10.3.0.2和10.2.0.2,
即, 如果启用反向路径过滤功能,它就会以为关键字去查找路由表,如果得到的输 出接口不为A,则认为反向路径过滤检查失败,它就会丢弃该包。
假设R2的两个接口分别为A(10.1.0.2)、B(10.2.0.2)。 从PC ping 10.2.0.2时,包的路径是PC-->10.3.0.1-->10.2.0.2, 此时包的 , 以进行反向路径检查, 得到输出设备是A, 因为目的地址是10.3.0.2,只能使用默认路由。A!=B,反向路径检查失败, 丢弃该包!
step1:查看三台设备的端口IP和路由
controller R2 ,本例中使用eth1/2
[root@controller ~]# ip addr list|egrep -E 'mtu|inet'|grep -v inet6
1: lo: mtu 65536 qdisc noqueue state UNKNOWN
inet 127.0.0.1/8 scope host lo
2: eth0: mtu 1500 qdisc pfifo_fast state UP qlen 1000
inet 10.0.208.179/24 brd 10.0.208.255 scope global eth0
3: eth1: mtu 1500 qdisc pfifo_fast state UP qlen 1000
inet 10.1.0.2/24 brd 10.1.0.255 scope global eth1
4: eth2: mtu 1500 qdisc pfifo_fast state UP qlen 1000
inet 10.2.0.2/24 brd 10.2.0.255 scope global eth2
[root@controller ~]# ip route
10.0.208.0/24 dev eth0 proto kernel scope link src 10.0.208.179
10.2.0.0/24 dev eth2 proto kernel scope link src 10.2.0.2
10.1.0.0/24 dev eth1 proto kernel scope link src 10.1.0.2
169.254.0.0/16 dev eth0 scope link metric 1002
169.254.0.0/16 dev eth1 scope link metric 1003
169.254.0.0/16 dev eth2 scope link metric 1004
default via 10.1.0.1 dev eth1
network R1 ,本例中使用eth1/2/3
[root@network ~]# ip addr list|egrep -E 'mtu|inet'|grep -v inet6
1: lo: mtu 65536 qdisc noqueue state UNKNOWN
inet 127.0.0.1/8 scope host lo
2: eth0: mtu 1500 qdisc pfifo_fast state UP qlen 1000
inet 10.0.208.180/24 brd 10.0.208.255 scope global eth0
3: eth1: mtu 1500 qdisc pfifo_fast state UP qlen 1000
inet 10.1.0.1/24 brd 10.1.0.255 scope global eth1
4: eth2: mtu 1500 qdisc pfifo_fast state UP qlen 1000
inet 10.2.0.1/24 brd 10.2.0.255 scope global eth2
5: eth3: mtu 1500 qdisc pfifo_fast state UP qlen 1000
inet 10.3.0.1/24 brd 10.3.0.255 scope global eth3
[root@network ~]# ip route
10.0.208.0/24 dev eth0 proto kernel scope link src 10.0.208.180
10.2.0.0/24 dev eth2 proto kernel scope link src 10.2.0.1
10.3.0.0/24 dev eth3 proto kernel scope link src 10.3.0.1
10.1.0.0/24 dev eth1 proto kernel scope link src 10.1.0.1
169.254.0.0/16 dev eth0 scope link metric 1002
169.254.0.0/16 dev eth1 scope link metric 1003
169.254.0.0/16 dev eth2 scope link metric 1004
169.254.0.0/16 dev eth3 scope link metric 1005
default via 10.0.208.254 dev eth0
comput PC ,本例中只使用eth3
[root@compute ~]# ip addr list|egrep -E 'mtu|inet'|grep -v inet6
1: lo: mtu 65536 qdisc noqueue state UNKNOWN
inet 127.0.0.1/8 scope host lo
2: eth0: mtu 1500 qdisc pfifo_fast state UP qlen 1000
inet 10.0.208.181/24 brd 10.0.208.255 scope global eth0
3: eth1: mtu 1500 qdisc pfifo_fast state UP qlen 1000
inet 10.0.0.31/24 brd 10.0.0.255 scope global eth1
4: eth2: mtu 1500 qdisc pfifo_fast state UP qlen 1000
inet 10.0.1.31/24 brd 10.0.1.255 scope global eth2
5: eth3: mtu 1500 qdisc pfifo_fast state UP qlen 1000
inet 10.3.0.2/24 brd 10.3.0.255 scope global eth3
[root@compute ~]# ip route
10.0.208.0/24 dev eth0 proto kernel scope link src 10.0.208.181
10.0.0.0/24 dev eth1 proto kernel scope link src 10.0.0.31
10.0.1.0/24 dev eth2 proto kernel scope link src 10.0.1.31
10.3.0.0/24 dev eth3 proto kernel scope link src 10.3.0.2
169.254.0.0/16 dev eth0 scope link metric 1002
169.254.0.0/16 dev eth1 scope link metric 1003
169.254.0.0/16 dev eth2 scope link metric 1004
169.254.0.0/16 dev eth3 scope link metric 1005
default via 10.3.0.1 dev eth3
在PC上ping 10.2.0.2或者挂着源IP 10.3.0.2来ping 10.2.0.2(都是一样的),都是不通的
[root@compute ~]# ping 10.2.0.2
[root@compute ~]# ping -I 10.3.0.2 10.2.0.2
step2:在R2上修改内核参数
[root@controller ~]# sysctl -a |grep -i rp_filter
net.ipv4.conf.all.rp_filter = 0
net.ipv4.conf.all.arp_filter = 0
net.ipv4.conf.default.rp_filter = 1
net.ipv4.conf.default.arp_filter = 0
net.ipv4.conf.lo.rp_filter = 1
net.ipv4.conf.lo.arp_filter = 0
net.ipv4.conf.eth0.rp_filter = 1
net.ipv4.conf.eth0.arp_filter = 0
net.ipv4.conf.eth1.rp_filter = 1
net.ipv4.conf.eth1.arp_filter = 0
net.ipv4.conf.eth2.rp_filter = 1
net.ipv4.conf.eth2.arp_filter = 0
sysctl -w net.ipv4.conf.default.rp_filter=0 ###禁用反向路径检查
sysctl -w net.ipv4.conf.eth1.rp_filter=0 ###注意:要设置default和所有使用到的接口的参数,不能只设置default
sysctl -w net.ipv4.conf.eth2.rp_filter=0 ###同上
[root@controller ~]# sysctl -a|grep rp_filter
net.ipv4.conf.all.rp_filter = 0
net.ipv4.conf.all.arp_filter = 0
net.ipv4.conf.default.rp_filter = 0
net.ipv4.conf.default.arp_filter = 0
net.ipv4.conf.lo.rp_filter = 1
net.ipv4.conf.lo.arp_filter = 0
net.ipv4.conf.eth0.rp_filter = 1
net.ipv4.conf.eth0.arp_filter = 0
net.ipv4.conf.eth1.rp_filter = 0
net.ipv4.conf.eth1.arp_filter = 0
net.ipv4.conf.eth2.rp_filter = 0
net.ipv4.conf.eth2.arp_filter = 0
在R1上修改内核参数
sysctl -w net.ipv4.conf.default.rp_filter=0
sysctl -w net.ipv4.conf.eth1.rp_filter=0
sysctl -w net.ipv4.conf.eth2.rp_filter=0
[root@network ~]# sysctl -a|grep rp_filter
net.ipv4.conf.all.rp_filter = 0
net.ipv4.conf.all.arp_filter = 0
net.ipv4.conf.default.rp_filter = 0
net.ipv4.conf.default.arp_filter = 0
net.ipv4.conf.lo.rp_filter = 1
net.ipv4.conf.lo.arp_filter = 0
net.ipv4.conf.eth0.rp_filter = 1
net.ipv4.conf.eth0.arp_filter = 0
net.ipv4.conf.eth1.rp_filter = 0
net.ipv4.conf.eth1.arp_filter = 0
net.ipv4.conf.eth2.rp_filter = 0
net.ipv4.conf.eth2.arp_filter = 0
net.ipv4.conf.eth3.rp_filter = 1
net.ipv4.conf.eth3.arp_filter = 0
之后在PC上进行ping测试: ping -I 10.3.0.2 10.2.0.2 ,不通,这是因为R1是作为路由器使用的,需要在R1上打开转发
step3:在R1上打开路由转发:
[root@network ~]# sysctl -w net.ipv4.ip_forward=1
在R2/R1和PC上清空缓存,避免对测试产生影响
ip route flush cache
此时在PC上进行ping测试: ping -I 10.3.0.2 10.2.0.2 通了
结论:
1 可以看到,在R2和R1上都禁用了反向路由检查参数(注意:是所有使用到的接口+default)之后,并且在R1上打开了路由转发,才能在PC上ping通
2 原理如下:默认情况下是打开反向路径检查的,这是为了阻止地址欺骗***。所以,默认情况下,在PC上ping -I 10.3.0.2 10.2.0.2 的时候,发送的数据包【源地址:10.3.0.2,目的地址:10.2.0.2】会从到R1的eth3接口,之后从R1的eth2(10.2.0.1)出去,到R2的eth2(10.2.0.2)接口,因为R1的路由表上有到10.2.0.0/24网段的路由,出口是eth2(详见R1的路由表);而R2收到包后,需要检查反向路由,此时的包【源地址:10.2.0.2,目的地址:10.3.0.2】会从R2的eth1(10.1.0.2)出去,到R1的eth1(10.1.0.1)接口,因为R2的路由表上的默认路由可以到达10.3.0.0/24网段,出口是eth1(详见R2的路由表),这样,对R2和R1来说就造成了非对称路由。解决方法就是禁止反向路由检查以允许非对称路由。
需要说明的是:在http://m.blog.csdn.net/layrong/article/details/45673037这个链接中,作者提到了两种方法,第二种方法是给R2上添加了一条静态路由:[root@controller ~]# ip route add 10.3.0.0/24 via 10.2.0.1,也确实可以实现ping通的目标,需要注意的是,对于第二种方法:
也需要设置R1的路由转发
不需要在R1/R2上关闭反向路由解析(使用默认的打开模式即可),因为此时我在R2上添加了一条到10.3.0.0/24网段的静态路由,是走R2的eth2(10.2.0.2)接口,之后到R1的eth2(10.2.0.1)接口的,数据包会走这条明细路由,而不会像之前那样走默认路由了,此时就是对称路由了。
转载地址:https://blog.csdn.net/weixin_28871097/article/details/116636810 如侵犯您的版权,请留言回复原文章的地址,我们会给您删除此文章,给您带来不便请您谅解!
发表评论
最新留言
关于作者
