网络编程复习(三):NIO模式
发布日期:2021-11-13 10:21:49
浏览次数:13
分类:技术文章
本文共 4165 字,大约阅读时间需要 13 分钟。
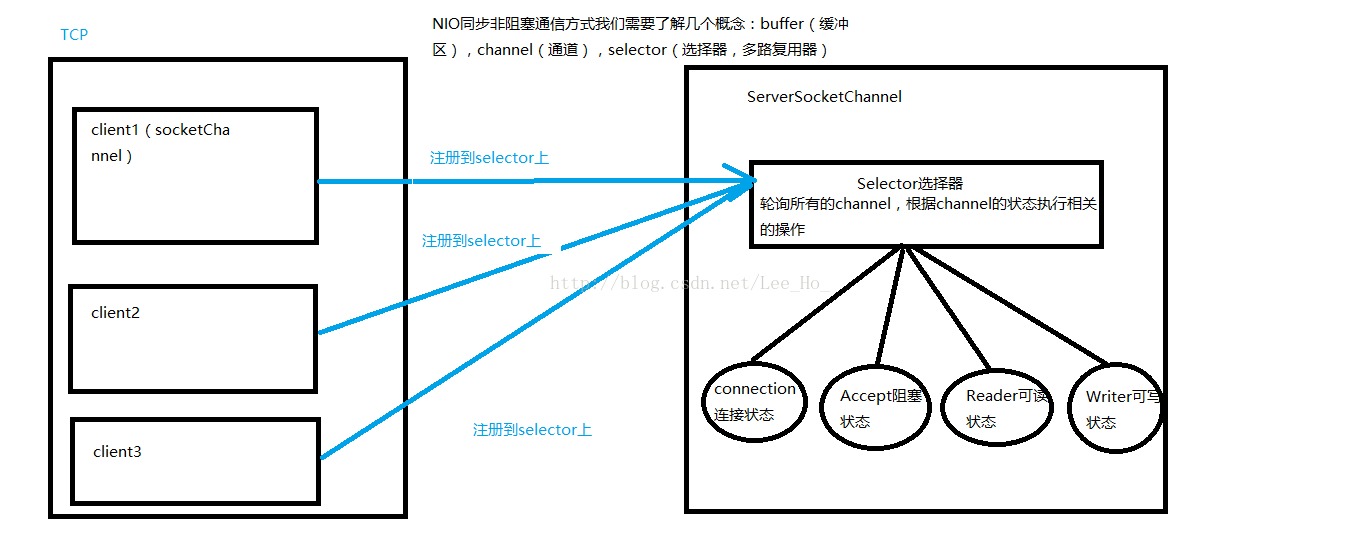
关于NIO,就是同步非阻塞,虽然效率会提高,但实现起来的有点麻烦,所以实际开发中用的很少,更多的是用Netty框架使用网络Socket,Netty其实是对JDK的nio的一个优化封装,实现起来更加方便,后续也将会介绍,下面看看流程图解:
client端:
package 网络编程_NIO;import java.io.IOException;import java.net.InetSocketAddress;import java.nio.ByteBuffer;import java.nio.channels.SocketChannel;public class Client { public static void main(String[] args) { //定义socket连接的地址与端口 InetSocketAddress address = new InetSocketAddress("127.0.0.1",8888); //通道 SocketChannel channel = null; //缓冲区 ByteBuffer buffer = ByteBuffer.allocate(1024); try { //打开通道 channel = SocketChannel.open(); //连接地址 channel.connect(address); while(true){ byte[] bys = new byte[1024]; //控制台读取数据1024字节 System.in.read(bys); //数据放入缓冲区 buffer.put(bys); //复位 buffer.flip(); //通道将缓冲区数据写给服务端 channel.write(buffer); //清空缓冲区 buffer.clear(); } } catch (Exception e) { e.printStackTrace(); }finally { if(channel!=null){ try { channel.close(); } catch (IOException e) { // TODO Auto-generated catch block e.printStackTrace(); } } } }} server端: package 网络编程_NIO;import java.io.IOException;import java.net.InetSocketAddress;import java.nio.ByteBuffer;import java.nio.channels.SelectionKey;import java.nio.channels.Selector;import java.nio.channels.ServerSocketChannel;import java.nio.channels.SocketChannel;import java.util.Iterator;public class Server implements Runnable{ private Selector selector; private ByteBuffer readerBuffer = ByteBuffer.allocate(1024); //private ByteBuffer writerBuffer = ByteBuffer.allocate(1024); public Server(int port) { try { //打开多路复用器 this.selector = Selector.open(); //打开连接通道 ServerSocketChannel socketChannel = ServerSocketChannel.open(); //设置为非阻塞模式 socketChannel.configureBlocking(false); //通道绑定端口监听 socketChannel.bind(new InetSocketAddress(port)); //通道注册到多路复用器上 socketChannel.register(this.selector, SelectionKey.OP_ACCEPT); System.out.println("Server started..."+port); } catch (Exception e) { // TODO: handle exception } } @Override public void run() { while(true){ try { //多路复用器开始监听 this.selector.select(); //返回多路复用器选择的结果集 Iterator keys = this.selector.selectedKeys().iterator(); //开始遍历 while(keys.hasNext()){ //获得选择的第一个元素 SelectionKey key = keys.next(); //将选择的元素从容器中移除 keys.remove(); //如果元素可用 if(key.isValid()){ //如果为阻塞状态 if(key.isAcceptable()){ this.accept(key); } //可读 if(key.isReadable()){ this.read(key); } //可写 if(key.isWritable()){ this.writer(key); } } } } catch (IOException e) { // TODO Auto-generated catch block e.printStackTrace(); } } } private void writer(SelectionKey key) { /*this.writerBuffer.clear(); SocketChannel channel = (SocketChannel) key.channel(); byte[] bys = new String("服务端已经接受到你的数据").getBytes(); writerBuffer.put(bys); writerBuffer.flip(); try { channel.write(writerBuffer); writerBuffer.clear(); } catch (IOException e) { // TODO Auto-generated catch block e.printStackTrace(); }*/ } private void read(SelectionKey key) { try { this.readerBuffer.clear(); SocketChannel channel = (SocketChannel) key.channel(); int count = channel.read(readerBuffer); if(count == -1){ key.channel().close(); key.cancel(); return; } this.readerBuffer.flip(); byte[] bys = new byte[this.readerBuffer.remaining()]; this.readerBuffer.get(bys); String body = new String(bys).trim(); System.out.println("Server"+body); //channel.register(this.selector, SelectionKey.OP_WRITE); } catch (IOException e) { // TODO Auto-generated catch block e.printStackTrace(); } } private void accept(SelectionKey key) { try { ServerSocketChannel socketChannel = (ServerSocketChannel) key.channel(); SocketChannel channel = socketChannel.accept(); channel.configureBlocking(false); //阻塞状态变为可读状态 channel.register(this.selector, SelectionKey.OP_READ); } catch (Exception e) { // TODO: handle exception } } public static void main(String[] args) { new Thread(new Server(8888)).start(); }} 这里我并没有实现服务端向客户端写数据,因为这种情况客户端也像一个服务端了,实现起来和server端代码很相似,加一个Selector就行了,这里感觉很麻烦,所以没有实现,有兴趣的朋友可以试下。 转载地址:https://blog.csdn.net/Lee_Ho_/article/details/78122588 如侵犯您的版权,请留言回复原文章的地址,我们会给您删除此文章,给您带来不便请您谅解!
发表评论
最新留言
表示我来过!
[***.240.166.169]2024年04月08日 14时50分53秒
关于作者

喝酒易醉,品茶养心,人生如梦,品茶悟道,何以解忧?唯有杜康!
-- 愿君每日到此一游!
推荐文章
xLua(六)——C#访问Lua的function
2019-04-27
基础知识——常用单位介绍
2019-04-27
xLua(七)——Lua访问C#(一)
2019-04-27
xLua(八)——Lua访问C#(二)
2019-04-27
Unity中实现解析Json文件
2019-04-27
Unity自带Json解析库——JsonUtility
2019-04-27
Unity中使用ViedoPlayer操作视频文件
2019-04-27
C#中的的输入与输出
2019-04-27
C#中@符号的作用
2019-04-27
C#中$符号的作用
2019-04-27
Mac装windows系统后如何更换触控板设置
2021-06-30
Windows系统下如何设置软件的快捷键
2021-06-30
语言中的溢出
2021-06-30
Unity中实现获取一段时间内移动设备声音的最大音量
2021-06-30
springboot的初始化启动过程
2021-06-30
关于spring bean 生命周期代码详解-产生到消亡
2021-06-30
spring 启动之全过程 源码解析
2021-06-30
Spring AOP 原理
2021-06-30
mysql 分库分表分区 动态扩容 总结
2021-06-30
白红宇的个人博客 - 记录点点滴滴的事 - 您是第 307910829 位访客
访问时间: 2024-04-25 23:00:29
访问IP: 3.145.178.240
Copyright © 2020 - 2023 blog.css8.cn 京ICP备2021015314号-1
手机版